When you install Starlink Gen 3, you’ll need a mount that handles wind, weather, and stays secure long-term. You’ve got several solid options—from adjustable wall mounts to heavy-duty pole kits—each with different features and installation requirements. The right choice depends on your space, budget, and how much adjustment you’ll need. Here’s what you should know about each option to make the best decision.
| Gen 3 Mount for Starlink V3 Dish Adapter |

| Most Adjustable | Mounting Type: Wall/roof/pole mount | Adjustment Capability: Rotatable rod with angle lock; pipe flip for longer eave | Weather Resistance: Aluminum-alloy construction for durability | VIEW LATEST PRICE | Read Our Analysis |
| Starlink Mount Adjustable Wall Mount with Telescoping Arm |
| Best Versatility | Mounting Type: Wall mount | Adjustment Capability: 90°-180° angle adjustment; telescoping arm (up/down, back/forth) | Weather Resistance: Rustproof, windproof, weatherproof metal | VIEW LATEST PRICE | Read Our Analysis |
| Starlink Gen 3 Adjustable Metal Pole Mount Kit |

| Best Router Integration | Mounting Type: Roof/wall/pole mount | Adjustment Capability: Four square holes for flexible orientation adjustment | Weather Resistance: Heavy-duty bracket for harsh storm resistance | VIEW LATEST PRICE | Read Our Analysis |
| XLTTYWL Starlink Gen 3 Complete Mounting Kit |

| Best All-in-One | Mounting Type: Router and power supply mount | Adjustment Capability: Fixed mount for router optimization | Weather Resistance: High-quality ABS plastic, weatherproof | VIEW LATEST PRICE | Read Our Analysis |
| Starlink Standard Wall Mount OEM Mounting Kit |

| Best OEM Option | Mounting Type: Pole/J-pole mount | Adjustment Capability: 360° rotation with 20° tilt | Weather Resistance: UV-resistant, weatherproof polymer plastic | VIEW LATEST PRICE | Read Our Analysis |
| CEKAY Starlink Gen 3 Mounting Kit with 51″ Pole |

| Best Heavy-Duty | Mounting Type: Wall/eave/roof mount with 51″ pole | Adjustment Capability: 360° rotation with up to 20° tilt | Weather Resistance: 1.5mm steel poles and aluminum alloy, weather-resistant | VIEW LATEST PRICE | Read Our Analysis |
| Starlink Gen 3 Telescoping Wall Mount Kit |
| Best Telescoping Design | Mounting Type: Wall/roof mount with telescoping arms | Adjustment Capability: Rotatable pole with vertical/horizontal support arms | Weather Resistance: Standard weather-resistant materials | VIEW LATEST PRICE | Read Our Analysis |
More Details on Our Top Picks
Gen 3 Mount for Starlink V3 Dish Adapter
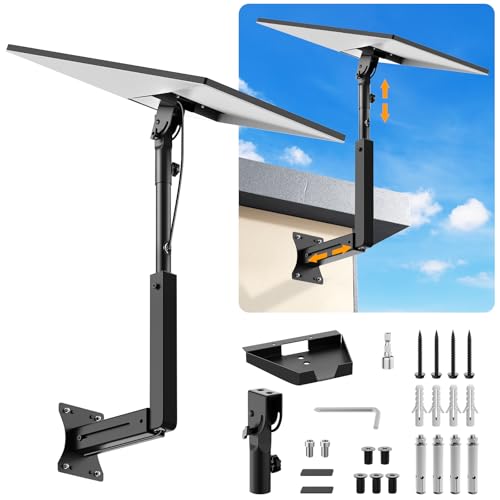
Need a mounting solution that won’t shift or loosen over time? The Gen 3 Mount for Starlink V3 Dish Adapter delivers adjustable wall, roof, and pole mounting in one kit. You’ll get an aluminum-alloy pipe adapter, steel support tubes, and a sturdy base that resists breaking. The rotating rod lets you fine-tune your dish’s angle by tightening screws to lock it in place. Installation works from either end of the 18-inch mount, giving you flexibility for longer eaves. The kit includes two screw sets—expansion anchors for concrete and lag screws for wood—plus extension screws, self-tapping screws, stainless screws, a wrench, and a drill bit. Follow the provided video and instructions for straightforward setup. Remember: this mount only works with Starlink Gen 3 dishes.
- Mounting Type:Wall/roof/pole mount
- Adjustment Capability:Rotatable rod with angle lock; pipe flip for longer eave
- Weather Resistance:Aluminum-alloy construction for durability
- Installation Complexity:Easy with instructional video
- Included Hardware:Expansion anchors, lag screws, extension screws, self-tapping screws, stainless screws, wrench, drill bit
- Cable Management:Standard installation support
- Additional Feature:Aluminum pipe adapter durability
- Additional Feature:Pipe flip longer eave
- Additional Feature:Comprehensive hardware screw assortment
Starlink Mount Adjustable Wall Mount with Telescoping Arm
Looking to mount your Starlink Gen 3 antenna on a wall with full adjustability? The Starlink Mount Adjustable Wall Mount with Telescoping Arm delivers versatile positioning through its retractable design. You’ll angle the antenna from 90° to 180° for optimal signal reception. The mount works with wood, brick, and concrete walls using either expansion screws for concrete or lag screws for wood. Installation requires drilling holes, securing brackets, and plugging into your Gen 3 antenna. You’ll insert two spacers into satellite dish holes before twisting screws carefully to avoid damage. This rustproof, weatherproof metal construction protects cables through hidden cable holes.
- Mounting Type:Wall mount
- Adjustment Capability:90°-180° angle adjustment; telescoping arm (up/down, back/forth)
- Weather Resistance:Rustproof, windproof, weatherproof metal
- Installation Complexity:Simple drilling, bracket securing, plug-in process
- Included Hardware:Expansion screws, lag screws, two spacers
- Cable Management:Hidden cable holes for protection and aesthetics
- Additional Feature:90° to 180° angle adjustment
- Additional Feature:Hidden cable hole protection
- Additional Feature:Multiple wall type compatibility
Starlink Gen 3 Adjustable Metal Pole Mount Kit
If you’re installing your Starlink dish in a space where flexibility and durability matter—whether that’s a roof, RV, cruise ship, or apartment patio—the Starlink Gen 3 Adjustable Metal Pole Mount Kit delivers a heavy-duty solution that won’t shift during storms or rough conditions. The kit includes a metal pipe, mounting base, support base, and router mount for cable management. Four square holes on each pipe end let you adjust orientation for optimal signal. Installation requires no advanced skills; you’ll get necessary accessories and a clear manual. The high-strength bracket resists deformation and handles harsh weather reliably. Contact customer support if questions arise during setup.
- Mounting Type:Roof/wall/pole mount
- Adjustment Capability:Four square holes for flexible orientation adjustment
- Weather Resistance:Heavy-duty bracket for harsh storm resistance
- Installation Complexity:Easy with no advanced skills required
- Included Hardware:Metal pipe, mounting base, support base, router mount, accessories
- Cable Management:Includes 2-in-1 router mount for cable management in tight spaces
- Additional Feature:Integrated 2-in-1 router mount
- Additional Feature:Four square holes orientation flexibility
- Additional Feature:Heavy-duty deformation-resistant bracket
XLTTYWL Starlink Gen 3 Complete Mounting Kit
The XLTTYWL Starlink Gen 3 Complete Mounting Kit stands out for anyone who wants to consolidate their router and power supply into a single, organized setup without sacrificing signal quality or taking up extra space. This integrated mount positions your UTR-32 standard router at an suitable angle to enhance signal coverage across your space. The kit’s compact design reduces clutter by securing both components together, eliminating multiple cables and separate placements. Installation takes minutes—simply attach the router and power supply to the mount’s designated slots without requiring tools or complicated steps. The high-quality ABS plastic construction resists impact and scratches, protecting your equipment from accidental damage. The snug fit keeps everything stable and aesthetically pleasing, while the interior antenna configuration maintains full Wi-Fi 6 performance. This solution works seamlessly with Starlink Gen 3, V3, and compatible router models.
- Mounting Type:Router and power supply mount
- Adjustment Capability:Fixed mount for router optimization
- Weather Resistance:High-quality ABS plastic, weatherproof
- Installation Complexity:Simple quick assembly/disassembly
- Included Hardware:ABS plastic mount body with installation accessories
- Cable Management:Integrated design for space-saving router/power supply organization
- Additional Feature:Tailored fit UTR-32 router
- Additional Feature:Space-saving integrated design
- Additional Feature:ABS plastic impact-resistant construction
Starlink Standard Wall Mount OEM Mounting Kit
You’ll want the Starlink Standard Wall Mount OEM Mounting Kit if you’re installing a Starlink Standard V3, Gen3, Gen4, 4X, or Enterprise dish and need a reliable, factory-designed solution that requires no professional installation. This kit includes a Support Base, two Setting Screws, and three plastic sleeves sized for 1.5, 1.67, and 2-inch poles or J-pole mounts. The mount offers 360-degree rotation and 20-degree tilt adjustments to orient your dish correctly. Built from UV-resistant, weatherproof polymer plastic, it withstands severe weather conditions, including hurricanes. Two cable paths ensure safe routing, and the precise slot design guarantees a perfect fit with your Starlink Standard dish.
- Mounting Type:Pole/J-pole mount
- Adjustment Capability:360° rotation with 20° tilt
- Weather Resistance:UV-resistant, weatherproof polymer plastic
- Installation Complexity:Easy without professional help needed
- Included Hardware:Support base, setting screws, plastic sleeves
- Cable Management:Two cable paths for safety
- Additional Feature:UV-resistant weatherproof polymer plastic
- Additional Feature:Three plastic sleeve compatibility options
- Additional Feature:Hurricane-tested durability certification
CEKAY Starlink Gen 3 Mounting Kit with 51″ Pole
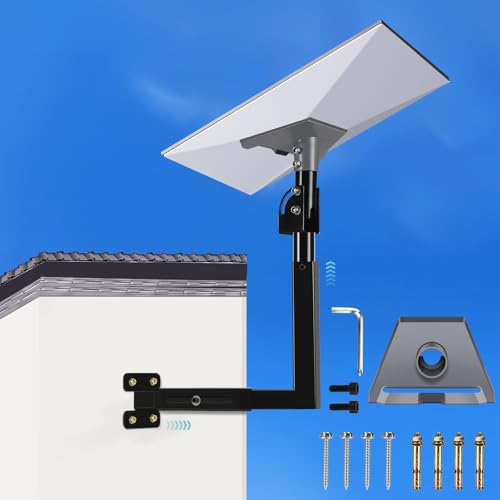
Looking for a complete mounting solution that doesn’t require special tools or technical expertise? The CEKAY kit delivers everything you need in one package. You’ll receive a Gen 3 pipe adapter, mast clamp, 51-inch mounting pole, stainless steel screws, wrench, and instruction manual. The heavy-duty steel construction—1.5mm thick poles and 2.0mm bracket—withstands wind and weather long-term. Install it on your wall, eave, or roof using the reversible J-pole design. The V-jam bracket system secures your dish while allowing 360° rotation and up to 20° tilt for ideal signal alignment. You can fit poles between 1–2 inches in diameter. If you need extra height later, a 16.5-inch extension is available separately.
- Mounting Type:Wall/eave/roof mount with 51″ pole
- Adjustment Capability:360° rotation with up to 20° tilt
- Weather Resistance:1.5mm steel poles and aluminum alloy, weather-resistant
- Installation Complexity:Quick DIY setup with no special tools
- Included Hardware:Gen 3 pipe adapter, mast clamp, 51″ pole kit, self-tapping screws, wrench
- Cable Management:Standard cable routing support
- Additional Feature:V-jam brackets vibration minimization
- Additional Feature:Optional 16.5″ mast extension
- Additional Feature:1.5mm thick steel poles
Starlink Gen 3 Telescoping Wall Mount Kit
Need a mounting solution that adapts to different wall and roof positions while keeping your Starlink Standard dish properly angled for optimal signal? This telescoping wall mount kit offers flexible installation options for various locations. The package includes a pipe adapter, pole, screws, and accessories designed specifically for Gen 3 Starlink compatibility. Installation requires drilling holes to secure the bracket and removing the existing kickstand before mounting the adapter. The telescoping design features vertical and horizontal support arms that you can adjust. You’ll rotate the pole to position your dish correctly. Multiple cable access points, including a hidden cable hole, let you route wiring discreetly. This kit supports both wall and roof mounting configurations.
- Mounting Type:Wall/roof mount with telescoping arms
- Adjustment Capability:Rotatable pole with vertical/horizontal support arms
- Weather Resistance:Standard weather-resistant materials
- Installation Complexity:Easy with standard drilling and mounting
- Included Hardware:Pipe adapter, pole, screws, essential accessories
- Cable Management:Multiple cable access points with hidden cable hole
- Additional Feature:Multiple hidden cable access
- Additional Feature:Vertical and horizontal support arms
- Additional Feature:High precision pipe adapter tested
Factors to Consider When Choosing Starlink Gen 3 Mounting Options
When selecting a Starlink Gen 3 mount, you’ll want to evaluate five key factors: first, verify that the mount works with your installation surface (roof, wall, pole, or tripod), second, check the adjustability range to ensure you can position the dish at the correct angle for your location, third, assess the build quality and durability materials to confirm they’ll withstand your climate, fourth, confirm that all necessary mounting hardware comes included in the package, and fifth, consider how the mount organizes cables and fits within your available space. Each factor directly affects whether your installation will be secure, functional, and maintainable over time. Review the specifications of each mount against your specific situation before making a purchase decision.
Installation Surface Compatibility
Where you’ll mount your Starlink Gen 3 dish determines which mounting kit works best for your setup. You’ll need to assess your installation surface—whether it’s wood, brick, or concrete—since each material requires different anchoring methods. Wood surfaces use lag screws for secure fastening, while masonry demands expansion anchors that grip inside the material. Pole mounts accommodate standard 1–2 inch diameter pipes, making them ideal for existing structures. Roof, wall, eave, and pole configurations each have specific kits designed for their environments. Many mounts feature adjustable or telescoping arms that let you achieve proper dish tilt and orientation regardless of your surface type. Select anchors and hardware rated for your material to ensure your installation stays secure against wind and weather.
Adjustability And Positioning Range
How much flexibility do you need in positioning your Starlink Gen 3 dish? Adjustability directly affects your signal quality and installation success.
Look for mounts offering 360° rotation plus tilt adjustments around 20° to fine-tune dish orientation across various structures. Telescoping arms or adjustable pipe adapters extend your mounting reach, accommodating different installation heights and angles. Some mounts feature up to 180° rotation capabilities for ideal signal reception in tight spaces.
Dual-ended rotate-with-lock mechanisms let you install from either end and securely lock your chosen angle. Multiple mounting holes support versatile alignment, enabling you to position your dish precisely. Hidden cable routes keep wiring organized while you adjust positioning. Prioritize mounts matching your installation location’s constraints and your signal coverage goals.
Build Quality And Durability
The structural integrity of your mount directly impacts whether your Starlink Gen 3 dish stays secure through storms, high winds, and years of outdoor exposure. Aluminum-alloy adapters deliver superior durability and lower breakage risk than lighter materials. Heavy-duty steel components—including 1–2 inch diameter poles and 14–16 gauge brackets—provide robust outdoor stability. Weatherproof and rustproof construction enables your system to endure wind, rain, and prolonged exposure without degradation. For lighter alternatives, ABS plastic and UV-resistant polymers resist weathering while maintaining reduced weight. Integrated, all-in-one mounting designs minimize vibration and movement during severe weather conditions. When selecting your mount, prioritize materials rated for your local climate. Compare bracket thickness, corrosion ratings, and weight capacity specifications. These factors determine long-term reliability and equipment protection.
Mounting Hardware Included
What’s actually included in your mounting kit will considerably affect your installation process and long-term stability. Most kits contain expansion anchors for concrete surfaces and lag screws for wooden structures. You’ll typically find multiple screw types—extension screws, self-tapping screws, and stainless screws—along with a wrench and drill bit. Many packages include mounting plates, pipe adapters, and base components that connect directly to your dish or router. Spacers and anti-rotation hardware prevent movement between the dish, bracket, and signal board. Cable management features like cable holes and multiple cable paths protect your wiring from weather and damage. Before purchasing, verify that your kit matches your installation surface and includes all necessary tools to avoid additional trips for supplies.
Space And Cable Management
Once you’ve confirmed your mounting hardware matches your installation surface, you’ll want to focus on how you’ll manage space and cable routing around your setup. Many Gen 3 kits include cable management features like hidden cable holes and secondary cable paths that keep wires organized and protected from weather damage. Telescoping or adjustable arms help position your dish while maintaining clean, streamlined cable runs along the mount. Some kits integrate router and power supply mounting into a single footprint, reducing clutter significantly. Look for plastic sleeves, spacers, and additional hardware designed to route cables safely through joints without bending or damage. Rotation and tilt adjustments also allow you to align your dish while keeping cable routing discreet and protected from environmental wear.
Final Thoughts
You’ll find the right Starlink Gen 3 mount by matching your installation location to the kit’s features. If you’re mounting on a wall, choose between adjustable or fixed options based on your angle needs. For pole installations, select a kit rated for your climate conditions. Verify you’ve got all hardware included, then follow the manufacturer’s setup steps carefully. Your choice determines signal strength and system durability.
Meet Ry, “TechGuru,” a 36-year-old technology enthusiast with a deep passion for tech innovations. With extensive experience, he specializes in gaming hardware and software, and has expertise in gadgets, custom PCs, and audio.
Besides writing about tech and reviewing new products, he enjoys traveling, hiking, and photography. Committed to keeping up with the latest industry trends, he aims to guide readers in making informed tech decisions.