You need a reliable Starlink roof mount to maintain consistent internet signal and protect your equipment from weather damage. Your choice depends on your roof type, desired adjustability, and installation method. Whether you’re installing on wood, concrete, or metal surfaces, you’ll find options ranging from no-drill solutions to heavy-duty permanent installations. Understanding the key features that distinguish quality mounts will help you select the right one for your specific setup—but which factors matter most?
| Gen 3 Mount for Starlink Standard Dish |

| Best Overall | Rotation Capability: Fixed positioning | Installation Method: Standard drilling required | Tilt/Angle Adjustment: Variable angle adjustment | VIEW LATEST PRICE | Read Our Analysis |
| Gen 3 Starlink 360° Rotatable Roof & Wall Mount |

| Best 360° Rotation | Rotation Capability: 360° full rotation | Installation Method: Lag screws (wood roofs) | Tilt/Angle Adjustment: 20° tilt adjustment | VIEW LATEST PRICE | Read Our Analysis |
| Starlink Gen 3 Mount Kit Pivot Roof Standard Mount |
| Best Pivot Design | Rotation Capability: 180° adjustable base | Installation Method: Standard mounting with screws | Tilt/Angle Adjustment: 180° adjustable | VIEW LATEST PRICE | Read Our Analysis |
| Starlink Adjustable Roof Mount Gen 3 with Support Arm |

| Most Versatile | Rotation Capability: 360° rotation | Installation Method: Drilling required (concrete/wood options) | Tilt/Angle Adjustment: Multi-dimensional adjustment (360°) | VIEW LATEST PRICE | Read Our Analysis |
| No Drill Starlink Roof Mount Gen 3 |

| Best No-Drill Option | Rotation Capability: Fixed angle adjustment | Installation Method: No drilling required | Tilt/Angle Adjustment: Adjustable angle with screw fixation | VIEW LATEST PRICE | Read Our Analysis |
| Starlink Generation 3 Heavy Duty Roof Mount Kit |

| Heavy-Duty Pick | Rotation Capability: Pivot design (limited rotation) | Installation Method: Standard drilling with lag screws | Tilt/Angle Adjustment: Pivot-mounted (angled roofs) | VIEW LATEST PRICE | Read Our Analysis |
| Ybervont Starlink Gen 3 Adjustable Roof Ridge Mount Kit |

| Best Ridge Mount | Rotation Capability: No rotation (ridge-specific) | Installation Method: No drilling (weight-based) | Tilt/Angle Adjustment: 0-30° adjustable adapter | VIEW LATEST PRICE | Read Our Analysis |
| Anautin Starlink Gen 3 Mount with Waterproof Design |
| Best Waterproof Design | Rotation Capability: 180° rotation | Installation Method: Pre-drilled holes with screws | Tilt/Angle Adjustment: Multi-axis tilt capability | VIEW LATEST PRICE | Read Our Analysis |
| Starlink Gen 3 Adjustable Metal Pole Mounting Kit |

| Best Multi-Surface Mount | Rotation Capability: Flexible orientation adjustment | Installation Method: Standard drilling required | Tilt/Angle Adjustment: Flexible orientation via square holes | VIEW LATEST PRICE | Read Our Analysis |
More Details on Our Top Picks
Gen 3 Mount for Starlink Standard Dish
If you’ve got a Starlink Gen 3 Standard Dish and need a mount that won’t let you down, the Gen 3 Mount for Starlink Standard Dish delivers the durability and adjustability you’re after. The aluminum-alloy adapter resists breaking better than standard materials, and you’ll get a steel support tube and base included. You can install it as a wall, roof, or pole mount using the 18-inch configuration. The rotating rod lets you fine-tune your dish’s angle by tightening screws to lock position. Installation includes expansion anchors for concrete, lag screws for wooden roofs, and multiple screw types to secure everything properly. You’ll also receive a wrench and drill bit. Follow the included video and instructions for straightforward setup.
- Rotation Capability:Fixed positioning
- Installation Method:Standard drilling required
- Tilt/Angle Adjustment:Variable angle adjustment
- Material Construction:Aluminum alloy adapter; steel support tubes
- Weather Resistance:Durable aluminum construction
- Mounting Surface Options:Wall or roof mounting
- Additional Feature:Aluminum pipe adapter included
- Additional Feature:Dual screw set options
- Additional Feature:Adjustable pipe flip design
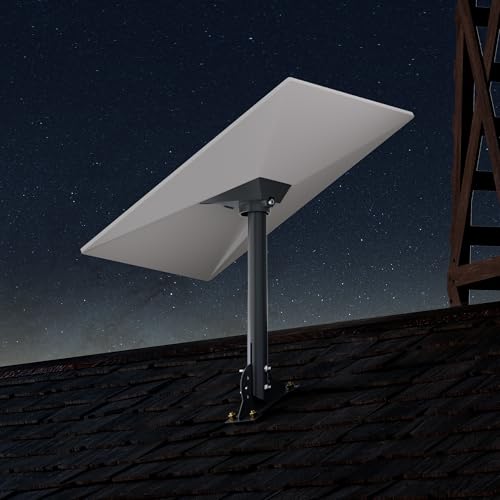
Gen 3 Starlink 360° Rotatable Roof & Wall Mount
You’ll want the Gen 3 Starlink 360° Rotatable Roof & Wall Mount if you’re installing a V3 Standard Dish on a wooden roof or wall and need flexibility to adjust your satellite alignment. This mount features a sturdy aluminum alloy adapter with steel pipe construction, designed to withstand extreme weather including heavy rain, high winds, and snow. The 20° tilt adjustment combined with full 360° rotation lets you fine-tune your dish position for optimal signal reception. Installation includes lag screws for secure wooden roof attachment without compromising structural integrity. You’ll receive a detailed instruction manual and installation video to guide your setup. The weatherproof design ensures long-lasting performance in challenging environments.
- Rotation Capability:360° full rotation
- Installation Method:Lag screws (wood roofs)
- Tilt/Angle Adjustment:20° tilt adjustment
- Material Construction:Aluminum alloy adapter; steel pipe
- Weather Resistance:Extreme weather rated (rain, wind, snow, sun)
- Mounting Surface Options:Roof or wall (wooden structures)
- Additional Feature:Full 360° rotation capability
- Additional Feature:20° tilt adjustment
- Additional Feature:Extreme weather design certified
Starlink Gen 3 Mount Kit Pivot Roof Standard Mount
The EAZUSE Starlink Gen 3 Mount Kit Pivot Roof Standard Mount works best for users who need a reliable, adjustable mounting solution for their Starlink V3 dish on either a roof or wall. You’ll receive a weather-resistant aluminum base with a 16-inch pole and an aluminum pipe adapter that grips securely without relying solely on screws. Installation requires four steps: place the base, insert your Starlink Gen 3 bracket into the antenna slot, attach the pole, and tighten the locking screws. The adjustable base rotates up to 180 degrees, letting you position your dish optimally regardless of your mounting surface. This kit measures 16 by 6 by 3 inches and weighs 1.5 kilograms, making it manageable for most installations.
- Rotation Capability:180° adjustable base
- Installation Method:Standard mounting with screws
- Tilt/Angle Adjustment:180° adjustable
- Material Construction:Aluminum alloy base; aluminum pipe adapter
- Weather Resistance:Powder-coated weather-resistant finish
- Mounting Surface Options:Roof or wall mounting
- Additional Feature:16-inch pole length
- Additional Feature:180° adjustable base
- Additional Feature:Deep pole grip design
Starlink Adjustable Roof Mount Gen 3 with Support Arm
Looking to secure your Starlink antenna on concrete, tile, wood, or brick surfaces? The Starlink Adjustable Roof Mount Gen 3 with Support Arm delivers rust-resistant construction and a 30-pound load capacity for stable installations. You’ll get two mounting screw options: expansion bolts for concrete and brick, threaded screws for wood. The telescoping support arm allows vertical height adjustment, while 360° rotation and adjustable base accommodate your specific positioning needs. A hidden cable port protects wiring from weather damage. Installation requires drilling holes, adjusting angles, tightening screws, then connecting to your Gen 3 device. This mount handles diverse surfaces reliably.
- Rotation Capability:360° rotation
- Installation Method:Drilling required (concrete/wood options)
- Tilt/Angle Adjustment:Multi-dimensional adjustment (360°)
- Material Construction:Premium rust-resistant metal
- Weather Resistance:Wind-resistant design
- Mounting Surface Options:Concrete, tile, wood, brick, walls
- Additional Feature:30+ pound load capacity
- Additional Feature:Hidden cable port protection
- Additional Feature:Telescoping support arm included
No Drill Starlink Roof Mount Gen 3
Need to install your Starlink Gen 3 dish without compromising your roof’s integrity? This no-drill mount secures your dish on ridged or flat roofs while preserving the roof structure. The 13-pound counterweight and pre-attached pipe adapter provide instant stability, eliminating drilling requirements. You’ll assemble the mount in minutes using included tools—no expertise needed. The adjustable angle feature allows you to position your dish optimally, then lock it with screws for windproof security. The anti-rust spray paint and waterproof exterior coating protect against harsh weather conditions. Installation stays portable and reusable; you can remove it quickly without leaving marks or damage. This mount fits only Starlink Gen 3 dishes, so verify compatibility before purchasing. After-sales support responds within twelve hours for any concerns.
- Rotation Capability:Fixed angle adjustment
- Installation Method:No drilling required
- Tilt/Angle Adjustment:Adjustable angle with screw fixation
- Material Construction:Aluminum adapter; anti-rust spray paint
- Weather Resistance:Weatherproof; exterior waterproof coating
- Mounting Surface Options:Ridge or flat roof only
- Additional Feature:13 lbs counterweight included
- Additional Feature:No drilling required installation
- Additional Feature:Portable and reusable design
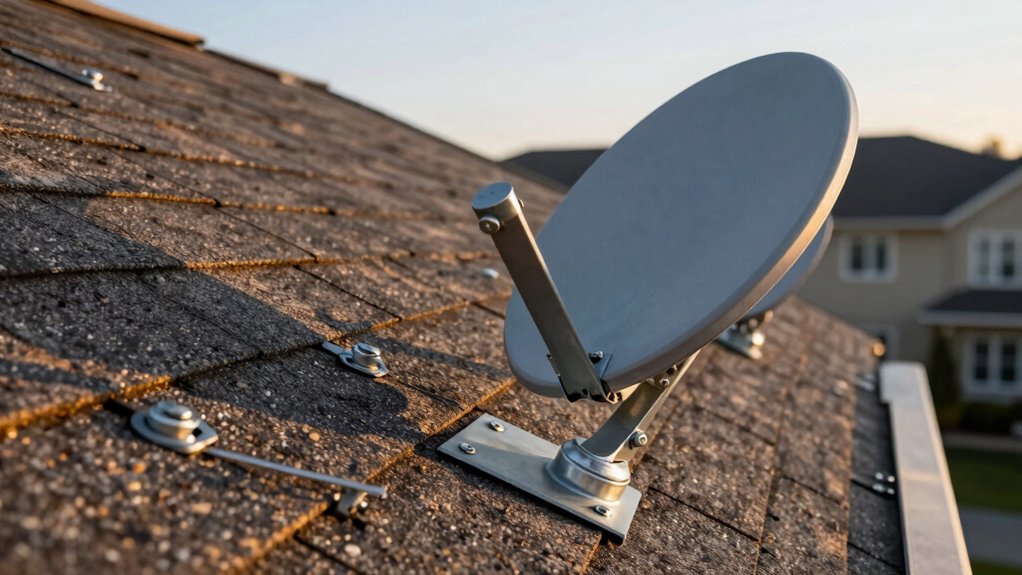
Starlink Generation 3 Heavy Duty Roof Mount Kit
If you’re installing a Gen3 Starlink dish on an angled roof and need a mount that won’t shift or fail under weather stress, Satellite Oasis’s SL3-PIVOT model delivers the stability you’re looking for. This pivot roof mount uses powder-coated steel and high-strength thermoplastic construction to withstand outdoor conditions. The kit includes lag screws, pitch pads, wire clips, and roof sealant—everything you need for installation. You’ll mount it horizontally on your angled roof using the removable kickstand version of Starlink Gen3. The pivot design lets you adjust your dish angle without reinstalling hardware. At 5 pounds and measuring 9 x 6 x 12.5 inches, it’s compact yet robust. Customer reviews rate it 4.8 out of 5 stars from 274 users. Amazon’s 30-day return guarantee backs your purchase.
- Rotation Capability:Pivot design (limited rotation)
- Installation Method:Standard drilling with lag screws
- Tilt/Angle Adjustment:Pivot-mounted (angled roofs)
- Material Construction:Powder-coated steel; high-strength thermoplastic
- Weather Resistance:Outdoor-rated steel hardware
- Mounting Surface Options:Angled roof horizontal mounting
- Additional Feature:Pivot mount design included
- Additional Feature:Wire clips and sealant
- Additional Feature:Powder-coated steel construction
Ybervont Starlink Gen 3 Adjustable Roof Ridge Mount Kit
The Ybervont Starlink Gen 3 Adjustable Roof Ridge Mount Kit works best for users who want to install their satellite dish on a roof ridge without drilling holes or risking water damage. This black alloy steel mount features a 0-30° adjustable adapter that lets you optimize your dish angle for different roof slopes. Installation requires no drilling—simply place two stones or large marble bricks in the bracket slots to secure the unit. The thickened alloy steel construction resists rust through anti-rust spray coating, while its porous design prevents water pooling. Weighing 12 pounds with dimensions of 16 x 5 x 3 inches, this mount accommodates various roof configurations. Customer ratings average 4.3 out of 5 stars based on 83 reviews.
- Rotation Capability:No rotation (ridge-specific)
- Installation Method:No drilling (weight-based)
- Tilt/Angle Adjustment:0-30° adjustable adapter
- Material Construction:Thickened alloy steel; anti-rust coating
- Weather Resistance:Anti-rust spray; porous design prevents water accumulation
- Mounting Surface Options:Roof ridge only
- Additional Feature:0-30° adjustable adapter
- Additional Feature:Drill-free installation method
- Additional Feature:Stone/brick weight fixation
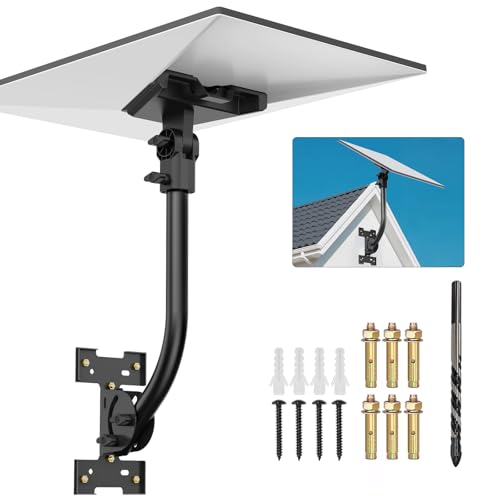
Anautin Starlink Gen 3 Mount with Waterproof Design
Looking to install Starlink on a wooden roof, mud wall, or rural property without worrying about water damage? The Anautin Starlink Gen 3 Mount delivers a rust-resistant iron construction with a weatherproof coating that handles rain, snow, and UV exposure. You’ll receive a complete 7-piece kit including the mount base, bent pipe, support base, screws, expansion anchors, and wrench. Setup requires no technical skills—pre-drilled holes and included hardware eliminate extra trips. The 180° rotation and multi-axis tilt let you adjust your dish for optimal signal alignment. Install on walls, roofs, or poles using the provided components. Interchangeable ends accommodate your preferred angle, making this mount suitable for seasonal adjustments.
- Rotation Capability:180° rotation
- Installation Method:Pre-drilled holes with screws
- Tilt/Angle Adjustment:Multi-axis tilt capability
- Material Construction:Premium iron; rust-resistant coating
- Weather Resistance:Weather-ready; handles rain, snow, UV
- Mounting Surface Options:Wall, roof, or pole; mud walls/wood
- Additional Feature:180° rotation capability
- Additional Feature:7-piece mounting kit
- Additional Feature:Interchangeable mounting ends
Starlink Gen 3 Adjustable Metal Pole Mounting Kit
For anyone needing flexible mounting across multiple environments—whether you’re installing on a roof, RV, cruise ship, or apartment patio—this adjustable metal pole kit delivers the durability and adaptability you’re looking for. The kit includes a heavy-duty metal pipe, mounting base, support base, and a 2-in-1 router mount for cable management in tight spaces. Four square holes on each pipe end let you adjust orientation for optimal signal reception. Installation requires no advanced skills; you’ll receive a clear manual and all necessary accessories. The high-strength bracket resists deformation and handles harsh weather without movement, making it suitable for various mounting scenarios. Contact customer support if you have questions during setup.
- Rotation Capability:Flexible orientation adjustment
- Installation Method:Standard drilling required
- Tilt/Angle Adjustment:Flexible orientation via square holes
- Material Construction:Heavy-duty bracket; high-strength materials
- Weather Resistance:Harsh storm resistant
- Mounting Surface Options:Roof, wall, eaves, patios, RVs, cruise ships
- Additional Feature:2-in-1 router mount
- Additional Feature:Four square adjustment holes
- Additional Feature:High-strength bracket design
Factors to Consider When Choosing Starlink Roof Mounts
When you’re selecting a Starlink roof mount, you’ll need to evaluate five key factors that directly affect your installation’s success and longevity. First, confirm your roof type compatibility—whether you’re working with asphalt shingles, metal, tile, or flat surfaces—since each requires different mounting hardware and installation methods. Second, assess the adjustability and rotation range you need for optimal signal reception, the installation complexity level based on your technical skills or budget for professional help, the weather resistance features that protect against corrosion and water damage in your climate, and the load capacity requirements to ensure the mount supports your dish’s weight plus wind and snow loads.
Roof Type Compatibility
What’s the first thing you should check before buying a Starlink roof mount? Verify that the mount works with your roof’s material type. Manufacturers specify compatibility for wood, concrete, brick, or tile surfaces, and not all mounts support every type.
For wood roofs, you’ll need mounts that come with lag screws for secure fastening. Concrete and brick roofs require expansion anchors instead. Tile roofs demand specialized hardware to avoid cracking.
Next, confirm the mount’s weatherproof rating. Look for models labeled as roof-ready or outdoor-rated to handle rain, wind, and sun exposure over time.
Finally, check whether the mount supports both roof and wall installation. This flexibility lets you adjust placement based on your roof’s pitch and angle, maximizing signal strength and installation options.
Adjustability & Rotation Range
Once you’ve confirmed your roof type and weatherproofing needs, you’ll want to evaluate how much you can adjust and rotate the mount itself. Look for mounts offering full 360° rotation to optimize dish orientation as satellite positions shift and wind exposure changes. Ensure the mount provides adjustable tilt or elevation ranges—typically 20° tilt or 0–30° horizontal adjustments—to fine-tune signal reception on varied roof angles. Check if the design supports multi-axis adjustment, such as 180° base rotation plus pipe-angle tweaks, to accommodate different mounting configurations. Verify that rotation and adjustment mechanisms lock securely with screws or clamps to maintain stable alignment after setup. Confirm compatibility with Gen 3 Starlink standard dishes and whether the pivot or hinge system handles heavy-duty outdoor conditions reliably.
Installation Complexity Level
Because installation difficulty directly affects your setup timeline and whether you’ll need professional help, you’ll want to assess how much technical skill each mount requires before purchasing. Mounts with included video tutorials and manuals let you complete installation without extensive expertise. Pre-attached adapters and all-in-one hardware kits reduce assembly steps and loose components, simplifying your process. Pivot and multi-axis designs offer easier alignment but demand careful initial positioning to work correctly. Adjustable features like tilt, angle, and height adjustments require additional alignment work and securing screws, increasing complexity. Drill-free options using counterweights or bricks avoid roof penetration but need proper securing methods. Evaluate your comfort level with basic tools and measurements, then match it to the mount’s complexity rating before deciding.
Weather Resistance Features
How well your mount withstands harsh outdoor conditions directly determines how long it’ll last and whether you’ll face corrosion, water damage, or component failure down the road. Look for weatherproof finishes like powder-coated or rust-resistant coatings that protect against rain, snow, sun, and humidity. Select mounts made from aluminum alloy or powder-coated steel for superior corrosion resistance. Verify the design shields exposed components—cables, ports, and joints—to minimize water intrusion. Check whether the mount includes robust seals or integrated sealants, such as roof sealant, to maintain weatherproof performance over time. Review manufacturer specifications for extreme weather performance claims, including heavy rain, high winds, and storms, to confirm reliable operation in your climate.
Load Capacity Requirements
What weight can your roof mount safely support? Most quality mounts handle 30 pounds or more, matching the Starlink Gen 3 dish weight plus hardware. Check the manufacturer’s load rating before purchasing—this spec directly affects safety during wind and storms. Next, consider your mounting surface: concrete and brick surfaces support different loads than wood framing, and mounts include specific hardware for each type. Adjustable or pivot mounts distribute weight differently, so verify the load capacity accounts for dynamic gust forces, not just static weight. For high-wind areas, prioritize mounts made from powder-coated steel or aluminum alloys with higher load ratings. Match your mount’s capacity to your local weather conditions and installation surface to ensure stable, secure operation year-round.
Cable Management Solutions
Proper cable management keeps your Starlink installation looking neat while protecting cables from sun damage, rain, and physical wear. Look for mounts with integrated cable ports that shield wiring from the elements. Choose kits offering dedicated router mounts to organize cables alongside your dish setup. Select mounts with adjustable multi-axis tilt and 360° rotation capabilities, allowing you to route cables along the mounting surface with minimal slack and strain. Verify that your mount includes weatherproof, rust-resistant housing to prevent water intrusion around cable entry points. Check for included accessories like wire clips, sealants, and cable pathways designed to secure and organize wires while maintaining roof integrity. These features work together to extend cable lifespan and ensure reliable long-term performance.
Final Thoughts
You’ve reviewed eight specific Starlink roof mount options and key selection factors. Choose based on your roof type: use lag screws for wood, expansion anchors for concrete. Prioritize Gen 3 compatibility, 360° rotation, and weatherproof coatings. Verify the mount includes cable management and installation guidance. Check windproof locking mechanisms before purchasing. Install according to manufacturer instructions to ensure secure, long-term performance.
Meet Ry, “TechGuru,” a 36-year-old technology enthusiast with a deep passion for tech innovations. With extensive experience, he specializes in gaming hardware and software, and has expertise in gadgets, custom PCs, and audio.
Besides writing about tech and reviewing new products, he enjoys traveling, hiking, and photography. Committed to keeping up with the latest industry trends, he aims to guide readers in making informed tech decisions.