When you’re tired of tangled cables behind your TV or desk, in-wall cable management systems offer a practical solution to organize wires out of sight. These systems fit between wall studs, use secure mounting plates, and keep power and data cables separated. You’ll find options with brush plates, pass-through designs, and built-in outlets. Each system has different depth requirements and installation methods, so choosing the right one depends on your specific setup—here’s how to find yours.
| Mount-It In-Wall TV Cable Concealer Kit with Power |
| Most Comprehensive Kit | Installation Time: Under 30 minutes | Extension Cord Length: 9 ft | Minimum Wall Cavity Depth: 2.4 inches | VIEW LATEST PRICE | Read Our Analysis |
| ECHOGEAR In-Wall Cable Management Kit for TV Wires |

| Easiest Installation | Installation Time: About 30 minutes | Extension Cord Length: 6 ft | Minimum Wall Cavity Depth: 2.5 inches | VIEW LATEST PRICE | Read Our Analysis |
| In-Wall Cable Management Kit with Hole Saw |
| Best Budget Option | Installation Time: About 30 minutes | Extension Cord Length: 6 ft | Minimum Wall Cavity Depth: 3 inches | VIEW LATEST PRICE | Read Our Analysis |
| Perlegear In-Wall Cable Management Kit for TV |

| Best for Safety | Installation Time: About 30 minutes | Extension Cord Length: 5.9 ft | Minimum Wall Cavity Depth: 2.8 inches | VIEW LATEST PRICE | Read Our Analysis |
| In Wall Cable Concealer Kit with Brush Wall Plate |

| Highest Cable Capacity | Installation Time: Under 30 minutes | Extension Cord Length: 9.8 ft | Minimum Wall Cavity Depth: 3.74 inches | VIEW LATEST PRICE | Read Our Analysis |
| In Wall Cable Management Kit with AC Outlets |

| Professional-Grade Power | Installation Time: About 30 minutes | Extension Cord Length: 9.8 ft | Minimum Wall Cavity Depth: 3.74 inches | VIEW LATEST PRICE | Read Our Analysis |
More Details on Our Top Picks
Mount-It In-Wall TV Cable Concealer Kit with Power
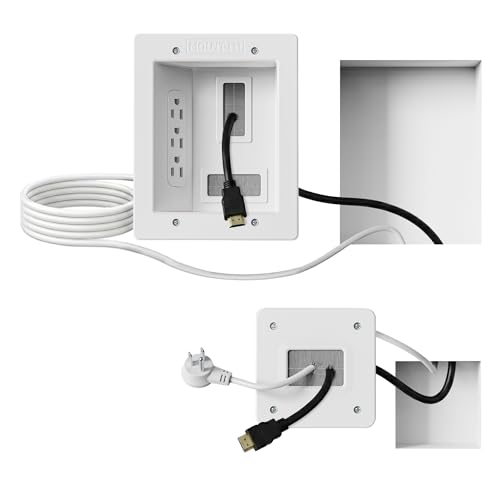
Looking to eliminate cable clutter behind your wall-mounted TV? The Mount-It In-Wall TV Cable Concealer Kit with Power organizes your home theater setup in under 30 minutes. You’ll receive two wall plates, a 9-ft extension power cord, a drywall saw, and a cutting template. The large plate requires a drywall cutout between studs with minimum cavity depth of 2.4 inches—typical walls provide 3.5 inches. Follow the step-by-step instructions to cut your opening, install the plates with pre-installed screws, and route multiple HDMI, Ethernet, and A/V cables through the recessed opening. The power cord connects to your existing outlet, while low-voltage cables run safely behind the wall. This ETL In-Wall Certified kit includes a lifetime warranty and durable materials for lasting reliability.
- Installation Time:Under 30 minutes
- Extension Cord Length:9 ft
- Minimum Wall Cavity Depth:2.4 inches
- Included Drywall Hole Saw:Yes (with cutting template)
- Safety Certification:ETL In-Wall Certified
- Cable Capacity:Multiple HDMI, Ethernet, and A/V cables
- Additional Feature:Lifetime warranty included
- Additional Feature:Two wall plates provided
- Additional Feature:ETL In-Wall Certified
ECHOGEAR In-Wall Cable Management Kit for TV Wires
If you’re tired of tangled cords cluttering your entertainment setup, the ECHOGEAR In-Wall Cable Management Kit offers the easiest installation among in-wall options—you’ll route power and AV cables behind your wall in about 30 minutes using just a drill. The kit includes upper and lower modules measuring 3.75″ wide by 3.25″ deep, a 6ft extension cord, and a drywall hole saw attachment. You’ll install the screw-in plastic modules up to 5 feet apart within the same stud bay, requiring at least 2.5″ of backspace behind drywall. The cable pass-through accommodates four large braided HDMI cables plus Ethernet and audio cords. Since the system is pre-wired and ETL In-Wall Certified, it meets electrical codes safely.
- Installation Time:About 30 minutes
- Extension Cord Length:6 ft
- Minimum Wall Cavity Depth:2.5 inches
- Included Drywall Hole Saw:Yes (drill attachment)
- Safety Certification:ETL In-Wall Certified
- Cable Capacity:Up to 4 large braided HDMI cables plus Ethernet and audio
- Additional Feature:Modules install up to 5′ apart
- Additional Feature:Fits 4 large braided cables
- Additional Feature:7-day weekly tech support
In-Wall Cable Management Kit with Hole Saw
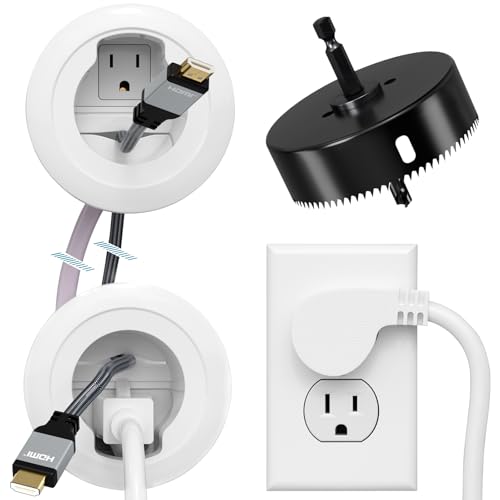
You’ll find this in-wall cable management kit ideal for hiding TV power and AV cables affordably. Installation takes about 30 minutes and requires drilling two 3-inch holes using the included hole saw. Before purchasing, verify your wall cavity depth reaches at least 3 inches and your TV plug width doesn’t exceed 1.125 inches. The kit includes a 6-foot extension cord, allowing you to route cables to outlets without exposed wiring. Built-in locking wings secure the modules behind your wall with no wobble or gaps. Drill at low speed to protect screw heads during installation.
- Installation Time:About 30 minutes
- Extension Cord Length:6 ft
- Minimum Wall Cavity Depth:3 inches
- Included Drywall Hole Saw:Yes (3-inch hole saw)
- Safety Certification:Not specified
- Cable Capacity:Multiple power and AV cables
- Additional Feature:5ft vertical range flexibility
- Additional Feature:Built-in locking wings grip
- Additional Feature:3″ hole saw included
Perlegear In-Wall Cable Management Kit for TV
The Perlegear In-Wall Cable Management Kit prioritizes safety for households with children and pets by concealing cables that’d otherwise create tripping hazards and expose power connections. You’ll install the system in roughly 30 minutes using the included hole saw attachment and dust bag for a clean process. The kit contains two power modules, a 5.9-foot extension cord, and a cutting template. Verify your wall depth reaches at least 2.8 inches before starting. Secure locking wings hold cable modules firmly in place, accommodating various TV heights and wireless speaker positions. The UL and SGS-certified materials offer fire-resistant construction and long-lasting durability.
- Installation Time:About 30 minutes
- Extension Cord Length:5.9 ft
- Minimum Wall Cavity Depth:2.8 inches
- Included Drywall Hole Saw:Yes (with dust bag)
- Safety Certification:UL and SGS certified
- Cable Capacity:Multiple HDMI, Ethernet, and audio cables
- Additional Feature:Dust-free installation with bag
- Additional Feature:UL and SGS certified
- Additional Feature:Fire-resistant construction
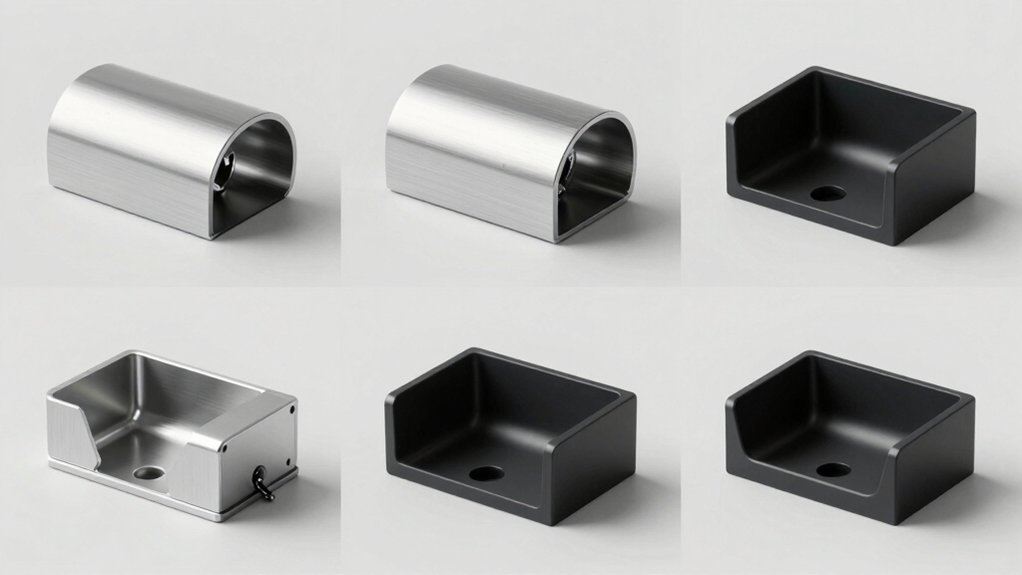
In Wall Cable Concealer Kit with Brush Wall Plate
Looking to route 100+ cables behind your wall without visible clutter? This all-in-one kit includes a recessed outlet box, brush wall plate, and 9.8-foot power cord with a 15A/125V receptacle. You’ll install it in under 30 minutes using basic tools—no electrician required. First, confirm your wall cavity depth reaches 3.74 inches minimum. Then follow the included cutting template and step-by-step instructions. Wing clips keep the outlet flush against drywall. The flame-retardant PC material and reinforced bracket ensure durability. You can conceal power cords, HDMI, Ethernet, and A/V cables simultaneously, creating a clean setup ideal for wall-mounted TVs, offices, and smart home devices.
- Installation Time:Under 30 minutes
- Extension Cord Length:9.8 ft
- Minimum Wall Cavity Depth:3.74 inches
- Included Drywall Hole Saw:Yes (with cutting template)
- Safety Certification:Flame-retardant materials
- Cable Capacity:100+ cables
- Additional Feature:Supports 100+ cables capacity
- Additional Feature:Flame-retardant PC material
- Additional Feature:15A/125V duplex receptacle
In Wall Cable Management Kit with AC Outlets
Ever struggle with tangled cords cluttering your entertainment setup? This in-wall kit solves that problem by hiding power cords and cables inside your walls. You get two AC outlets with a 9.8-foot power cord, a brush wall plate, and a drywall saw for installation. The flat 45° plug sits flush against the wall at just 0.28 inches thick, preventing bulky protrusions. Before you start, verify your wall cavity is at least 3.74 inches deep. Cut two standard holes using the included template, then insert the outlets. Installation takes about thirty minutes. The outlets deliver 125V/15A power—up to 1,875 watts maximum. UL and ETL certifications confirm safety, and tamper-resistant outlets with safety shutters protect children and pets.
- Installation Time:About 30 minutes
- Extension Cord Length:9.8 ft
- Minimum Wall Cavity Depth:3.74 inches
- Included Drywall Hole Saw:Yes (with cutting template)
- Safety Certification:UL and ETL certified
- Cable Capacity:Multiple power cords, speaker wires, and AV cables
- Additional Feature:45° flat plug design
- Additional Feature:Tamper-resistant safety outlets
- Additional Feature:Up to 1875W max
Factors to Consider When Choosing an In Wall Cable Management System
Before you select an in-wall cable management system, you’ll need to measure your wall cavity depth, check that the system accommodates your cables’ diameter and quantity, and verify the power cord length meets your outlet spacing requirements. Next, evaluate the installation time and complexity based on your skill level and available tools, then confirm the system carries relevant safety certifications and uses fire-rated materials that comply with electrical codes. These factors together determine whether a system will function safely in your specific space and installation scenario.
Wall Cavity Depth Requirements
Why does wall cavity depth matter so much when you’re selecting an in-wall cable management system? Your wall’s available space directly determines which kits you can install. Most kits require between 2.4 and 3.74 inches of depth behind your drywall to function properly. If your cavity’s too shallow, the kit won’t mount correctly, interfere with wall plates, or allow cables to route through. Before purchasing any system, measure your cavity depth by checking the distance between your studs and drywall back. Account for existing insulation, which reduces available space. Compare your measurement against the kit’s specifications. This step prevents installation failures and ensures your cable management system fits within your wall structure without complications.
Cable Capacity And Compatibility
How many cables do you actually need to run through your walls, and what types are they? Count each HDMI, Ethernet, USB, audio, and power cable you’ll install. Check your kit’s maximum capacity—some systems fit 4 large braided HDMI cables plus Ethernet and audio cords, while high-capacity designs support 100+ cables. Match your cable count to the kit’s rated capacity to avoid overcrowding. Verify compatibility with your specific cable types and gauges. Confirm the kit accommodates power extension cords ranging from 6 to 9.8 feet, ensuring adequate reach to your components. Review module spacing requirements, typically up to 5 feet apart within a stud bay, to maintain proper organization and airflow. Select a kit that handles your complete cable load without compromise.
Power Cord Length Specifications
When you’re selecting an in-wall cable management system, the power cord length you choose directly determines where you can place your electrical outlets relative to your wall-mounted TV or components. Most kits offer cords ranging from 6 feet to 9.8 feet. Shorter 6-foot cords work well for outlets positioned close to your TV installation. Longer 9.8-foot cords reach distant outlets, giving you more flexibility in outlet placement. Before deciding, measure your wall cavity depth and the distance from your TV location to the nearest available outlet. Longer cords require careful routing to prevent tension and visibility issues. Some kits include drywall saws and templates to assist with routing longer cords. Match your cord length to your specific outlet location and wall configuration to meet electrical codes and prevent exposed wiring.
Installation Time And Complexity
Once you’ve determined your power cord length and outlet placement, you’ll need to evaluate how much time and effort the installation itself will require. Most DIY kits take around 30 minutes to complete, though some manufacturers claim faster installation with step-by-step templates. You’ll need to drill or cut holes using provided hole saw attachments or drywall saws, so prepare appropriate tools beforehand. Check your wall cavity depth—systems require between 2.4 and 3.74 inches depending on the kit. Some kits demand precise spacing, keeping power modules within the same stud bay and no more than 5 feet apart. Verify safety certifications like ETL In-Wall or UL/SAG compliance before purchasing. Understanding these requirements helps you estimate realistic installation time and decide whether professional installation is necessary.
Safety Certifications And Materials
Before you purchase an in-wall cable management system, you’ll need to verify that it meets essential safety standards and uses appropriate materials for behind-wall installation. Look for ETL In-Wall Certified or UL-listed labels, which confirm electrical safety and code compliance. Check that all materials are flame-retardant and fire-resistant to minimize ignition risk when installed behind walls. Examine the system for tamper-resistant outlets and safety shutters that block direct access by children or pets. Verify that low-voltage components are certified to safely separate power and data cables. Request documented safety certifications and installation guidelines from the manufacturer. Confirm these documents align with your local building codes before installation. These steps protect your home and ensure your cable management system meets required safety standards.
Aesthetic Design And Finish
How’ll you hide cables effectively while keeping your walls looking clean and finished? Start by selecting kits with slim profiles and flush-mount designs that eliminate visible gaps. Choose white or neutral-colored plates matching your drywall to achieve seamless integration. Look for recessed opening designs that conceal cables and reduce protruding components. Select kits featuring dust-free installation options, including hole saw attachments and dust bags, to maintain wall aesthetics during work. Verify that wall plates and modules have clean, modern finishes with minimal visible seams once installed. These design elements work together to ensure your in-wall cable management system remains invisible while maintaining professional appearance throughout your space.
Final Thoughts
You’ve reviewed six in-wall cable management systems offering different features and price points. Select your system based on cavity depth, cable capacity, and whether you need integrated power outlets. Measure your wall space, verify ETL certification, and check stud bay compatibility. Install the wall plates using the included hole saw, route cables through the concealer, and secure them with locking wings. You’ll achieve a clean, organized appearance while maintaining code compliance.
Meet Ry, “TechGuru,” a 36-year-old technology enthusiast with a deep passion for tech innovations. With extensive experience, he specializes in gaming hardware and software, and has expertise in gadgets, custom PCs, and audio.
Besides writing about tech and reviewing new products, he enjoys traveling, hiking, and photography. Committed to keeping up with the latest industry trends, he aims to guide readers in making informed tech decisions.