When you’re setting up a recording studio, you’ll want a microphone that captures warm, natural sound without breaking your budget. Ribbon microphones deliver this quality consistently. They handle high volume levels, come with shock mounts, and offer durable construction built to last. Your choice depends on your specific needs—whether you’re recording vocals, instruments, or drums. Here’s what separates the top options and why each one matters for your setup.
| R2 MKII Ribbon Microphone |

| Classic Value Pick | Polar Pattern: Figure-8 | Connector Type: XLR | Maximum SPL Handling: Not specified | VIEW LATEST PRICE | Read Our Analysis |
| MXL R144 Multi-Purpose Ribbon Microphone with Shockmount Purple (MXL R144) |
| Compact & Versatile | Polar Pattern: Figure-8 | Connector Type: XLR | Maximum SPL Handling: High SPL capability | VIEW LATEST PRICE | Read Our Analysis |
| R10 Ribbon Microphone |
| Professional Studio Standard | Polar Pattern: Figure-8 (Bi-directional) | Connector Type: XLR | Maximum SPL Handling: 160 dB @ 1 kHz | VIEW LATEST PRICE | Read Our Analysis |
| Stagg Ribbon Microphone (SRM70) |

| Budget-Friendly Option | Polar Pattern: Figure-8 | Connector Type: XLR | Maximum SPL Handling: 148 dB @ 1 kHz | VIEW LATEST PRICE | Read Our Analysis |
| Stagg Ribbon Microphone (SRM75S) |

| Stereo Matched Pair | Polar Pattern: Figure-8 | Connector Type: XLR | Maximum SPL Handling: Not specified | VIEW LATEST PRICE | Read Our Analysis |
More Details on Our Top Picks
R2 MKII Ribbon Microphone
Looking for a classic value pick in ribbon microphones? The Golden Age Project R2 MKII delivers professional-grade performance without excessive cost. This figure-8 pattern microphone works well for studio vocals, acoustic instruments, and drum overhead placement. You’ll receive a brass construction unit weighing 3.29 pounds with standard XLR connectivity. The R2 MKII maintains availability since its 2011 release, indicating proven reliability. Customer ratings reach 4.8 out of 5 stars across fifteen reviews. Connect the microphone to your audio interface, position it according to your source material, and adjust preamp levels to capture optimal signal. The figure-8 pattern rejects side sounds while accepting front and rear frequencies, making it effective for controlling room noise.
- Polar Pattern:Figure-8
- Connector Type:XLR
- Maximum SPL Handling:Not specified
- Frequency Response Range:Not specified
- Included Accessories:None specified
- Enclosure Material:Brass
- Additional Feature:Classic ribbon characteristics
- Additional Feature:Outstanding value proposition
- Additional Feature:Brass construction material
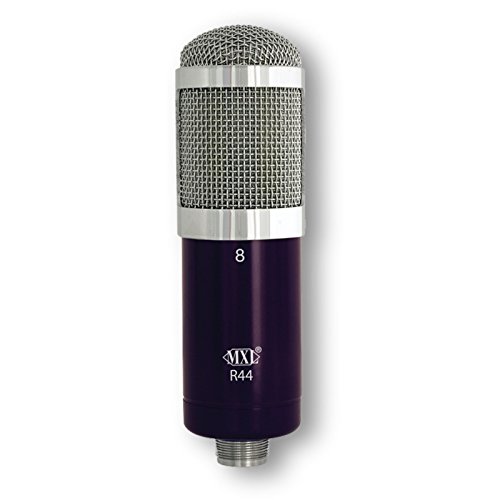
MXL R144 Multi-Purpose Ribbon Microphone with Shockmount Purple (MXL R144)
The MXL R144’s compact design and versatile figure-8 polar pattern make it ideal for engineers who need flexible microphone options without sacrificing studio space. This ribbon microphone delivers classic, rich midrange sound suitable for recording horns and electric guitars. Its high SPL capability handles loud instruments without distortion. The included shockmount reduces vibration noise during recording. Use the R144 when you want to expand your microphone collection with a dependable tool that captures both direct instruments and room acoustics effectively. Its compact form factor fits tight booth setups.
- Polar Pattern:Figure-8
- Connector Type:XLR
- Maximum SPL Handling:High SPL capability
- Frequency Response Range:Not specified
- Included Accessories:Shockmount
- Enclosure Material:Not specified
- Additional Feature:High SPL capability
- Additional Feature:Compact design placement
- Additional Feature:Includes shockmount accessory
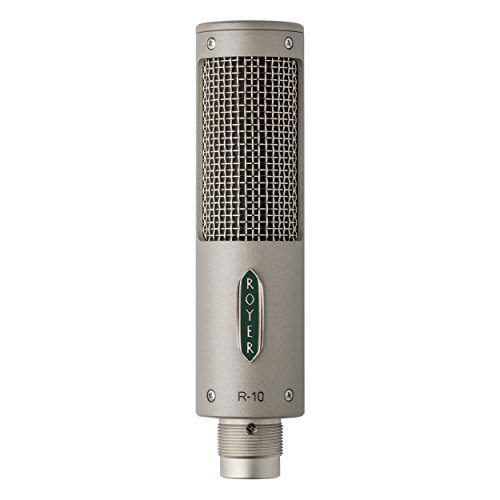
R10 Ribbon Microphone
Royer Labs’ R-10 serves professionals who need a professional studio standard microphone that handles demanding recording environments without sacrificing audio quality. This passive ribbon mic features a 2.5-micron aluminum ribbon element that captures smooth, phase-linear audio across 30 Hz–15,000 Hz. Position it near guitar cabinets, acoustic instruments, or vocals using its compact mounting system. The bi-directional polar pattern and humbucking wiring reduce noise effectively. With 160 dB SPL handling and a three-layer windscreen, you’ll minimize proximity effect and air blasts. Connect via XLR to your preamp. Hand-built in Burbank, the R-10 includes a swivel mount and carrying case for portable studio or live applications.
- Polar Pattern:Figure-8 (Bi-directional)
- Connector Type:XLR
- Maximum SPL Handling:160 dB @ 1 kHz
- Frequency Response Range:30 Hz–15,000 Hz ±3 dB
- Included Accessories:Built-in swivel mount, carrying case
- Enclosure Material:Nickel/metal
- Additional Feature:160 dB SPL handling
- Additional Feature:Hand-built in California
- Additional Feature:Built-in windscreen included
Stagg Ribbon Microphone (SRM70)
Want a versatile ribbon mic that won’t strain your budget? The Stagg SRM70 delivers. This figure-8 pattern microphone captures vocals and instruments with natural sound and quick response. It handles 148 dB maximum SPL, so you’ll record loud sources without distortion. Connect it via XLR to your mixing console, audio interface, or portable recorder. The pure aluminum ribbon produces a 20 Hz–18 kHz frequency range, covering most studio needs. At 1.95 kg, it’s portable enough for stage work. The included shock mount reduces handling noise. You get a one-year warranty against manufacturer defects plus a 30-day return guarantee through Amazon.
- Polar Pattern:Figure-8
- Connector Type:XLR
- Maximum SPL Handling:148 dB @ 1 kHz
- Frequency Response Range:20 Hz–18 kHz
- Included Accessories:Shock mount
- Enclosure Material:Aluminum
- Additional Feature:Quick transient response
- Additional Feature:Pure aluminum ribbon
- Additional Feature:Portable, lightweight design
Stagg Ribbon Microphone (SRM75S)
Stagg’s SRM75S delivers a stereo matched pair of ribbon microphones designed for engineers who need low-noise, high-fidelity recording across vocals and instruments alike. You’ll benefit from the wide frequency response that captures full dynamic range without distortion. The included XLR stereo split cable and shock mount simplify setup for both stage and studio use. Position the microphones to isolate your sound source, then secure them using the shock mount to minimize vibration interference. This configuration works effectively for drum overheads, acoustic instruments, and vocal recording. The matched pair ensures consistent tonal character across stereo applications, making it a practical choice for professional projects requiring reliable stereo capture.
- Polar Pattern:Figure-8
- Connector Type:XLR
- Maximum SPL Handling:Not specified
- Frequency Response Range:Wide frequency response
- Included Accessories:XLR stereo split cable, shock mount
- Enclosure Material:Not specified
- Additional Feature:Two matched microphones
- Additional Feature:Minimal distortion performance
- Additional Feature:XLR stereo split cable
Factors to Consider When Choosing Ribbon Microphones for Recording
When you’re selecting a ribbon microphone for your recording studio, you’ll need to evaluate several technical specifications that directly affect your recording quality and equipment compatibility. Start by examining the microphone’s polar pattern to match your recording environment, then assess its frequency response curve to ensure it captures the instruments you’ll be recording, check its maximum SPL rating to confirm it won’t distort during loud performances, compare ribbon material quality since different metals affect durability and sound characteristics, and finally verify that its impedance matches your preamp’s input requirements. These five factors work together to determine whether a specific ribbon microphone will function effectively within your studio setup and deliver the results you’re seeking.
Polar Pattern Selection Matters
How you’ll use your ribbon microphone in the studio depends largely on its polar pattern, which determines where it picks up sound. Cardioid patterns capture sound primarily from the front, making them ideal for isolating vocals or instruments while rejecting background noise. Omnidirectional patterns pick up sound equally from all directions, which works well for recording room ambiance or ensemble performances. Figure-eight patterns capture sound from the front and back while rejecting sound from the sides, making them useful for recording two sources simultaneously. Consider your recording setup first. Identify whether you’re recording a single source or multiple sources. Then match the polar pattern to your needs.
Frequency Response Characteristics
What’ll determine whether a ribbon microphone captures the warmth you’re after or the presence you need? Frequency response characteristics. You’ll examine the microphone’s frequency chart to identify which frequencies it emphasizes or reduces. Look at the low-end response first—microphones with a presence peak between 2kHz and 5kHz will highlight vocals and instruments. Check the high-frequency rolloff next, which typically begins around 10kHz. If you’re recording vocals, you’ll want a presence peak. For orchestral instruments, you’ll prefer a flatter response. Review the technical specifications sheet provided by the manufacturer. Compare response curves across models you’re considering. Select the frequency response that matches your primary recording application. Test the microphone with your actual instruments before committing.
Maximum SPL Handling Capacity
Beyond frequency response, you’ll need to evaluate a ribbon microphone’s maximum SPL (Sound Pressure Level) handling capacity to ensure it won’t distort or sustain damage during recording sessions. Check the microphone’s specifications for its maximum SPL rating, typically measured in decibels (dB). Compare this rating against the sound levels you’ll record. Drums and amplifiers often exceed 120 dB SPL, requiring microphones with higher capacity ratings. A microphone rated for 130 dB SPL handles these sources safely. If you’ll record quieter sources like vocals or acoustic instruments, a lower SPL rating suffices. Select a microphone whose maximum SPL exceeds your loudest anticipated sound source by at least 6 dB to maintain signal clarity and prevent distortion or equipment damage.
Ribbon Material Quality Differences
When you’re selecting a ribbon microphone, the material composition of the ribbon itself—typically aluminum or specialized alloys—directly affects your microphone’s durability, frequency response, and overall performance. Aluminum ribbons offer affordability and decent sensitivity but require careful handling due to fragility. They’re prone to damage from physical shock or excessive humidity. Specialized alloys like corrugated designs provide improved durability and extended frequency response. These ribbons resist rupture better and maintain consistent performance over time. When evaluating ribbon quality, examine the thickness and corrugation pattern. Thicker ribbons withstand higher sound pressure levels. Corrugated ribbons distribute stress more effectively across the material. Check manufacturer specifications for frequency response charts and maximum SPL ratings. Compare these specs against your intended recording applications to ensure your chosen microphone meets your studio’s demands.
Impedance And Preamp Compatibility
After confirming your ribbon microphone has the durability and frequency response you need, you’ll want to match it with a preamp that handles its electrical characteristics correctly. Check your microphone’s impedance rating, typically between 200 and 600 ohms. Your preamp must accommodate this specification to avoid signal loss or distortion. Most modern preamps handle standard impedance levels, but verify compatibility before purchasing. Connect your microphone to the preamp using a balanced XLR cable, which protects the signal from interference. Test the connection by speaking into the microphone while monitoring the preamp’s input levels. Adjust the gain knob gradually until the signal registers clearly without clipping. This setup ensures optimal sound quality and prevents equipment damage from impedance mismatches.
Proximity Effect Reduction Features
How does your ribbon microphone’s proximity effect impact your recordings? When you place a microphone too close to a sound source, low frequencies become exaggerated, creating an unnatural, boomy tone. To reduce this problem, you’ve got several options.
First, maintain proper microphone distance. Position your microphone 6 to 12 inches from the sound source, depending on your desired effect. Second, select ribbon microphones with cardioid patterns rather than omnidirectional designs, as they naturally reject proximity coloration. Third, use a high-pass filter on your preamp or audio interface, rolling off frequencies below 80 Hz. Fourth, apply equalization during mixing to reduce excessive bass if proximity effect occurs. These straightforward steps’ll help you capture cleaner, more balanced recordings without unwanted low-frequency buildup.
Build Construction And Durability
Beyond managing proximity effect in your recordings, you’ll want to examine the physical construction of your ribbon microphone, since durability directly affects how long your equipment performs reliably and how well it withstands studio use.
Check the microphone’s chassis material—aluminum and steel frames provide better protection than plastic. Inspect the ribbon element itself, as thinner ribbons break more easily during transport or accidental drops. Look for shock mounts included with the mic, which absorb vibrations and reduce damage risk.
Review the cable connectors for reinforced designs that resist wear from repeated plugging and unplugging. Verify that replacement parts, particularly ribbon cartridges, are available and affordable. Research the manufacturer’s warranty period and repair services. Quality construction ensures your investment remains functional through years of regular studio work.
Studio Versus Live Applications
Since ribbon microphones perform differently depending on whether you’ll use them in a controlled studio environment or an unpredictable live setting, you’ll need to evaluate your primary application before making a purchase. Studio ribbon mics prioritize sound quality and sensitivity, capturing detailed recordings in acoustically treated rooms. They’re fragile and require stable conditions. Live ribbon mics feature reinforced diaphragms and rugged construction to withstand handling, transport, and environmental changes. Determine your main use first. If you’re recording vocals, instruments, or podcasts indoors, choose studio-grade models. If you’re performing at venues or traveling frequently, select live-rated options. Some professionals maintain separate microphones for each application to optimize performance in both contexts.
Final Thoughts
You’ve now reviewed five ribbon microphones that’ll work for your studio needs. Match your choice to your budget and recording goals: pick the R2 MKII or R10 for professional quality, the MXL R144 for versatility, or the Stagg models for cost-effective options. Consider your space, mic placement requirements, and whether you need mono or stereo recording. Test each model’s polar pattern and SPL handling against your specific equipment before purchasing.
Meet Ry, “TechGuru,” a 36-year-old technology enthusiast with a deep passion for tech innovations. With extensive experience, he specializes in gaming hardware and software, and has expertise in gadgets, custom PCs, and audio.
Besides writing about tech and reviewing new products, he enjoys traveling, hiking, and photography. Committed to keeping up with the latest industry trends, he aims to guide readers in making informed tech decisions.