When you’re setting up Starlink, you’ll need a reliable wall mount that adapts to your specific installation. The right mount handles various dish generations, offers full rotation and tilt adjustment, and withstands weather conditions long-term. You’ve got several options available, each with different features and compatibility levels. Understanding what each mount delivers helps you avoid costly mistakes and guarantees stable, long-lasting performance. Here’s what you should know about selecting the best option for your situation.
| Gen 3 Mount for Starlink Adjustable Wall/Roof Kit |

| Most Versatile | Rotational Adjustment: Rod rotation with screw locking | Material Construction: Aluminum-alloy adapter with steel tubes | Compatible Wall Types: Concrete/masonry and wooden roofs | VIEW LATEST PRICE | Read Our Analysis |
| Starlink Gen 3 Adjustable Metal Pole Mounting Kit |

| Best For Beginners | Rotational Adjustment: Four square holes for flexible orientation | Material Construction: Heavy-duty bracket with high-strength materials | Compatible Wall Types: Multiple mounting options (roof/wall) | VIEW LATEST PRICE | Read Our Analysis |
| Starlink Wall Mount Gen 3 with Telescoping Arm |
| Best Overall | Rotational Adjustment: 90° to 180° angle adjustment | Material Construction: Top-grade metal, rustproof coating | Compatible Wall Types: Wood, brick, and concrete walls | VIEW LATEST PRICE | Read Our Analysis |
| Starlink Gen 3 Mount Kit with 360° Adjustable Bracket |

| Professional Grade | Rotational Adjustment: 360° horizontal rotation via adapter | Material Construction: All-stainless steel construction | Compatible Wall Types: Various eave widths and wall types | VIEW LATEST PRICE | Read Our Analysis |
| Gen 3 Mount for Starlink V3 Standard Dish |

| Best Value | Rotational Adjustment: 90° base tilt; 360° adapter rotation | Material Construction: Stainless steel with rust-proof finish | Compatible Wall Types: Concrete or wood walls/roofs | VIEW LATEST PRICE | Read Our Analysis |
| Gen 3 Mount for Starlink V3 360° Adjustable |

| Editor’s Choice | Rotational Adjustment: 360° rotation for signal optimization | Material Construction: Rust-resistant aluminum alloy and steel tubing | Compatible Wall Types: Wooden roofs (with lag screws) | VIEW LATEST PRICE | Read Our Analysis |
| Starlink Gen 3 Wall/Roof Pipe Mount Kit with Adapter |
| Most Features | Rotational Adjustment: 360° rotation on bracket; 180° at base | Material Construction: CNC-machined aluminum alloy with galvanized steel pipes | Compatible Wall Types: Standard house walls and wooden roofs | VIEW LATEST PRICE | Read Our Analysis |
| IZLTUV Gen 3 Starlink Wall Mount Kit with Adapter |
| Budget-Friendly Pick | Rotational Adjustment: 135° pivot pole range | Material Construction: Aluminum alloy adapter with heavy-duty steel pole | Compatible Wall Types: Standard house walls, brick, and garages | VIEW LATEST PRICE | Read Our Analysis |
| Starlink Gen 3 Heavy Duty Wall Mount with Pipe Adapter |
| Best Durability | Rotational Adjustment: Freely adjustable positioning | Material Construction: Aluminum alloy with anti-corrosion black finish | Compatible Wall Types: External walls and various locations | VIEW LATEST PRICE | Read Our Analysis |
| Adjustable Starlink Gen 3 Pole Mount Kit |

| Best For Renters | Rotational Adjustment: 360° rotation and 30° tilt | Material Construction: High-quality stainless steel with waterproof coating | Compatible Wall Types: Wall, roof, and eaves soffit installation | VIEW LATEST PRICE | Read Our Analysis |
More Details on Our Top Picks
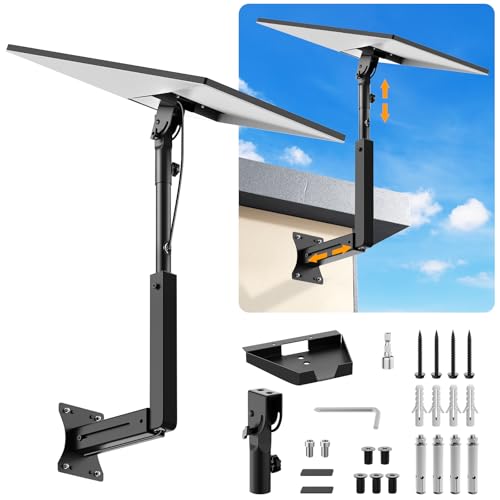
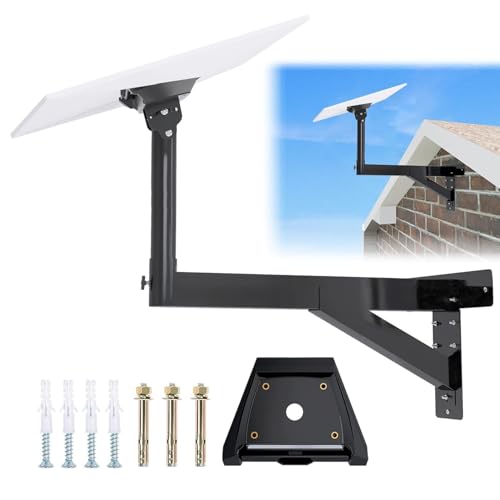
Gen 3 Mount for Starlink Adjustable Wall/Roof Kit
Looking to mount your Starlink Gen 3 dish on a wall, roof, or pole without permanent installation? This adjustable kit includes an aluminum pipe adapter, steel support tubes, and a mounting base designed specifically for your Gen 3 dish. You’ll get two screw sets—expansion anchors for concrete and lag screws for wood—plus extension screws, self-tapping screws, stainless screws, a wrench, and drill bit. The rotating rod lets you fine-tune your dish’s angle by loosening and tightening screws. The 18-inch wall mount flips to extend reach over longer eaves. Installation is straightforward: watch the provided video, follow the manual, and use included tools to secure your setup quickly.
- Rotational Adjustment:Rod rotation with screw locking
- Material Construction:Aluminum-alloy adapter with steel tubes
- Compatible Wall Types:Concrete/masonry and wooden roofs
- Included Hardware:Two screw sets, wrench, drill bit, manual
- Weather Resistance:Durable, less prone to breaking
- Installation Difficulty:Easy; watch video and follow instructions
- Additional Feature:Pipe flip for longer eaves
- Additional Feature:Aluminum pipe adapter included
- Additional Feature:Two screw set types
Starlink Gen 3 Adjustable Metal Pole Mounting Kit
The Starlink Gen 3 Adjustable Metal Pole Mounting Kit works best for users who need flexible installation options across multiple environments—whether you’re mounting on a roof, wall, RV, cruise ship, or eave—and want a solution that doesn’t require advanced technical skills. You’ll receive a metal pipe, mounting base, support base, router mount, manual, and installation accessories. The heavy-duty bracket resists deformation during harsh storms. Four square holes on each pipe end let you adjust orientation for optimal signal reception. You can install it yourself using the clear manual without specialized knowledge. The included 2-in-1 router mount manages cables efficiently in tight spaces like apartments or offices. Contact customer support if questions arise during installation or setup.
- Rotational Adjustment:Four square holes for flexible orientation
- Material Construction:Heavy-duty bracket with high-strength materials
- Compatible Wall Types:Multiple mounting options (roof/wall)
- Included Hardware:Metal pipe, mounting base, router mount, accessories
- Weather Resistance:Sturdy, resistant to deformation; handles harsh storms
- Installation Difficulty:Easy; includes accessories and clear manual
- Additional Feature:2-in-1 router mount included
- Additional Feature:Four square hole orientation
- Additional Feature:Heavy-duty storm resistant bracket
Starlink Wall Mount Gen 3 with Telescoping Arm
If you’ve got a Starlink Standard, Gen 3, or V4 antenna and you’re looking for a wall-mounted solution with positioning flexibility, the Starlink Wall Mount Gen 3 with Telescoping Arm delivers adjustable mounting with a retractable support arm that lets you move the antenna up and down or back and forth to optimize your signal reception. The mount’s angle adjustment ranges from 90° to 180°, accommodating various installation scenarios. Its top-grade metal construction resists rust, wind, and weather damage. Installation requires drilling holes into wood, brick, or concrete walls using either expansion screws or lag screws, then securing brackets and connecting the antenna. Hidden cable holes protect wiring and improve appearance.
- Rotational Adjustment:90° to 180° angle adjustment
- Material Construction:Top-grade metal, rustproof coating
- Compatible Wall Types:Wood, brick, and concrete walls
- Included Hardware:Expansion and lag screws, spacers, manual
- Weather Resistance:Rustproof, windproof, weatherproof
- Installation Difficulty:Simple; drill holes, secure brackets, plug in
- Additional Feature:Telescoping support arm design
- Additional Feature:Hidden cable hole protection
- Additional Feature:Compatible with multiple wall types
Starlink Gen 3 Mount Kit with 360° Adjustable Bracket
Want a mount that works on walls, roofs, and poles without requiring additional equipment? This comprehensive kit includes everything you need: pipe adapter, curved pipe connector, expansion screws, tension bolts, wrenches, and drill bit. The all-stainless steel construction resists corrosion and withstands winds up to 70 mph. You’ll adjust your dish using 180° vertical movement at the bracket base and 360° horizontal rotation via the adapter for precise satellite positioning. Hand-tighten the manual fixing screws to secure angles without extra tools. Select expansion screws for brick or vinyl siding, or threaded screws for wooden walls. The curved pipe design accommodates various eave widths for flexible installation on multiple surfaces.
- Rotational Adjustment:360° horizontal rotation via adapter
- Material Construction:All-stainless steel construction
- Compatible Wall Types:Various eave widths and wall types
- Included Hardware:Pipe adapter, screws, bolts, wrenches, drill bit
- Weather Resistance:Withstands winds up to 70 mph
- Installation Difficulty:Comprehensive kit; no extra accessories needed
- Additional Feature:Curved pipe design flexibility
- Additional Feature:180° vertical adjustment capability
- Additional Feature:Hand-tighten screws no tools
Gen 3 Mount for Starlink V3 Standard Dish
Looking to install Starlink on a concrete or wood wall or roof? The Gen 3 Mount provides a sturdy stainless steel solution that won’t rust or corrode. You’ll get a 90° base tilt and 360° adapter rotation for optimal positioning. The kit includes an aluminum pipe adapter, bent support pipe, extended pipe, base, wrench, four silicone pads, and installation screws. For concrete surfaces, you’ll use expansion screws; for wood, use lag screws. Setup is straightforward with a detailed instruction manual. The silicone pads protect your Starlink device during installation, ensuring both secure mounting and equipment safety.
- Rotational Adjustment:90° base tilt; 360° adapter rotation
- Material Construction:Stainless steel with rust-proof finish
- Compatible Wall Types:Concrete or wood walls/roofs
- Included Hardware:Aluminum adapter, steel pipe, wrench, silicone pads, manual
- Weather Resistance:Rust-proof and weather-proof
- Installation Difficulty:Easy, quick setup with detailed manual
- Additional Feature:Silicone pads device protection
- Additional Feature:Extended pipe included
- Additional Feature:90° base tilt adjustment
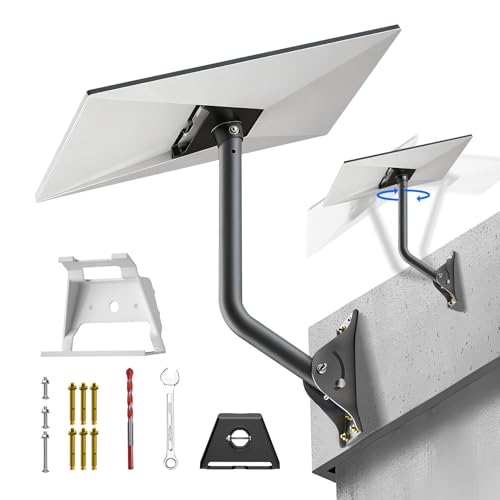
Gen 3 Mount for Starlink V3 360° Adjustable
The Gen 3 Mount for Starlink V3 360° Adjustable works best for you if you own a Starlink V3 or 4X dish and need reliable, weather-resistant mounting on a wooden roof or wall. This mount features rust-resistant aluminum alloy and reinforced steel tubing that withstands extreme weather and UV exposure. You’ll get 360° rotation capability, allowing you to position your dish vertically or horizontally for optimal signal reception. Installation is straightforward—the included lag screws secure the mount firmly to wooden surfaces. You receive a complete instruction manual and video guide to walk you through setup. The brand Gitaobac backs this product with a one-year warranty and typically offers a 30-day Amazon return window.
- Rotational Adjustment:360° rotation for signal optimization
- Material Construction:Rust-resistant aluminum alloy and steel tubing
- Compatible Wall Types:Wooden roofs (with lag screws)
- Included Hardware:Lag screws, manual, video guide
- Weather Resistance:Withstands extreme weather and UV exposure
- Installation Difficulty:Easy; step-by-step manual and video guide
- Additional Feature:5X stronger structure reinforcement
- Additional Feature:Premium heavy-duty construction materials
- Additional Feature:Video guide included setup
Starlink Gen 3 Wall/Roof Pipe Mount Kit with Adapter
If you’re installing a Starlink Gen 3 or 4X dish on a wall or roofline and need both outdoor and indoor mounting solutions in one kit, the Starlink Gen 3 Wall/Roof Pipe Mount Kit with Adapter delivers everything you’ll need. The outdoor mount features CNC-machined aluminum and galvanized steel pipes that resist extreme temperatures and 75 mph winds. You’ll adjust the dish using 360° rotation on the bracket and 180° rotation at the base for optimal signal alignment. The included router mount uses high-quality ABS plastic with silicone pads to protect your walls. Install the router on any wall or table, angling it as needed. The kit includes pipes, screws, a support base, wrench, and drill bit for complete installation.
- Rotational Adjustment:360° rotation on bracket; 180° at base
- Material Construction:CNC-machined aluminum alloy with galvanized steel pipes
- Compatible Wall Types:Standard house walls and wooden roofs
- Included Hardware:Aluminum adapter, pipes, router mount, screws, wrench, manual
- Weather Resistance:Withstands -40°F to 200°F, 75 mph winds, snow loads
- Installation Difficulty:Easy; everything needed for hassle-free setup
- Additional Feature:CNC-machined aluminum alloy adapter
- Additional Feature:Dual-length reversible pipe accommodation
- Additional Feature:Indoor router mount included
IZLTUV Gen 3 Starlink Wall Mount Kit with Adapter
Want to mount your Starlink V3 dish securely on a wall without complicated installation? The IZLTUV Gen 3 Starlink Wall Mount Kit offers a straightforward solution. You’ll receive an aluminum alloy adapter, heavy-duty steel pivot pole, adjustable base, hardware, and instructions. The pivot pole rotates 135° so you can adjust your dish’s angle for optimal signal reception. Mount the kit directly onto standard house walls, brick, or garage surfaces using the included wall anchors. The thickened steel construction withstands challenging weather conditions. Simply assemble the components, secure the adapter to your Starlink V3 dish, attach the pivot pole, fasten the base to your wall, and fine-tune the angle for best performance.
- Rotational Adjustment:135° pivot pole range
- Material Construction:Aluminum alloy adapter with heavy-duty steel pole
- Compatible Wall Types:Standard house walls, brick, and garages
- Included Hardware:Adapter, base, pivot pole, screws, anchors, wrench, manual
- Weather Resistance:Engineered for challenging weather conditions
- Installation Difficulty:Ready to install out of the box
- Additional Feature:135° pivot pole range
- Additional Feature:Extra-thickened steel construction
- Additional Feature:Adjustable base angle tuning
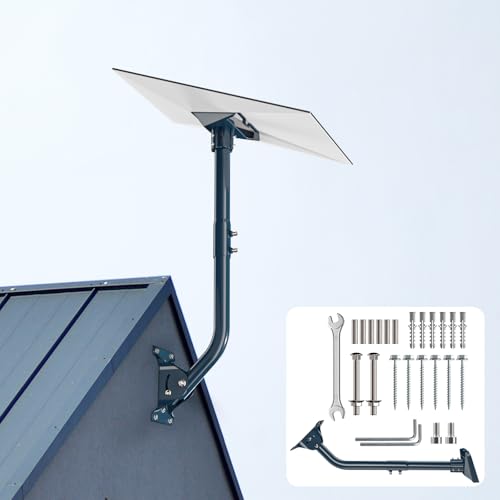
Starlink Gen 3 Heavy Duty Wall Mount with Pipe Adapter
For anyone installing Starlink Gen 3 satellite internet on external walls or near eaves, this heavy-duty wall mount delivers the stability you’ll need in challenging weather conditions. The triangular base with diagonal pole support creates a stronger structure that resists strong winds. You’ll benefit from the anti-corrosion black finish that protects against rust and weather damage over time. Installation includes two types of wall mounting screws and a pipe adapter designed specifically for Starlink Gen 3. The buckle design allows screw-free installation, preventing potential damage to your satellite dish. You can select your installation location based on your actual setup requirements. The manufacturer provides installation instructions and videos to guide you through setup.
- Rotational Adjustment:Freely adjustable positioning
- Material Construction:Aluminum alloy with anti-corrosion black finish
- Compatible Wall Types:External walls and various locations
- Included Hardware:Pipe adapter with buckle design, screws, manual, video
- Weather Resistance:Wear and weather resistant for extended life
- Installation Difficulty:Quick installation with instructions and videos
- Additional Feature:Triangular base diagonal support
- Additional Feature:Buckle design screw-free installation
- Additional Feature:Extended eave accommodation length
Adjustable Starlink Gen 3 Pole Mount Kit
The Adjustable Starlink Gen 3 Pole Mount Kit’s 360-degree rotation and 30° tilt capability make it your best option if you’re mounting your dish on a wall, roof, or eaves soffit where you need to optimize signal reception without permanent repositioning. The kit includes a pipe adapter, pole, and essential fasteners for secure installation. You’ll drill holes into your chosen surface, secure the bracket firmly, then slot your Starlink dish into place. The stainless steel construction with waterproof coating withstands harsh outdoor conditions and moisture. The hidden antenna design protects your equipment while maintaining a clean appearance alongside your Starlink device.
- Rotational Adjustment:360° rotation and 30° tilt
- Material Construction:High-quality stainless steel with waterproof coating
- Compatible Wall Types:Wall, roof, and eaves soffit installation
- Included Hardware:Pipe adapter, pole, screws, and accessories
- Weather Resistance:Built to withstand harsh outdoor and damp conditions
- Installation Difficulty:Easy; drill holes, secure bracket, slot in place
- Additional Feature:30° tilt adjustment capability
- Additional Feature:Brushed hardened PBT surface
- Additional Feature:Hidden antenna design protection
Factors to Consider When Choosing Starlink Wall Mounts
When you’re selecting a wall mount for your Starlink dish, you’ll need to verify compatibility with your specific Starlink model, assess the material’s durability against weather conditions in your area, and check the adjustment range to ensure you can achieve the proper angle for optimal signal reception. Next, examine the installation hardware included with the mount—verify that it’s suitable for your wall type, whether that’s wood, brick, metal, or composite materials—and confirm you have the tools needed for setup. Finally, consider how much flexibility you need for future adjustments, since some mounts offer tilt and rotation capabilities while others provide fixed positioning.
Compatibility With Starlink Models
Which Starlink model you own directly determines which wall mount’ll work for your dish. Gen 3 Standard Dish models use different mounts than Gen 3/4X or Mini variants. Check your dish’s generation first, then match it to the mount’s compatibility list. Some mounts work exclusively with Gen 3 Standard setups, while others accommodate both Gen 3 and 4X models. Mini and Gen 2 dishes require specific mounts not suitable for other generations. Actuated versions need different mounting hardware than standard models. Before purchasing, verify the mount packaging or product description states compatibility with your exact Starlink model. Mismatched equipment results in improper alignment, reduced signal strength, or installation failure. Take time to confirm specifications match your dish before ordering.
Material Durability And Weather Resistance
Once you’ve confirmed your Starlink model’s compatibility, you’ll need to evaluate the mount’s material composition and weather-resistance features to ensure long-term performance. Look for aluminum-alloy adapters and stainless steel components, which offer superior corrosion resistance in outdoor conditions. Check that the mount has rust-proof and weather-proof finishes to protect against sun, rain, and humidity exposure. Examine the construction for heavy-duty features like thickened pivot parts and reinforced tubing, which increase load-bearing capacity and wind tolerance. Verify that all-metal or stainless assemblies can withstand harsh weather and UV exposure year-round. Confirm the mount includes anti-corrosion coatings, such as black finishes, that reduce wear and extend service life. These material choices directly impact your mount’s durability and reliability.
Adjustment Range And Flexibility
How do you know if a mount’ll give you the precise positioning your Starlink dish needs? Check the adjustment range first. Most quality mounts offer 360° horizontal rotation, letting you aim your dish in any direction. Look for models with 90° to 180° vertical adjustment angles to fine-tune elevation based on your location and obstacles. Some mounts include telescoping arms that extend or retract, accommodating different wall depths and eave clearances. Dual-direction adjustment at both the bracket base and adapter enables simultaneous vertical and horizontal tuning without repositioning your entire setup. Consider mounts with 30° incremental tilt settings to optimize your sky view while maintaining secure connection. Evaluate your specific installation location, then select a mount matching those adjustment requirements.
Installation Hardware And Ease
After you’ve determined your mount’s adjustment range, you’ll need to evaluate what hardware comes in the kit and how straightforward the installation process is. Most quality mounts include expansion anchors for concrete or masonry walls and lag screws for wooden surfaces, allowing you to install on your preferred substrate without purchasing additional fasteners. Check whether the kit provides essential tools like wrenches and drill bits, which eliminate the need for extra equipment. Some packages bundle stainless steel fasteners that resist corrosion and weathering. Advanced kits may include pipe adapters, support bases, and spacers that ensure secure connections between your dish and bracket. Built-in cable management features protect wires from damage and improve your installation’s appearance. Verify that your chosen mount supplies everything necessary for quick, efficient installation.
Mounting Surface Type Options
What surface you’re mounting your Starlink dish to will determine which fastening method and hardware you’ll need to use. Wooden surfaces require lag screws that create a tight, secure fit directly into the wood. Concrete and masonry demand expansion screws paired with wall plugs to anchor properly into dense materials. Brick, vinyl siding, and fiber cement also work with expansion screws, making them versatile substrate options. For outdoor installations, you’ll want corrosion-resistant hardware and weatherproof adapters to prevent rust and water damage on exposed surfaces. Many mounting kits include drill bits and wall plugs specifically designed for concrete or masonry work. Check your kit’s specifications to confirm compatibility with your wall type before purchasing or installing your mount.
Weight Capacity And Stability
Once you’ve confirmed your mounting surface can accommodate the fasteners, you’ll need to evaluate whether your chosen mount can handle both the Starlink dish’s weight and environmental forces like wind. Check the manufacturer’s weight capacity rating and compare it to your dish’s actual weight plus any additional hardware. Look for mounts with reinforced aluminum or steel tubing bases, which resist higher loads and wind stress. Verify that angle locks and adjustment screws lock securely without slipping under pressure. Extended pipe configurations require stronger mounting surfaces and fasteners to prevent leverage-related failures. For outdoor installations, choose corrosion-resistant finishes like stainless steel or coated metals to maintain structural integrity over time. Match your fastener type—expansion screws for concrete, lag screws for wood—to your specific substrate for optimal support.
Cable Management And Aesthetics
How you route and conceal your Starlink cables directly affects both the installation’s appearance and the longevity of your wiring. Quality mounts feature hidden cable holes and dedicated routes that protect wires from weather exposure and physical wear. Look for mounts with rubber or silicone pads that prevent chafing where cables contact mounting points. Adjustable arms and brackets let you direct cables along discreet paths while keeping your dish properly aligned. Many full kits include mounting hardware and routing guides that simplify cable management from the dish to your indoor equipment. Choosing a mount with these cable management features keeps your installation looking clean and organized while extending your equipment’s lifespan.
Final Thoughts
You’ve now reviewed the top 10 Starlink wall mounts designed for universal compatibility. When you’re ready to purchase, verify your dish model (Gen 3, 4X, or Mini), confirm the mount’s rotation and tilt ranges meet your needs, and check that installation hardware matches your surface type. Select corrosion-resistant materials, ensure weatherproof construction, and install following the manufacturer’s instructions. Proper mounting guarantees optimal signal reception and equipment longevity.
Meet Ry, “TechGuru,” a 36-year-old technology enthusiast with a deep passion for tech innovations. With extensive experience, he specializes in gaming hardware and software, and has expertise in gadgets, custom PCs, and audio.
Besides writing about tech and reviewing new products, he enjoys traveling, hiking, and photography. Committed to keeping up with the latest industry trends, he aims to guide readers in making informed tech decisions.