If you’re any kind of gamer, from casual to pro, you know how much your equipment matters. With the wrong controller, display, or headset, you won’t be performing at your best. Having the right gear won’t automatically turn a beginner into a pro. But between two players of similar skill and experience, good gear can make the difference. The same principle applies to streaming. Having a great camera or top-notch microphone won’t put you on the front page of YouTube. But poor sound or grainy video will make your streams and pre-recorded videos less appealing. Take a look at some of the top Twitch streamers, and how slick their videos look. That’s what you’re competing with.
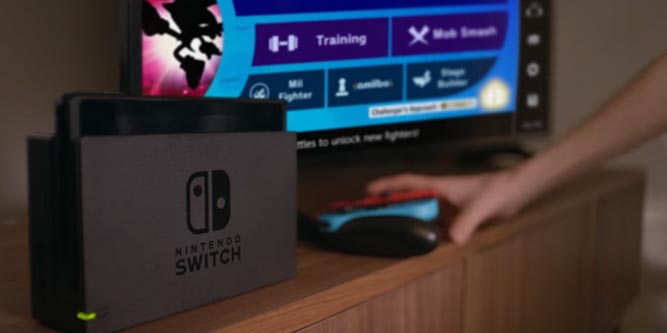
Today, we’re going to focus specifically on streaming equipment for the Nintendo Switch. Every game platform is a little different, and requires its own types of equipment. This is especially true for the Nintendo Switch, due to its hybrid design. There are any number of gadgets a streamer could use in the content creation process. Depending on your needs, you might use a greenscreen or advanced editing software. For now, we’re going to stick with the basics. We’ll talk about the best capture card, webcam, microphone, and headset. This equipment is all you really need to get started streaming. As you get more experience, you can add more equipment depending on your needs. Let’s get started!
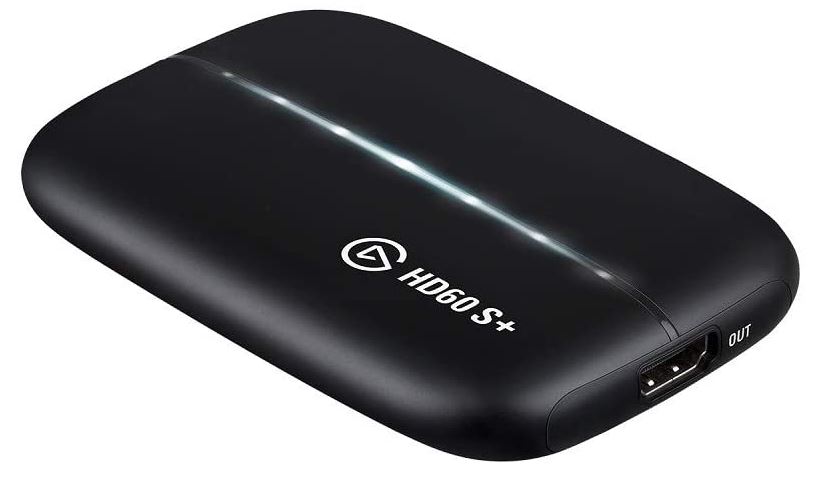
Elgato HD60 S+
Elgato is a famous manufacturer of all kinds of audio and video technology. A capture card is an essential piece of equipment if you’re streaming from any console. It takes the raw HDMI video from your console and converts it into a compressed video format. This format can then be streamed to the web, or edited with your favorite editing software. Without a capture card, you won’t have any way of actually using your console’s video output.
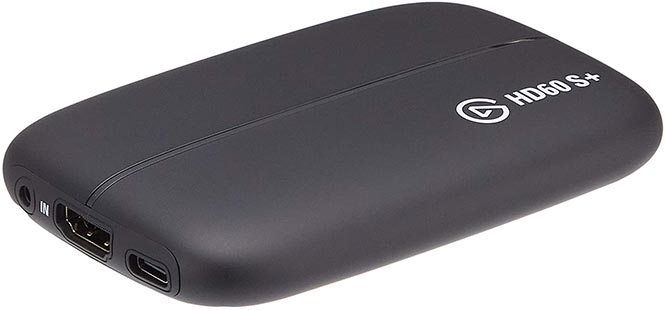
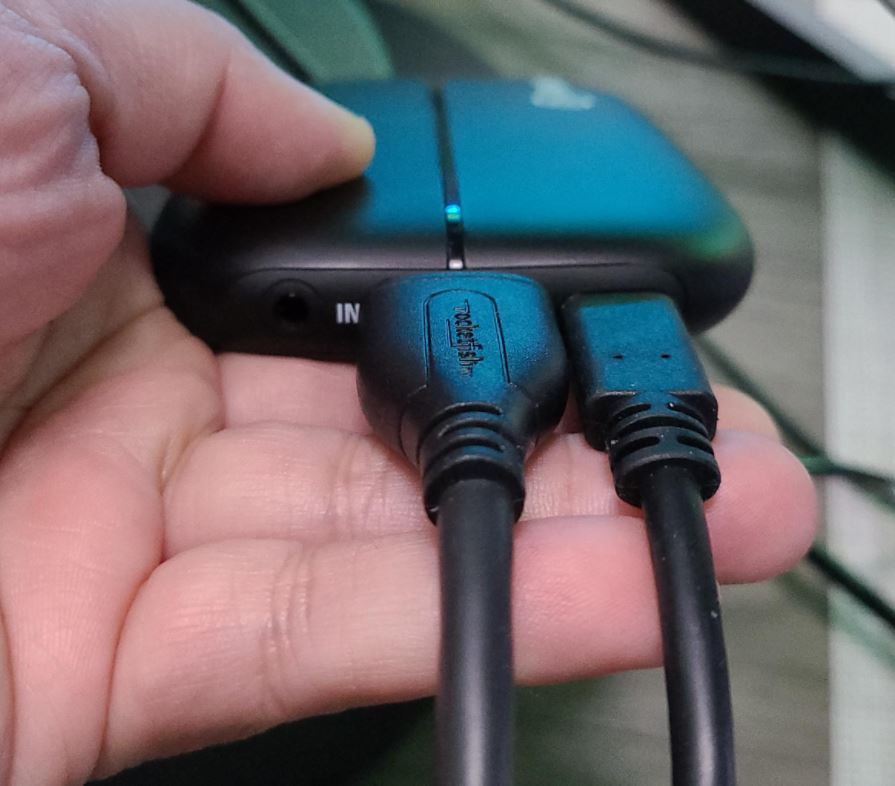
The Elgato HD60 S+ is a full-sized capture card, with a bit more capability than the Cam Link. That said, “full-sized” is a relative term. You’re still looking at a compact device, with a 4.41-inch length, a 2.95-inch width, and an 0.75-inch thickness. The housing is matte black, with an extended oblong shape and smooth, rounded edges. On one end, you’ll find the HDMI output port, which connects to your PC. On the other end, there’s an HDMI input to accept the signal from your console. This same end also has a USB Type-C power port, along with a 3.5mm aux port. The top of the housing sports an LED stripe, which illuminates whenever the card is active.
There are a couple of different ways to use the HD60 S+. The first is a simple pass-through mode, which is what you’d use for live-streaming. Video and audio are sent to the capture card, which compresses it in real time and sends it to your PC. In pass-through mode, you’ll have a maximum video quality of 4K, at 60 frames per second. In practice, you’ll only get 1080p, because that’s the Switch’s native resolution. But you’ll still be capturing video in the highest possible quality.
Alternatively, you can use the capture card as a standalone recording device. This isn’t useful for live-feeds, but it’s incredibly helpful for pre-recorded videos. You can capture recordings anywhere in the world, with just your console and the card. Then, you can transfer the footage to your computer later for editing and uploading. Even if recording is not active at the moment, you can go back and pick up events that have just happened. Using the flashback recording function, you can capture random, unplanned moments for later uploading. In recording mode, your videos will be saved in 1080p, at a rate of 60 frames per second.

Along with capturing your game footage, you can also use the HD60 S+ for your voice chat. Using the 3.5mm aux jack, your voice recording will be sent forward to your computer. Even better, the voice chat will be saved as a separate audio track. This makes it far easier to edit your footage later on, since your audio channels are separate.
As far as compatibility goes, you don’t have to worry about any issues. Not only does this capture card work with the Nintendo Switch, it also supports Xbox and PlayStation consoles. So if you want to stream from multiple platforms, you’ll be able to do that. The output is universal, and works with PC and Mac, as well as OBS Studio and other popular streaming software.
Logitech Brio 4K Webcam
Logitech is one of those brands that needs no introduction. Any time you’re talking about computer or gaming accessories, Logitech is on our short list of brands.
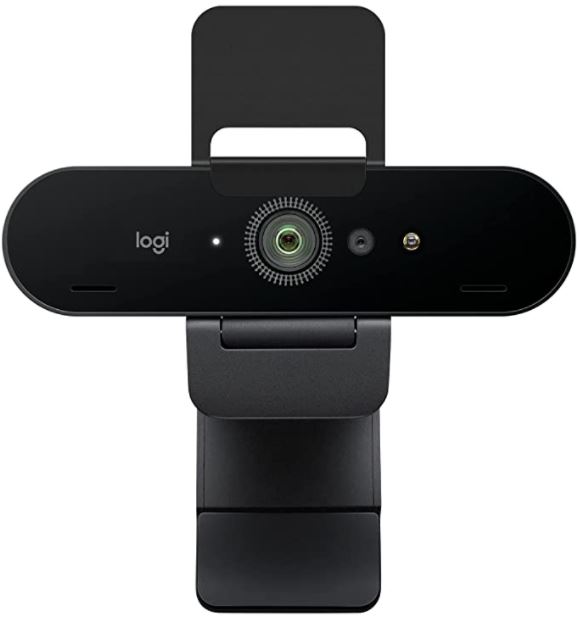
The Logitech Brio 4K Webcam has a black rectangular housing, with an extra-wide oval shape. The total dimensions are 4 inches wide, one inch high, and an inch thick. This wide profile is designed to support a pair of stereo mics, which are built into the “wings” of the housing. The lens itself is located in the center, and recessed into the main housing with a tough outer glass layer. This keeps the lens safe, and provides a clear view. The main camera body has a plastic stand, which is designed to clip onto the top of your monitor. Another part of the bracket has a little privacy cover, which can fold over the lens when not in use.
This camera captures video in full 4K resolution. That’s a lot higher than most webcams, and you might think it’s more than necessary. After all, most streaming sites still don’t support anything higher than 1080p, in order to preserve bandwidth. The reason to use a 4K camera is because you might want to apply effects or perform editing. When you process a digital video, you’re always losing a little bit of detail from the original. So if you start with 4K instead of 1080p, your final 1080p product will still be crisper and clearer. The maximum framerate is 90FPS, probably more than is necessary for a webcam.
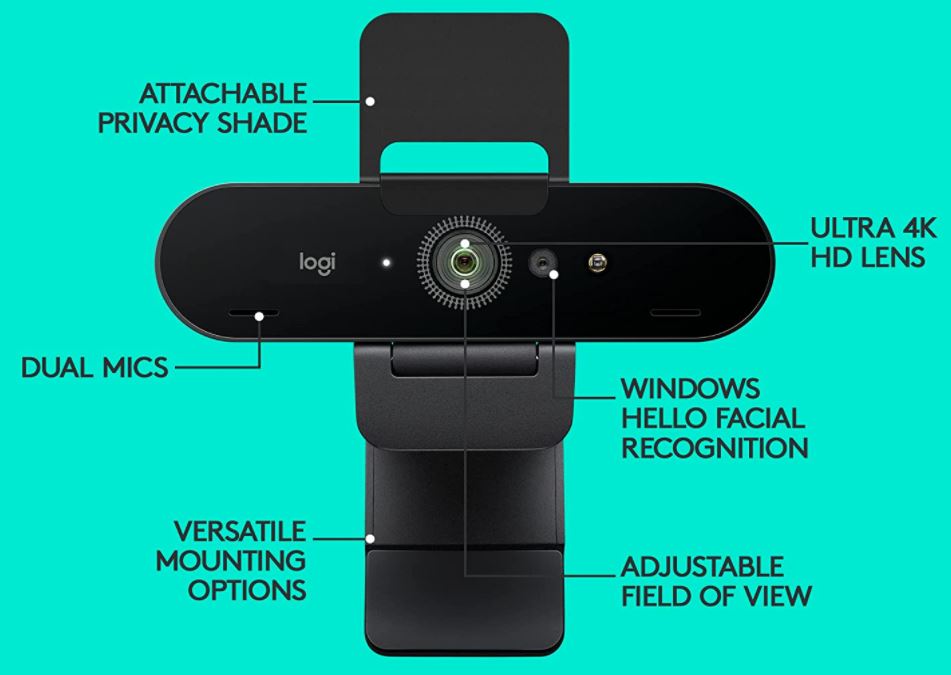
The Brio 4K will automatically adjust its sensitivity based on the current light level. As lighting conditions change, your face won’t constantly shift from light to dark. There’s a few milliseconds’ delay, but for the most part, the transitions are pretty smooth. In addition to that, you can install the free Logi Tune software to make additional adjustments. Note that this software is not required – the camera will work just fine without it. It’s plug and play on both Windows and Mac.
Using Logi Tune, you can switch between three different fields of view: 90, 78, and 65 degrees. This allows you to get a wider view of your room, or a tighter view of your face. Keep in mind that conferencing software like Zoom will take the direct feed from your camera. Since it’s not passing through the software, you’ll only be able to get a 90-degree field of view. But if you’re using recording software like OBS, you won’t have any issues. And if you do, you’re covered by Logitech’s 12-month manufacturer’s warranty.
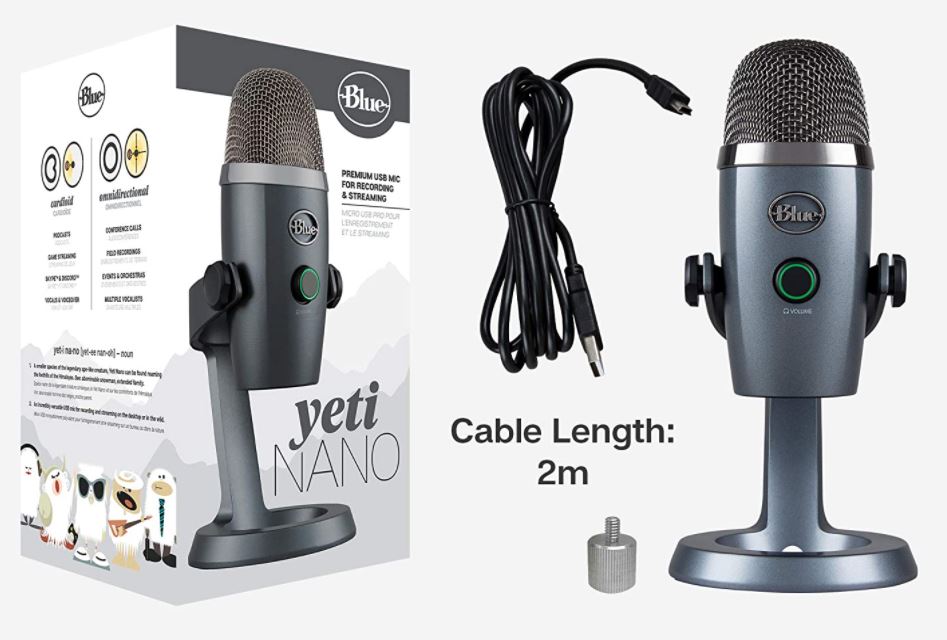
Blue Yeti Nano Premium USB Microphone
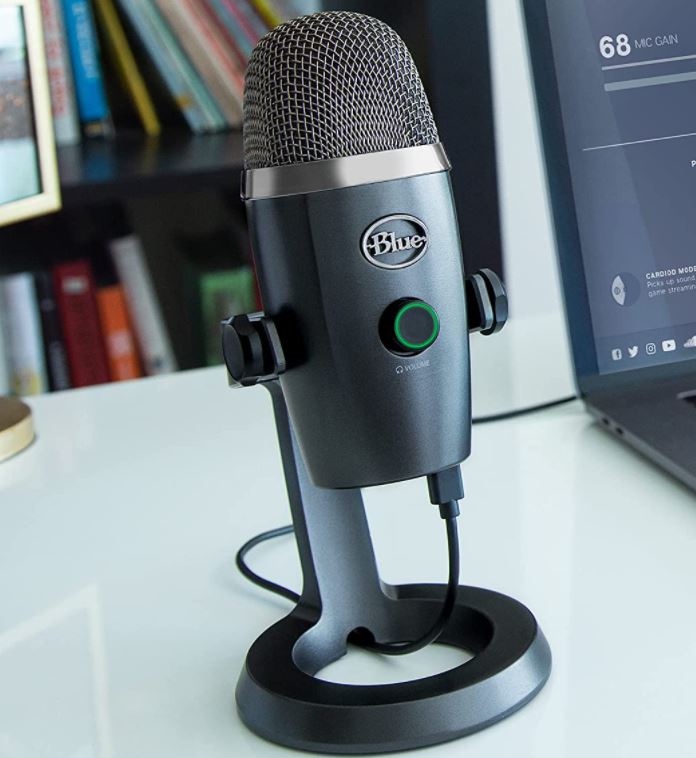
The Blue Yeti Nano Premium USB Microphone has a chubby, barrel-style design with a matte plastic housing. It’s available in black, red, grey, or blue, to meet a variety of tastes. Stick with black if you don’t want your mic to attract attention, or shoot for something more colorful. The lower portion of the housing has a gain dial on the front, with a Blue logo directly above it. The upper portion consists of a metal mesh cover, which protects the main mic element.
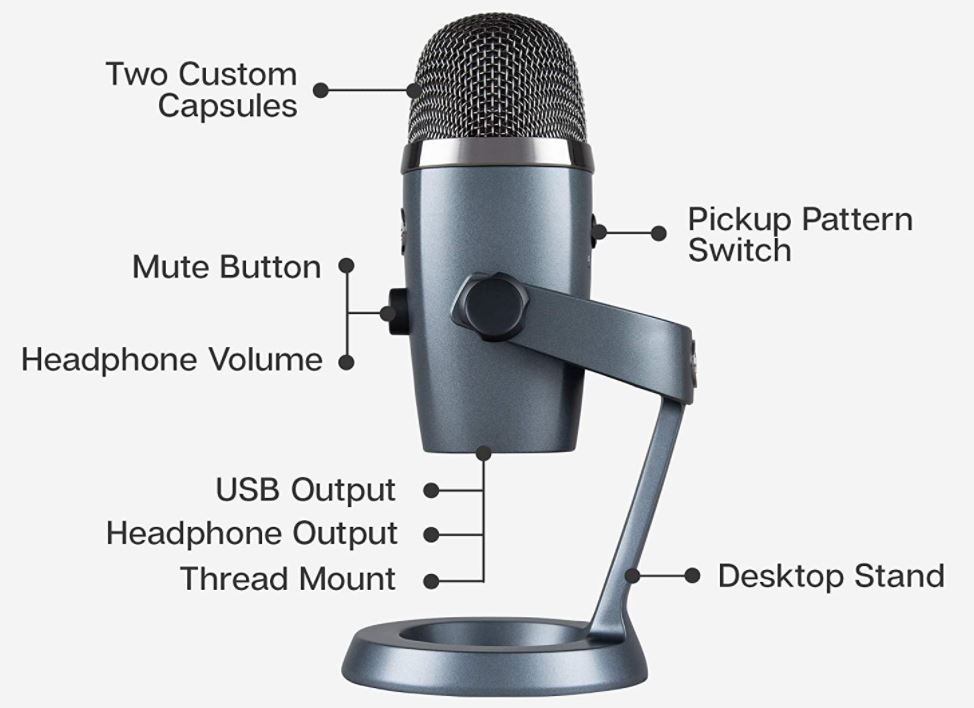
Both sides of the mic attach to the arms of a swivel mount, which sits on a vertical arm. This arm attaches to a round ring base, which is both lightweight and stable. As a result, it’s easy to use the Nano on your desk. Alternatively, it has a threaded base, so you can attach it to a tripod or other mic mount.
The back side of the case has a pickup pattern button with a pair of indicator lights. This button lets you switch between two different mic patterns. The first is a standard cardioid pattern, which is standard for condenser mics. Sensitivity is very high to the front, falls off to the sides, and is dead in the back. This is ideal for when you’re recording by yourself in a room, since you won’t pick up much background noise. The second pickup pattern is omnidirectional, which picks up noise from all 360 degrees. This picks up more background noise, but allows you to record two or more speakers with one mic.
The audio quality is a bit bass-heavy, but you still get plenty of response across all frequencies. We wouldn’t use it for recording music, but for the spoken word, it sounds excellent. It connects to your computer via USB, and it’s plug and play on both Windows and MacOS. There’s also a little 3.5mm aux port in the bottom, so you can monitor in real time as you record.
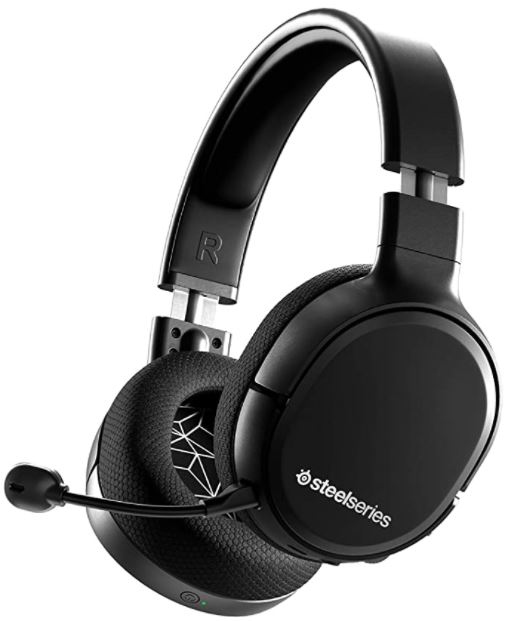
SteelSeries Arctis 1 Wireless Gaming Headset
SteelSeries is well-known for their high-quality gaming accessories. The SteelSeries Arctis 1 Wireless Gaming Headset continues in that same tradition of quality. This headset has big, wide ear cups, with thick fabric pads that are comfortable enough to wear all day. The plastic housing is available in black or white to meet all tastes, and the ear cups swivel for comfort. The head band is adjustable, and is steel-reinforced for extra strength. Despite this, it’s flexible, and springs back into place if it’s twisted.
On the left ear cup, you’ll find a black gooseneck mic, which is easy to twist out of the way. The same ear cup also has a volume dial and a mute switch to control your in-game chat. The power button is located on the right ear cup.
The Arctis 1’s internal battery is rated for 20 hours per charge, which is pretty impressive. This assumes you’re listening at medium volume, but you’re looking at tons of performance regardless. And with the USB charging cable, you can fully charge the battery in only a couple of hours.
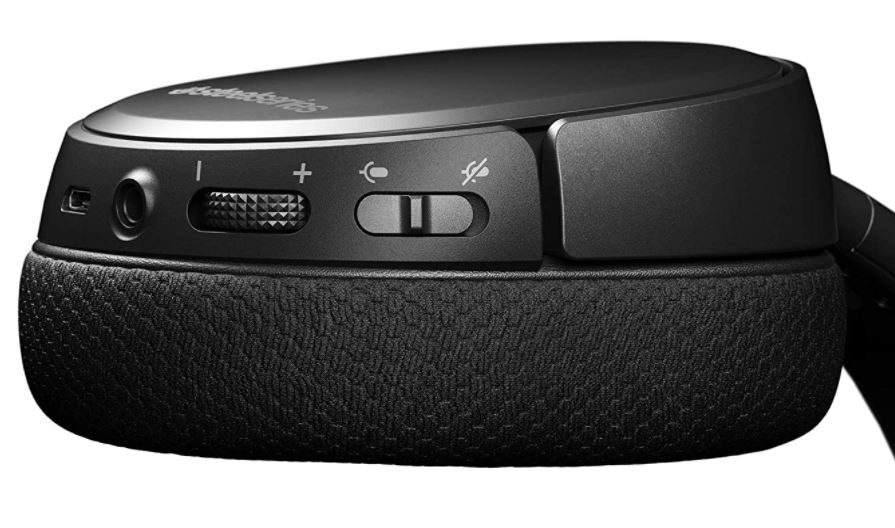
To connect to your Switch, you just use the little USB Type-C fob. This is included in the kit, and pairs with the headset via 2.4GHz wireless. This is perfect for the Switch, because of the front-center location of the Type-C port. Alternatively, you can use the 3.5mm aux cable, which plugs into the left ear cup. This won’t drain any batteries, but you won’t be able to mute or adjust the volume.
Final Verdict
As you can see, all of these devices make a great part of any beginning streamer’s kit. Let’s go over what we’ve learned. We began by looking at the Elgato HD60 S+. This powerful little capture card can record your video in 4K, and supports 1080p, 60FPS live streams. It’s easy to set up and use, and compatible with almost any recording software. And despite its capabilities, it’s still small enough to carry around in your pocket.
The Logitech Brio 4K Webcam is a solid choice for any Switch streamer. The 4K video gives you excellent quality for processing, and it’s easy to mount and use. An adjustable field of view is great for close angles, and the free software takes minutes to set up. All in all, this is a reliable performer.
The Blue Yeti Nano Premium USB Microphone is an affordable USB mic that’s great for the human voice. It’s easy to set up, and can be used with the factory stand or an aftermarket tripod. And for your in-game communications, the SteelSeries Arctis 1 Wireless Gaming Headset is an ideal companion. It’s comfortable to wear, with a battery that will last all day.
Meet Ry, “TechGuru,” a 36-year-old technology enthusiast with a deep passion for tech innovations. With extensive experience, he specializes in gaming hardware and software, and has expertise in gadgets, custom PCs, and audio.
Besides writing about tech and reviewing new products, he enjoys traveling, hiking, and photography. Committed to keeping up with the latest industry trends, he aims to guide readers in making informed tech decisions.