In the world of console gaming, some hardware achievements stand out more than others. For example, take the Nintendo Wii. First launched in 2006, the Wii ultimately sold more than 100 million units, making it the sixth-best selling console ever. This was a tough act to follow, but Nintendo lived up to their reputation. In 2017, they released the Nintendo Switch, a hybrid console that can also be used in handheld mode. It’s now sold more than 50 million units, over 60 million if you count Switch Lite sales. Even using the lower number, the Switch has outsold the Super NES, earning it a place in gaming history.
Of course, the Switch requires a battery to operate in handheld mode. For this purpose, it relies on an internal rechargeable battery pack. This battery pack is convenient in that it’s much smaller than a comparable “standard” battery. It allows for a slim form factor that makes the Switch more portable. Unfortunately, even the best battery needs to be replaced after it’s been through enough charge cycles. We’ve reviewed a number of Nintendo Switch accessories, from charging stations to replacement thumb sticks. Today, we’ll be looking at three different replacement Switch batteries.
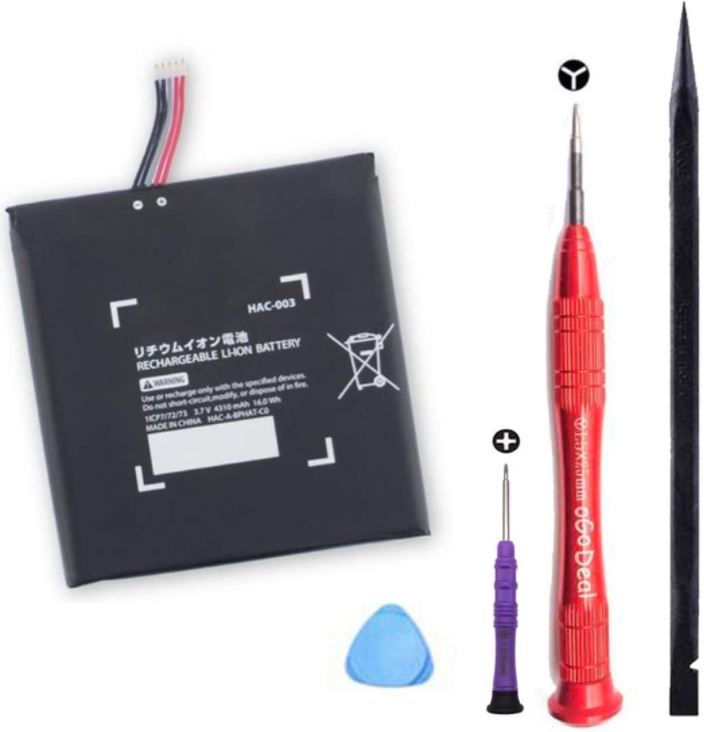
First up on our list is the oGoDeal HAC-003 Battery Replacement. First up is the oGoDeal HAC-003 Battery Replacement. This is a complete replacement kit, along with all the tools you need. However, it’s not compatible with newer Switch variants. Next, we’ll review the BatteryMon HAC-003 Battery Replacement. This is a universal replacement battery, but it doesn’t include any tools. Finally, we’ll look at the Antank HAC-003 MARlO Edition Battery Replacement Kit. This battery is also universal, and also includes all the tools you need for installation. Let’s take a closer look, and see what each battery brings to the table!
About the Original Nintendo Switch Battery
Before we talk about actually replacing your battery, it’s important to understand the dead one inside your Switch. You see, there isn’t just one universal “Nintendo Switch battery”. In fact, there are two. The first model, model HAC-001, was used from 2007 until August of 2019. At that point, Nintendo upgraded to model HAC-001(-01), which offered an increased, 4,310mAh capacity. This was a 20 percent increase over the original 3,600mAh model, and a 30 to 50 percent increase in play time. If you’re not sure which console version you own, check the back. You’ll find the model number on the label with the rest of the product information.
Internal rechargeable batteries have a number of advantages. The biggest is size, where they can fit into very small spaces. Unfortunately, changing a dead internal battery can be a bit of a pain. Originally, this wasn’t supposed to be an issue. When the Switch first launched, Nintendo claimed they would be offering a paid battery replacement service. Unfortunately, they never followed up on that claim, which means you’ll have to do the job yourself. There is one exception to this, though. If your Switch is still under warranty, contact Nintendo customer service. During your warranty period, they will replace a failed battery at no cost to you.
How to Replace Your Nintendo Switch Battery
If your battery has died and won’t recharge, it’s time for a replacement. The bad news is that you’re most likely going to have to do the job yourself. The good news is that it’s a relatively simple job. Before you begin, let your Switch battery drop down below 25 percent. There’s no need to totally kill the battery. However, keeping it below 25 percent makes it less likely to explode or catch fire if it’s punctured. Considered that you’re about to be prying it out, taking this safety measure is only prudent.
The next thing you need to do is remove the rear panel. This is the large black panel that covers the entire back of your Switch unit. Get your Y00 tri-point screwdriver and Phillips #00 screwdriver handy. You’ll also want a dish or some plastic bags to hold onto the removed screws. Keep in mind that most of the screws are different lengths, and the differences are subtle. If you keep them organized while you’re taking them out, reassembling your Switch will be a lot easier.
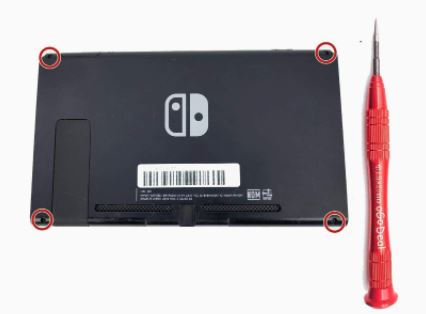
First, remove the four tri-point screws from the corners of the rear panel. These are the only tri-point screws on the panel, so you can set that screwdriver aside for now. Next, flip your Switch on its head and remove the two Phillips #00 screws on either side of the charging port. While you’re at it, flip open the kickstand and remove the screw that’s hiding under there. Now look at the top of the Switch and remove the screw next to the air vents. Finally, remove the center screw on both the left and right Joy-Con rails. You can ignore the other screws on the rails, since they have nothing to do with this procedure.
Wow! That was a lot of screws! Pull off the rear panel, and you’re going to see yet another panel, this one made of shiny aluminum. Before you remove that, though, you’re going to have to take out the Micro SD card reader. This will be easy to find; it’s the shiny gold thing at the bottom left side of the unit. Remove the screw, then lift the board out gently. Keep it as level as possible as you lift it, since this will make the black connector pull out more cleanly. During re-installation, just press on the foam pad. Be careful to have the card properly lined up, though, to avoid damaging anything.
Once the SD card reader is gone, the aluminum shield plate will be easy to remove. Unscrew the six screws, including the one in the center, and lift it off. Do this carefully. There’s a layer of thermal compound between the plate and the heatsink. To get the best results, you can replace this paste. However, if you’re careful and keep it all in place, you shouldn’t have to replace anything.
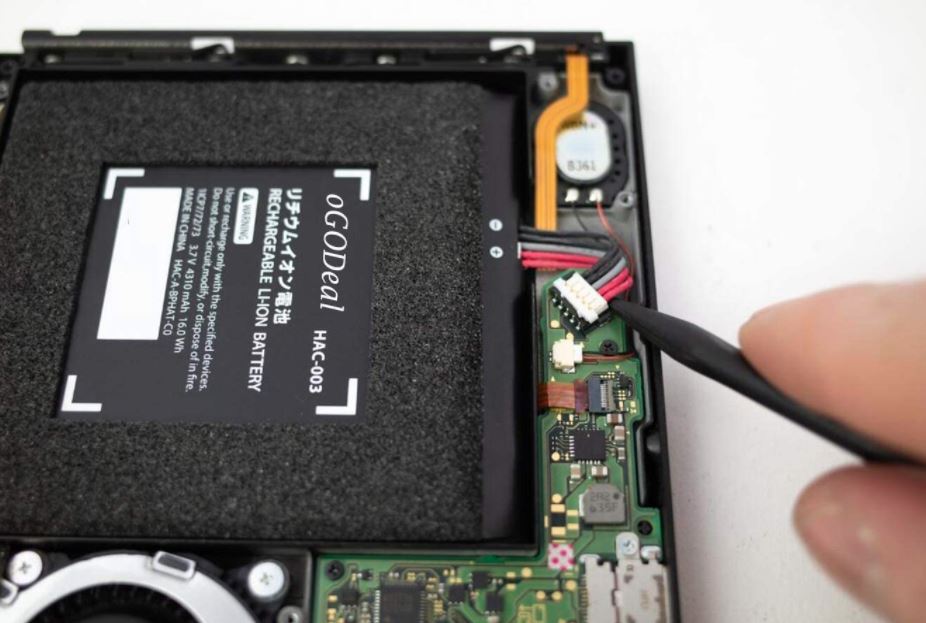
Underneath the plate, you’ll see the battery. Sometimes, it’s partially covered in foam, while other times it’s fully exposed. Either way, the first thing you need to do is disconnect the battery from the power supply. You can do this by prying up on the white connector with a plastic spudger. If you don’t have a spudger, use a wood tool. A metal tool such as a screwdriver can easily damage the connection.
Once the battery is disconnected, pry it loose with a plastic spudger. In some cases, the battery may be held in place with adhesive. If this is the case, apply isopropyl alcohol or adhesive remover liberally along one edge of the battery. Tilt your Switch to spread the alcohol under the battery, and wait three to five minutes for it to work. Now, try prying the battery again. If you need to, apply more solvent. Under no circumstances pry hard enough to damage the battery. If you do that, it might leak toxic chemicals, which could burn you or damage the Switch.
Finally, it’s time to insert your new battery. Before you do, clean out any residual solvent, and apply double-sided adhesive in the battery compartment. Press your new battery into place, and plug it into the motherboard. From there, it’s just a matter of screwing everything back together. Now that we know what we’re dealing with, let’s look a bit more closely at each of these replacement batteries!
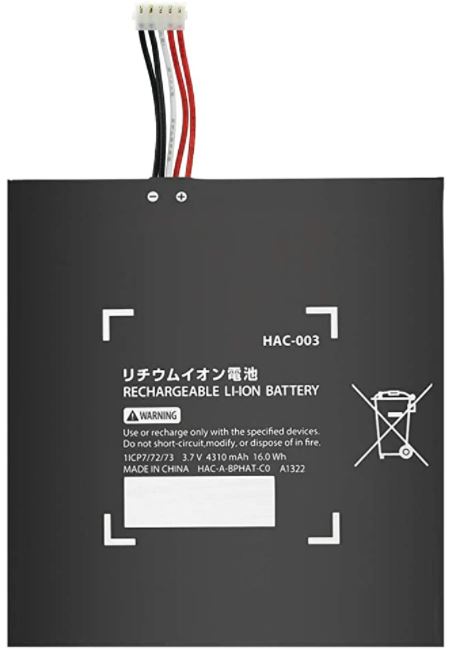
oGoDeal HAC-003 Battery Replacement
The oGoDeal HAC-003 Battery Replacement is designed to replace older Nintendo Switch batteries. As a result, it’s compatible with HAC-001 Switch units, but not with HAC-001(01) devices. On the other hand, it’s very affordable, so it’s a great value if you have an earlier model Nintendo Switch. Not only that, but even though it’s only compatible with older systems, it still has a 4,310mAh capacity. This makes it a significant upgrade over the original Switch battery. This battery comes with 24-hour customer service, as well as a 30-day money back guarantee. Considering the fact that a battery either works or doesn’t, 30 days should be more than long enough.
Along with the battery itself, the oGoDeal kit includes all the tools you need for replacement. To begin with, you get Phillips #00 and Y00 tri-point drivers. They’re both compact, with a textured, ribbed finish that makes them easy to grip with two or three fingers. The kit also includes a pair of spudgers. One is long and slender, designed primarily for connectors. The other looks like a guitar pick, and is ideal for prying out your Switch’s battery.
BatteryMon HAC-003 Battery Replacement
If you have a newer Nintendo Switch, you need a compatible battery. In this case, the BatteryMon HAC-003 Battery Replacement is a solid choice. It’s identical to the original OEM battery, so you can use it with any Switch, new or old. Indeed, it’s great for older Switch owners if you already own assembly tools. Unfortunately, there are no tools in the kit, so you’ll need your own tool set to actually change your battery.
The BatteryMon replacement battery comes with a six month manufacturer’s warranty. If the battery fails within that period, they’ll replace or refund it at your option.
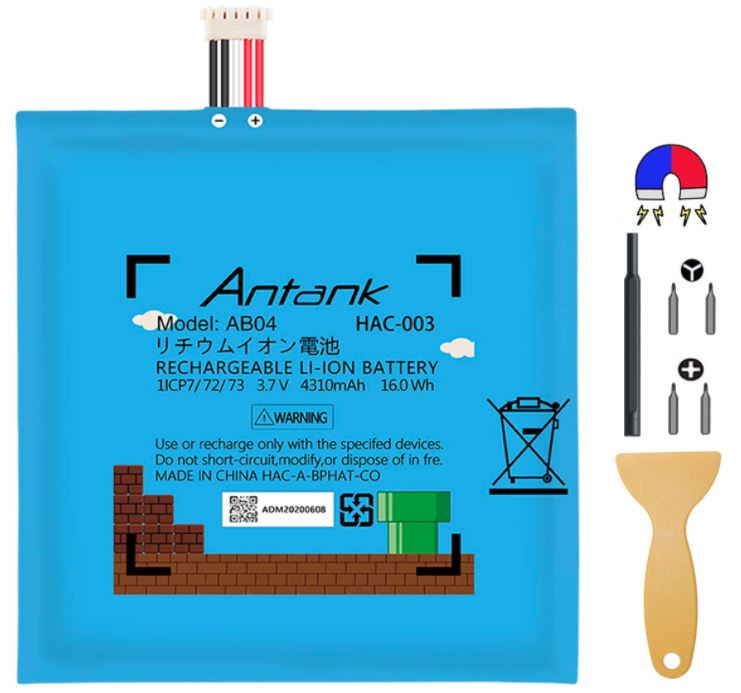
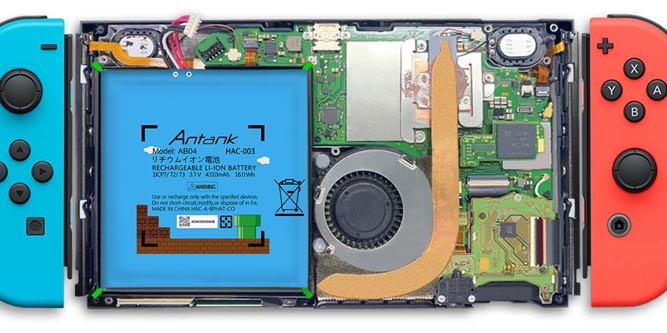
Antank HAC-003 MARlO Edition Battery Replacement Kit
The Antank HAC-003 MARIO Edition Battery Replacement Kit is the priciest option on our list. But for spending the most money, you also get the most complete package. For one thing, you get a 4,310mAh battery that’s compatible with both HAC-001 and HAC-001(01) Switch units. This makes it a straightforward replacement for newer Switches, or an upgrade for older systems. In addition, all the cells in this battery are guaranteed to be brand new. They’re rated for a minimum of 540 charging cycles, so the battery should theoretically last for years.
As you can see, the battery itself is pretty well-engineered. But along with the battery, you also get a set of replacement tools. To begin with, there’s a small stainless steel hex bit grip. This grip is designed for use in small spaces, and can fit any standard hex bit, not just the ones in the kit. There are two #00 Phillips bits and two Y00 tri-wing bits, twice as many as you need for the job. There’s also a plastic spudger. It’s perfect for prying out the battery, but it’s a bit wide for anything that requires finer control. Finally, there’s a set of six replacement screws. They make the job easier if you manage to lose a screw or two during disassembly.
Final Verdict
So, which one of these Nintendo Switch replacement batteries is the best of the bunch? To begin with, all of the batteries are OEM or equivalent. This means they’re all safe to use, with over charge, over current, and short circuit protection. You won’t run into any issues there. That said, there are still other details to sort out.
To begin with, consider the oGoDeal HAC-003 Battery Replacement. This battery pack is only compatible with older, HAC-001 Switch variants. However, it comes as a complete kit. And it’s cheaper than complete kits that come with universal batteries. If you have an older Switch console, why pay more for universal battery when this one will do?
The BatteryMon HAC-003 Battery Repalcement is a great choice if you already own Switch assembly tools. It doesn’t include any, so the price is correspondingly lower. It’s also universal, which means you can use it in any Switch console, both HAC-001 and HAC-001(-01).
The last battery we looked at was the Antank HAC-003 MARlO Edition Battery Replacement Kit. It’s the priciest of the bunch, but it’s also the most complete package. You get a universal battery, so you don’t have to worry about whether or not it’s compatible with your Switch. You also get a full set of installation and assembly tools. It’s a great bargain if you’ve got a newer Switch and no assembly tools.
Meet Ry, “TechGuru,” a 36-year-old technology enthusiast with a deep passion for tech innovations. With extensive experience, he specializes in gaming hardware and software, and has expertise in gadgets, custom PCs, and audio.
Besides writing about tech and reviewing new products, he enjoys traveling, hiking, and photography. Committed to keeping up with the latest industry trends, he aims to guide readers in making informed tech decisions.