
The keyboard is an essential part of our daily interaction with computers, facilitating communication, creativity, and work. Whether for cleaning, repairing, or satisfying sheer curiosity, there may come a time when you need to remove the keys from your keyboard.
To assist you in this process, we’ve rounded up three practical methods for doing just that. So join us as we guide you to safe and effective keycap removal. Let’s jump right in.
Precautionary Measures: Getting Prepared
Before diving into the key-removal process, it’s essential to set the stage with some precautionary measures. These preparatory steps will ensure a smooth, safe, and scratch-free experience. Now, let’s outline these essential safeguards:
Turn Off and Unplug Your Device
Before you embark on this keyboard adventure, ensure your computer or laptop is turned off and unplugged. The last thing you want is an unexpected command wreaking havoc on your system or a surprising electric jolt.
Choose the Right Tools with Care
Your keyboard’s keys are delicate and deserve gentle treatment. Using improper tools or heavy force can cause unnecessary scratches or damage. For starters, you want to pick a tool that suits the method you’re using. Be sure to use gentle, controlled force. Also, consider the aesthetics of your keyboard if you’re worried about superficial damage.
Embrace the Power of Gentle Force
Here’s where finesse beats brute strength:
- Resist the temptation to pry too hard or fast.
- A soft touch can make the difference between a key that’s removed successfully and one that’s launched into oblivion.
- Approach the task with patience and care. The keys aren’t going anywhere, so take your time to get it right.
With these precautions in mind, you’re now prepared to proceed with confidence. Whether you’re using household tools or professional equipment, these guidelines will help you remove those keys safely and efficiently. Shall we begin?
Method 1: Using Household Tools
The journey to key removal doesn’t necessarily require specialized tools. Sometimes, the most effective solutions are found right at home, in your toolbox, or even in your kitchen drawer. Let’s explore two ingenious ways to remove keys using everyday household tools:
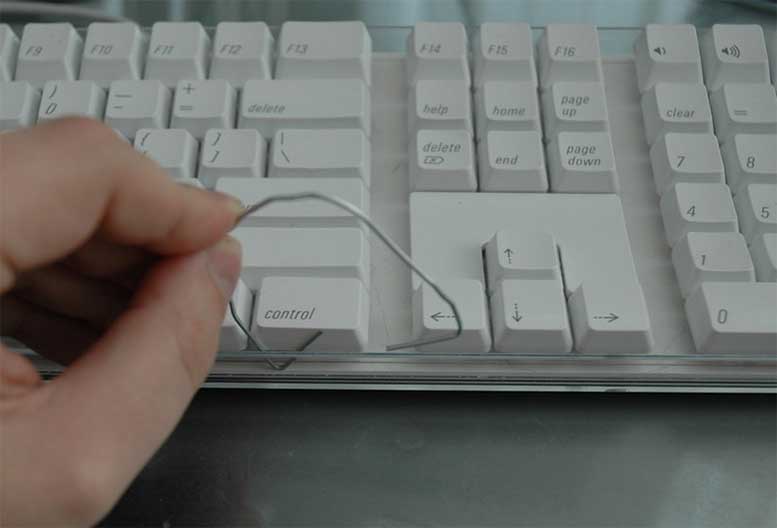
The Ingenious Paperclip
No keycap puller at hand? No problem. Your trusty paperclip can come to the rescue. It may be small, but its adaptability knows no bounds. Here’s how to transform this unassuming office supply into a key-removing wonder:
- Unbend the paperclip completely.
- Shape it into a “U.”
- Bend the ends inwards, creating a makeshift keycap puller.
- Slide it underneath the key and gently pry it off.
With just a few bends and adjustments, you’ve got yourself a suitable replacement for a keycap puller tool. It might not look like much, but it’s all you need to successfully remove keyboard keys.
The Mighty Screwdriver or Butter Knife
Screwdrivers and butter knives can replace a keycap puller if handled with the respect they deserve. Follow these guidelines to ensure you’re wielding these tools wisely:
- Choose a flathead screwdriver or butter knife that fits comfortably under the keys.
- Apply gentle pressure; the goal is key removal, not launching keys into space!
- Be aware that these tools might cause superficial damage. Consider this a fair trade for the satisfaction of DIY triumph.
If aesthetics matter to you, proceed with extra caution to preserve the appearance of your keyboard. Attempting to remove keys too hastily can result in unsightly scuffs and scratches.
A Final Note on Household Tools
Using household items for key removal can be surprisingly effective, but it requires a patient and gentle touch. Always remember:
- Work slowly to avoid unnecessary force or haste.
- Consider potential damage and weigh that against the convenience of using what’s on hand.
- If in doubt, investing in a proper keycap puller might be worth it, but don’t underestimate the humble paperclip or your kitchen’s mightiest butter knife.
Now that we’ve unlocked the potential of everyday tools, are you ready to try one of these methods yourself? Or perhaps you’re interested in learning some other removal methods? Read on to find out what your options are.
Method 2: Using a Keycap Puller
Sometimes, the best tool for a job is the one specifically designed for that task. Enter the keycap puller, your go-to gadget for fuss-free, scratch-free key removal. Here’s how you can use it:
Acquiring the Keycap Puller
When it comes to removing keys, a keycap puller is a veritable knight in shining plastic or wire. This tool, available at your local electronics repair shop or online, is designed for this very purpose. Remember:
- Wire pullers are generally considered better than plastic ones. Why settle for less?
- Durability and scratch resistance matter here. It’s not just about getting the keys off; it’s about getting them off elegantly.
If you’re concerned about aesthetics or the lifespan of your keyboard, this small investment could save you in the long run. Keycap pullers are a safer, more sophisticated way.
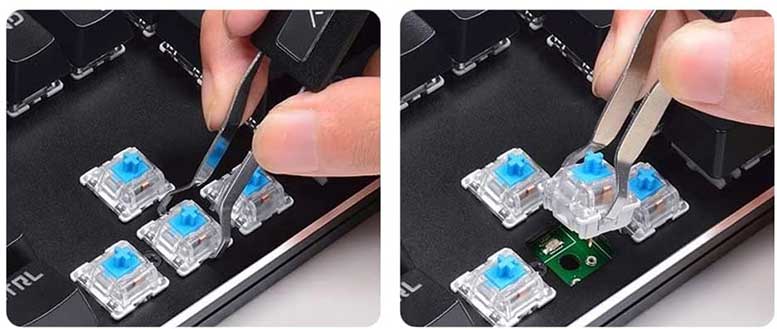
Engaging with the Keycap Puller
The keycap puller has only one goal: safe and effective key removal. Here’s your step-by-step guide to becoming a master key remover:
- Slide the prongs of your keycap puller underneath the edges of a key.
- If you’re using a plastic puller, listen for the satisfying click as it snaps onto the key. With a wire puller, a gentle twist should hook it in place.
- Pull up, and presto! The key is freed without fuss or fanfare.
Feel free to repeat as needed, putting this specialized tool to use and making your life a whole lot easier.
Choosing the Right Keycap Puller
Are you going for wire or plastic? It might seem trivial, but your choice could impact the ease and quality of your key-removing adventure:
- Wire keycap pullers are more durable and less likely to scratch the keys. They’re the choice of keyboard connoisseurs.
- Plastic pullers, although effective, might lack the robustness and finesse of their wire counterparts. They’ll do in a pinch, but why not aim for perfection?
There really isn’t an advantage to using metal over plastic other than ease of use. Either puller type should yield the same results in the end.
After the Key Removal
You’ve removed the keys, but what now? Clean them, store them, replace them, or simply admire your handiwork. Just remember:
- If cleaning the keys, stick to mild solutions and thorough drying.
- Handle the keycap puller with care, and it will be ready for future key-related escapades.
In the end, whether you opt for wire or plastic, a keycap puller brings precision and professionalism to your keyboard maintenance. It’s a small investment, yes. But we think it’s well worth it in the long run and will pay you back with time-saving convenience.

Method 3: Without Tools
Who said you need fancy tools to remove keyboard keys? Sometimes, the best tools are the ones that you have with you. In this case, they might just be in your pocket or at your fingertips. From credit cards to house keys, here are some common items that can work wonders in keycap removal in a pinch:
The Mighty Credit Card
Credit cards aren’t just for shopping sprees. You can use this plastic card to gently pry off those keys:
- Slide the edge of the card under the key you want to remove.
- Apply slow and steady pressure. Patience is a virtue, after all.
- Pop off the key, and repeat as needed.
Take your time with this method, as too much pressure could result in a broken card.
The Handy Finger
Who knew your own digits could double as tools? The truth is that they can work quite well in this instance. Here’s the technique to safely and effectively pop off those keycaps:
- Carefully slide your fingernail under the edge of the key.
- Gently wiggle your finger to loosen the key.
- With a little bit of care (and perhaps some trial and error), the key will come off.
Please bear in mind that you shouldn’t attempt this feat if you have a delicate manicure, as it could wreak havoc on your nails.
The Ever-Reliable Key
Ironically, one of the best tools to remove a key might be another key! Here’s how to make it work:
- Choose a key that fits comfortably under the keycap.
- Apply gentle pressure, as with the credit card, and pry it off.
Keys may vary in thickness and rigidity, so try to use one that feels (and fits) right. You shouldn’t have to worry about bending your key too much, but it’s still a good idea to use one that is sufficiently sturdy and durable.
Final Thoughts
There you have it, three fantastic ways to reclaim your keyboard! Whether it’s the improvised paperclip or the professional keycap puller, you’ve now got the wisdom to tackle the keys like a pro. Remember, gentle force, a wise choice of tools, and plenty of patience are all it takes to successfully remove your keycaps.
Meet Ry, “TechGuru,” a 36-year-old technology enthusiast with a deep passion for tech innovations. With extensive experience, he specializes in gaming hardware and software, and has expertise in gadgets, custom PCs, and audio.
Besides writing about tech and reviewing new products, he enjoys traveling, hiking, and photography. Committed to keeping up with the latest industry trends, he aims to guide readers in making informed tech decisions.