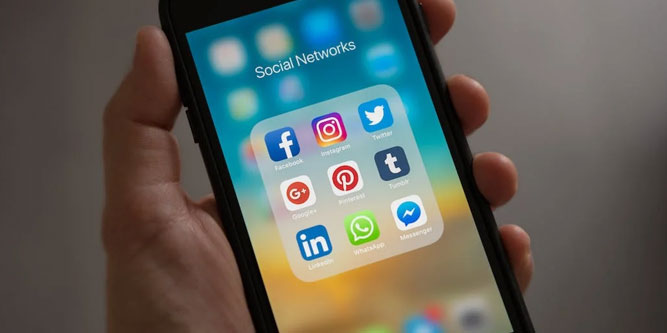
If you haven’t heard about Instagram reels, you should check them out. They’re Instagram’s answer to TikTok; quick, 15-second videos with multiple clips and fun effects. You can share your reels with friends, and even share them public in Instagram’s “Explore” section.
This is a new feature that allows users to browse videos via a constant feed. In many ways, Explore is like a TikTok clone. And just like TikTok, it gives you an opportunity to expose yourself to a broad audience.
Instagram Reels have become a near-instant success. But by default, they won’t be posted to Facebook. This can be confusing, particularly if you already have a linked account. Instagram Story posts will cross-post to Facebook, but for Reels, you have to do a bit more work.
So, how do you share your Instagram Reels to Facebook? You need to start by linking your Facebook and Instagram accounts. We’ll talk about how to do that, as well as how to share an individual Reel and set up automatic sharing. We’ll also go over how to create an Instagram Reel, and how to make the best possible Reel. By the time we’re done, you’ll know everything there is to know about this exciting new feature. Let’s get started!
First, Link Your Accounts
If you want to share Instagram Reels on Facebook, you’ll have to link your accounts. This doesn’t just allow you to share Reels. It allows you to share your Instagram Story posts on Facebook. And as a side benefit, it lets you share posts to your Instagram story directly from Facebook. Here’s how to link your accounts:
1. Open the Instagram app and log into your account if necessary.
2. Tap your profile picture in the bottom right corner of the screen.

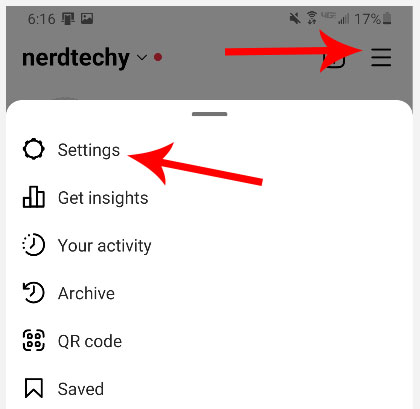
3. Tap the menu icon in the top right, then select “Settings.”
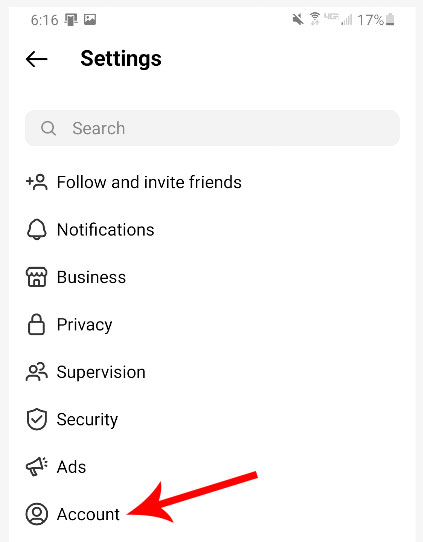
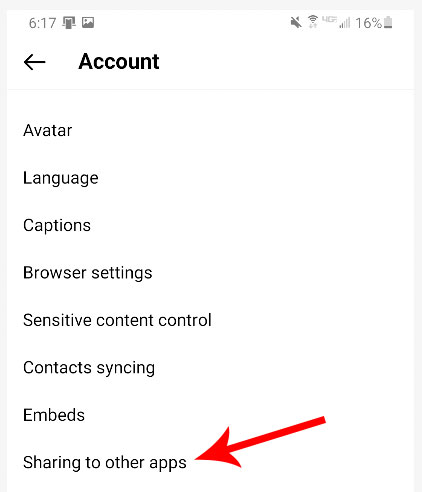
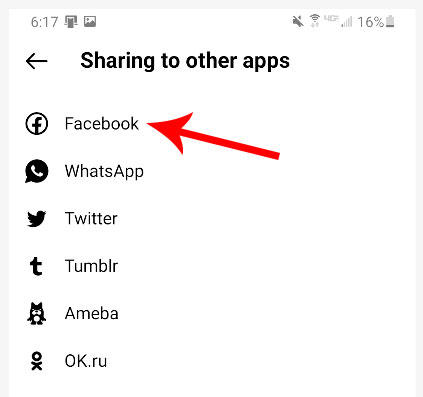
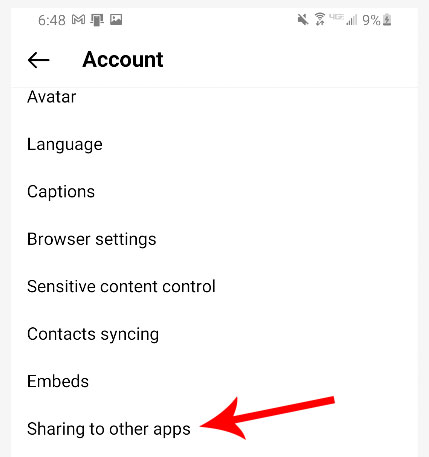
4. Choose “Account,” and you’ll see one of two options: “Sharing to other apps” or “Set up accounts.” Tap whichever one you see.
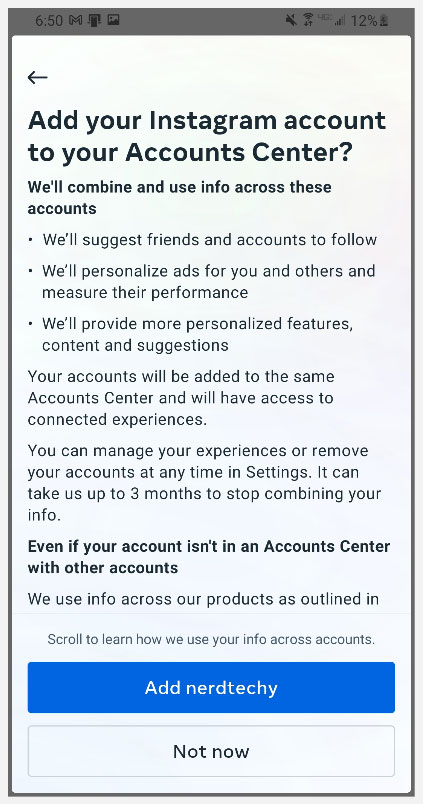
5. Look for “Facebook” in the menu, and select it. You’ll be prompted to log into your Facebook account.
6. Once you’re logged in, tap the dot where it says “Share to Facebook.” You will then be asked if you would like to turn on Facebook sharing.
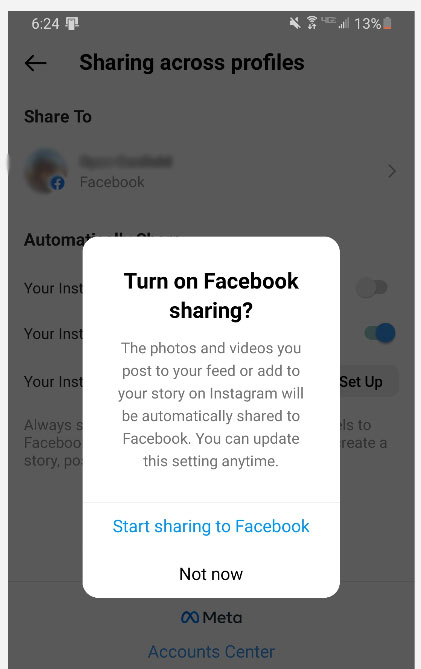
Congratulations! Your Instagram and Facebook accounts are now linked.
Next, Share Your Reel
Once your accounts are linked, sharing your Reel to Facebook is absurdly simple. Just follow these steps:
1. Record your Instagram Reel.
2. Before you share it, tap the spot next to the words “Recommend on Facebook.”
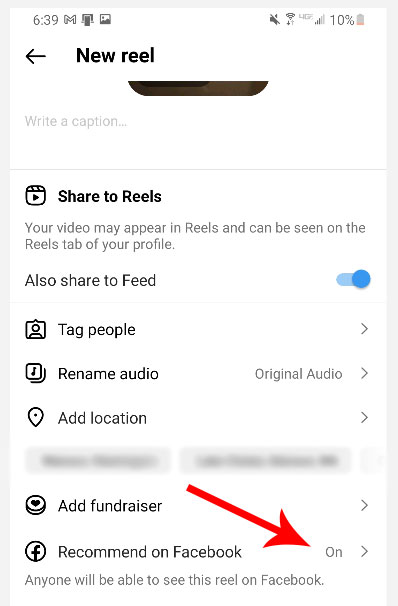
3. There will be a toggle switch next to any linked Facebook accounts. Switch it on.
4. You’ll be asked whether you want to share all future reels to Facebook, or just the one you’re currently sharing.
5. Once you’ve chosen your settings, touch the left-facing arrow at the top left of the screen. Tap “Share,” and your Reel will be shared.
Set Up Automatic Sharing
If you want to set up automatic sharing, you can do it the first time you share a Reel to Facebook. Alternatively, you can change your settings elsewhere in Instagram.
1. Tap your profile picture on the bottom right corner of the screen.

2. From your profile page, tap the menu button at the top right, then hit the settings button.
3. Next, select “Accounts,” and then choose “Sharing to other apps.”
4. Select the Instagram account you want to share from. Then choose the Facebook profile you want to share your Reels to.
5. Scroll down to the “Automatically share” section. Next to “Your Instagram Reels,” select “Set up.”
6. Follow the prompts, and you’ll be all set.
How to Create an Instagram Reel
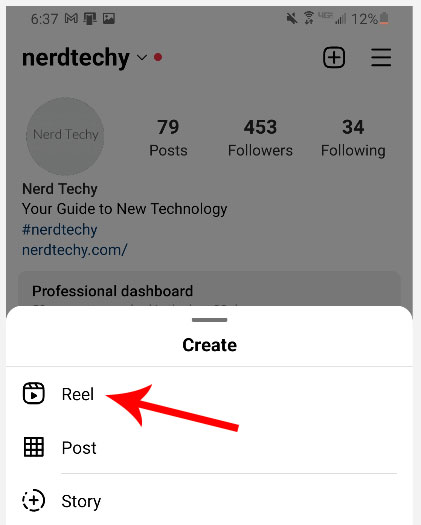
If you’ve never created an Instagram Reel, you might be curious how it’s done. It’s actually pretty simple. First, open your Instagram camera, and tap “Reels.” There, you’ll see several useful tools for editing your new Reel. These include:
- Audio – By default, an Instagram reel will use the audio from whatever video you record. Your original audio will be attributed to your account. That way, if somebody selects “Use Audio” to remix your audio, you’ll still get an attribution. You can also use pre-recorded audio. This can be something you’ve recorded yourself, or a song from Instagram’s extensive music library.
- Timer and Countdown – This is an essential feature for anyone who shoots their own videos. Press record, and you’ll see a short countdown before Instagram starts recording. You can even set the camera to run for a pre-set number of seconds.
- >AR Effects – These are similar to Instagram’s AR effects for other videos. You can use filters and overlays from Instagram, as well as those from other creators.
- Align – If your Reel contains a lot of quick cuts, they can look awkward. Unless your camera is perfectly positioned, the background will jerk around from cut to cut. The “Align” function keeps the background lined up correctly, so all your cuts are seamless.
- Speed – Using the speed function, you can speed up or slow down sections of your video. This is great for fun slow-motion recordings, or to make slight corrections if you’re singing to a beat.
You can record a Reel all in one go, or you can use your camera to create a series of shorter clips. You can even take video clips from your gallery and splice them together to create a Reel.
Instagram Reel Tips
Reels might be a relatively new feature, but lots of creators are already making them. Whether you’re a brand, an Instagram influencer, or a regular person, it’s worth putting your best food forward. So, how do you create Reels that are both shareable and informative? Here are some pointers:
- Tailor Your Content to Your Audience – Reels are short-form content. You only have a few seconds to get your point across, let alone to get people’s attention. There’s no time to take a scattershot approach. Know your audience, and post something that will immediately get their attention.
- Provide Real Value – Teach your users something they didn’t know. Maybe you have a recipe to share, or some crafting advice. People like educational content because it’s something that can help them out in the real world.
- Feature Your Products and Services – Product placement is a great way to grow brand awareness. Just don’t overdo it. Nobody watches Instagram Reels because they want to see more ads.
Why Won’t my Instagram Reels Share to Facebook?
Sometimes, cross-posting between Instagram and Facebook can break down for whatever reason. The most common cause is an app glitch. You can usually fix the problem by rebooting your phone. But if that doesn’t work, you can try clearing your cache. Make sure to do this for both the Instagram and the Facebook app.
If that doesn’t work, you may have to re-link your Facebook account. Go to “Accounts and Profiles” in your Instagram settings, and un-link your account. Then use the steps we listed above to link it again. At that point, everything should work.
Who Can See the Reels I Share to Facebook?
Since Facebook and Instagram have different privacy settings, cross-posting can be a bit confusing. So, how does it work? Let’s go over the basics:
- You can set your default audience for Reels via Facebook. This can be the same as your default sharing setting, or it can be entirely different. Otherwise, your audience for Reels will depend on your Instagram settings.
- If you have a public Instagram account, your Reels will be set to public on Facebook.
- If you have a private Instagram account, your Reels will be set to friends only on Facebook.
- If you are under 18, your Reels will be set to friends only on Facebook.
Remember that your Facebook friends list and Instagram friends lists are separate. Let’s say you’re friends with someone on Facebook but not on Instagram. When you share your Reel to Facebook, it could still appear in their feed unless you’ve customized your sharing settings. This can even be true if you’ve restricted or blocked the person on Instagram.
If your Facebook Reels are public, other Facebook users will be able to remix your reel. You can change this by disabling remixing on Instagram. This is the only setting that carries over from one platform to another.
There’s one other thing to keep in mind. If you want to enable the “Recommend on Facebook” option, you’ll need to set your Instagram account to public.
What Does “Recommend on Facebook” Mean?
“Recommend on Facebook” is an optional feature that authorizes Facebook to recommend your Reels on their app. This can put your Reels into random people’s feeds, similar to Instagram’s native Explore function. This is an easy way to expand your reach even further. Best of all, it helps you reach an audience that may not even be on Instagram.
Best of all, you don’t have to have a Facebook account to select “Recommend on Facebook.” So even if Facebook isn’t a part of your social media strategy, it can’t hurt to enable the function. Along the same lines, Facebook users can remix your Reels the same way as Instagram users. As a result, you have even more opportunity of going viral.
Can I Also Share my Instagram Reels to Other Social Media?
Yes, you can. In addition to Facebook, you can also share reels to platforms like Twitter and Tumblr. The function works the same as it does for sharing your Reels to Facebook. Go to “Sharing to other apps” or “Set up accounts,” and choose the relevant platform. Enter your login details, and you’ll be ready to go.
Can I Share a Reel on Facebook if I’ve Already Shared it on Instagram?
So, what if you’ve already shared a Reel to Instagram? To cross-post it to Facebook, open the reel, then tap the Share button at the bottom. Tap the option to “Save Video,” and save the clip to your phone’s gallery. Now you can go to Facebook and upload it.
Final Thoughts
As you can see, Instagram Reels are a powerful tool for getting exposure and growing your audience. By cross-posting them to Facebook, you’ll effectively double your audience. Of course, you also need to craft compelling content. But if you put together some top-quality reels, it can be a big boost for your brand.
Meet Ry, “TechGuru,” a 36-year-old technology enthusiast with a deep passion for tech innovations. With extensive experience, he specializes in gaming hardware and software, and has expertise in gadgets, custom PCs, and audio.
Besides writing about tech and reviewing new products, he enjoys traveling, hiking, and photography. Committed to keeping up with the latest industry trends, he aims to guide readers in making informed tech decisions.
Hello,
What if the option of cross sharing reels on facebook is not available?
When I linked my accounts in the Accounts Center, I can only share posts and stories to facebook, bur the reels option does not show. I can’t share reels or recommend my content on facebook.
How do you make the reel option show up?
I creat my posts or reels on IG and share them to fb via instructions you detailed. Problem is they post to fb as reels only which is difficult for me to find unless I look up fb reels. How can I share to fb as a post so it can post to my fb page? So when I go to my page it will be first post up? My friends tell me they don’t see my posts cause I guess they are posted as reels. Is there a way to share them from IG to fb so they post as a regular fb post on my page or wall?