The Nintendo Switch is one of the most popular consoles in history. This is, in large part, due to its unique, innovative design. You can use it as a handheld console, or throw it in the dock for a traditional experience with better graphics. This makes the Switch the most versatile game system in history. Unfortunately, it also means your Switch and Switch dock can take a bit of a beating. You most likely aren’t traveling with your Xbox or PlayStation on a daily basis. But if you’re regularly on the road with your Switch, it can get beat up from repeated use.
For the most part, Nintendo did an excellent job of engineering a portable console that’s built to last. However, one common pain point is the cooling fan that’s built into the unit. When the Switch is bumped and vibrated around, the bearings can eventually wear out. This leads to premature failure, even when the rest of your Switch is ticking like a Swiss watch. In this case, it can make more sense to replace the fan than to buy a whole new Switch console. Another reason to replace your Switch fan is if it’s gotten noisy. Not only can this signal impending failure, but it’s just plain annoying.
In the past, we’ve reviewed a large number of Switch parts and accessories. These include replacement thumb sticks and attached power banks, in addition to many others. Since we already know our way around the Nintendo Switch, we thought we’d check out a few replacement fans.
Today, we’ll be looking at three different options, beginning with the inRobert Replacement Internal Cooling Fan. This fan comes with everything you need for replacement, including tools and thermal paste. Next, we’ll check out the S-Union New Replacement Internal Cooling Fan. This kit includes the thermal paste, but assumes you have your own tools. Finally, we’ll review the PartEGG Original Replacement Internal CPU Cooling Fan. This is the most affordable option, but it’s just a fan, so you’ll have to provide your own extras. Let’s take a closer look!
How Hot Can Your Switch Get?
Nintendo has not published any information on exactly how hot a Nintendo Switch can safely get. However, there are a few things we can do to extrapolate and make an educated guess. To do this, let’s look at one of the more demanding Switch games, Legend of Zelda: Breath of the Wild. Assuming normal, docked use, you get a temperature reading of about 107F (about 42C) at the vent. Keep in mind that this reading is approximate, since you’re not getting the actual CPU reading.
If we look at some other devices, such as tablets and phones, they can push 120F (49C) without damage. And they generally lack the advanced cooling system of the Nintendo Switch. Moreover, the heating system’s piping is routed away from the Switch’s battery. This makes heat less of an issue for your battery, which is often a concern on mobile devices.
Of course, there are still a few things you should be aware of. The first is that the Switch dock can cause the unit to heat up. This isn’t a safety concern, but it’s something you should know before grabbing your Switch after a long session. That said, once you’ve put the Joy-Con controllers on their rails, the temperature difference won’t really be noticeable.
Another thing you should be careful about is any third-party replacement dock. Many are just fine, but check to make sure the model you’re buying won’t block the air vents on your Switch. If it will, move on to another model, no matter how good the extra bonus features are.
Finally, be careful about gaming in very hot environments. From what we’ve seen online, the Switch performs well under most conditions. These include muggy, 95-degree Florida days. But if you don’t have air conditioning and temperatures are hitting 120 degrees, turn the Switch off. It’s just not designed to operate under those kinds of extreme conditions.
How to Replace Your Nintendo Switch Fan
If the worst has happened and your fan has failed, you have a few options. First, you can buy a new Switch. This is easy, but it’s a bit pricey. Second, you can pay for a repair. This costs less, but you can expect to be without your Switch for a few weeks. Finally, you can perform your own repair. With a replacement fan, some thermal paste, a Phillips #00 screwdriver and a tri-point screwdriver, you’re good to go. Here’s a quick overview of how to replace your Switch fan.

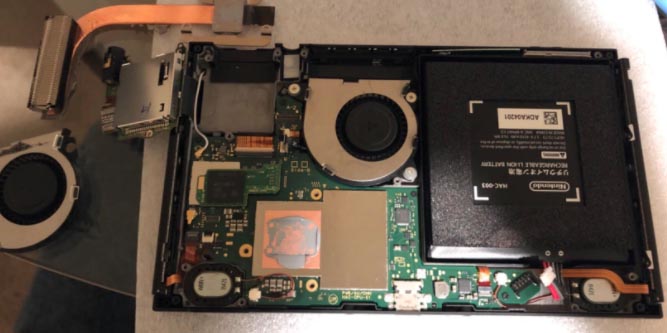
First, you need to remove the rear panel from the console. This means removing a whole bunch of screws, and not all of them are the same size and length. It helps if you have a magnetized bowl or some plastic baggies to keep from losing anything. In total, you’ll need to remove six Phillips #00 screws and four tri-point screws. Start with the tri-point screws, which are located on the corners of the panel and are easiest to find. Next, you’ll need to remove all the Phillips screws. Here’s where to find them:
- Two from the bottom of the Switch, on either side of the charging port.
- One more on the bottom of the Switch, under the kickstand.
- One from the top of the Switch, next to the air vent.
- One on each side, in the middle of each Joy-Con rail. You can ignore the four other screws on each side, since they have nothing to do with the rear panel.
Once all the screws are removed – and safely stored away – remove the rear panel from your Switch. At the bottom left, you’ll see a small, rectangular gold card. That’s the SD card reader, and it will need to be removed as well. Remove the Phillips screw, and lift the SD card reader gently up and out. Be careful of the delicate black connector on the side. When you reassemble the Switch, you’ll need to position the card reader just over the slot. Then press down gently on the foam pad until the connector snaps back in. Don’t press directly on the connector. It’s easy to damage, and you could even damage the motherboard itself.
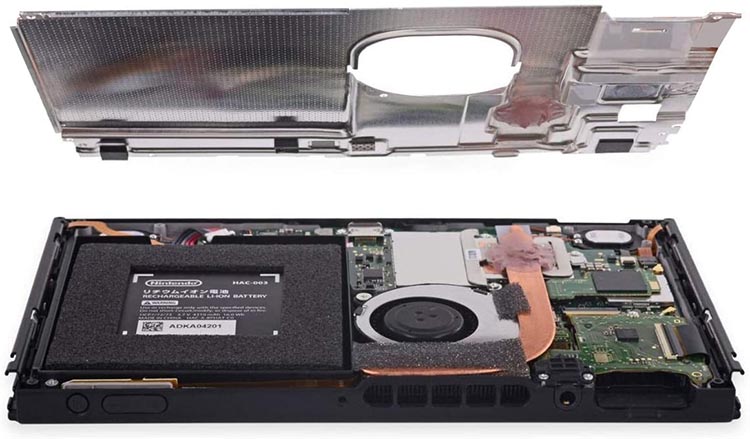
The rest of the “guts” of the Switch will be concealed by a large aluminum shield plate. Remove the six Phillips screws that hold it in place, and flip it over.
Next, use a plastic spudger to unplug the battery connection from the motherboard. This is just for safety, since you’re disconnecting a powered part of the system. Now, follow the copper power strip from the broken fan to the heatsink. Remove the three Phillips screws that hold the heatsink in place, and tilt it up 45 degrees. Rotate the heatsink to the side, and you can remove the power strip.
On the bottom side of the power heatsink, you’ll see some thermal paste. You’ll also see thermal paste on top of the Switch’s power supply. Use a lint-free cloth and isopropyl alcohol or electronics cleaner to remove the paste. Keep in mind that when you reassemble the Switch, you’ll need to replace this thermal paste. Most fans include paste, but there’s no reason you can’t use your own if you’ve already got some.
At this point, you can easily remove the fan. Remove the two Phillips screws that hold it in place, and flip open the ZIF connection with a spudger. Lift the left side of the fan first, and rotate it towards you. This should give you enough clearance to pull out the fan. Be careful to unhook it from the rubber grommet on the way out, since you’ll need that for reassembly. From here, all you need to do is drop in your new fan and reverse the assembly instructions. The whole process should take less than 20 minutes, but can take longer if you’re not careful about screw organization. If you’ve kept your screws sorted, the whole process is a breeze.
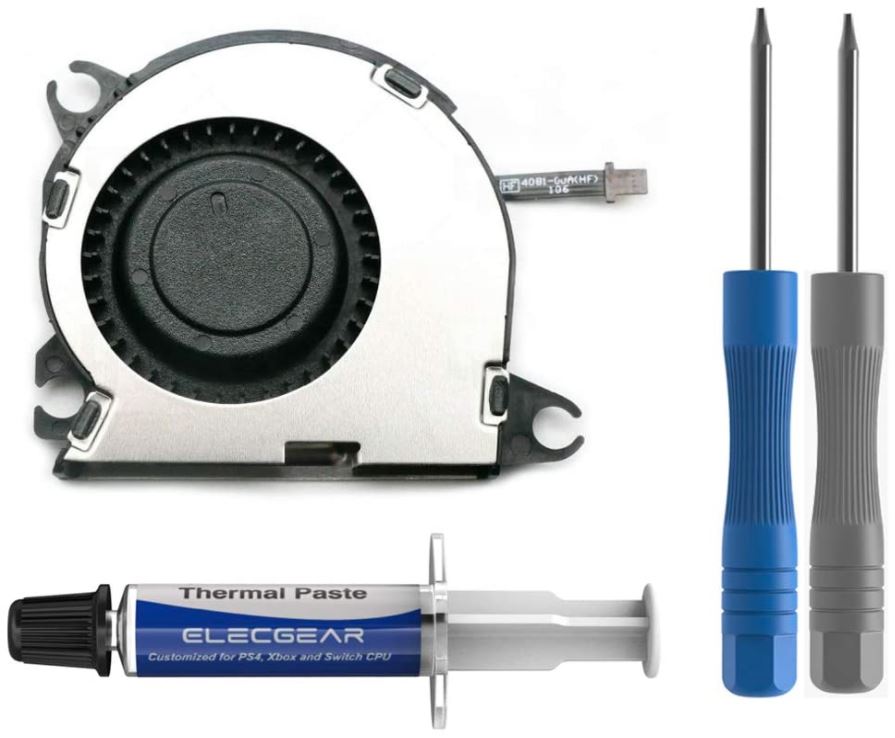
inRobert Replacement Internal Cooling Fan
The inRobert Replacement Internal Cooling Fan is the first choice on our list, and that’s not a coincidence. The thing that sets this replacement fan apart from the others is that it’s a complete kit. You get the fan, the essential tools, and thermal paste. Even if you’ve never worked on any game console ever, you’ll be all ready to get started.
The fan itself is a basic OEM fan. There’s nothing fancy about it, but there doesn’t really need to be. This isn’t a controller or a new gaming monitor. It’s a fan, and it gets the job done. The thermal paste is roughly equivalent to the original paste, with a thermal conductivity of 6.5w/m-k. It’s non-bleeding, which makes application easy, even for beginners.
The tools are fairly basic, but the grips on both the tri-point screwdriver and the Phillips #00 are surprisingly comfortable. There’s a plastic spudger included, so you don’t have to worry about scratching the motherboard. There are even a few alcohol wipes for cleaning up the old thermal paste.
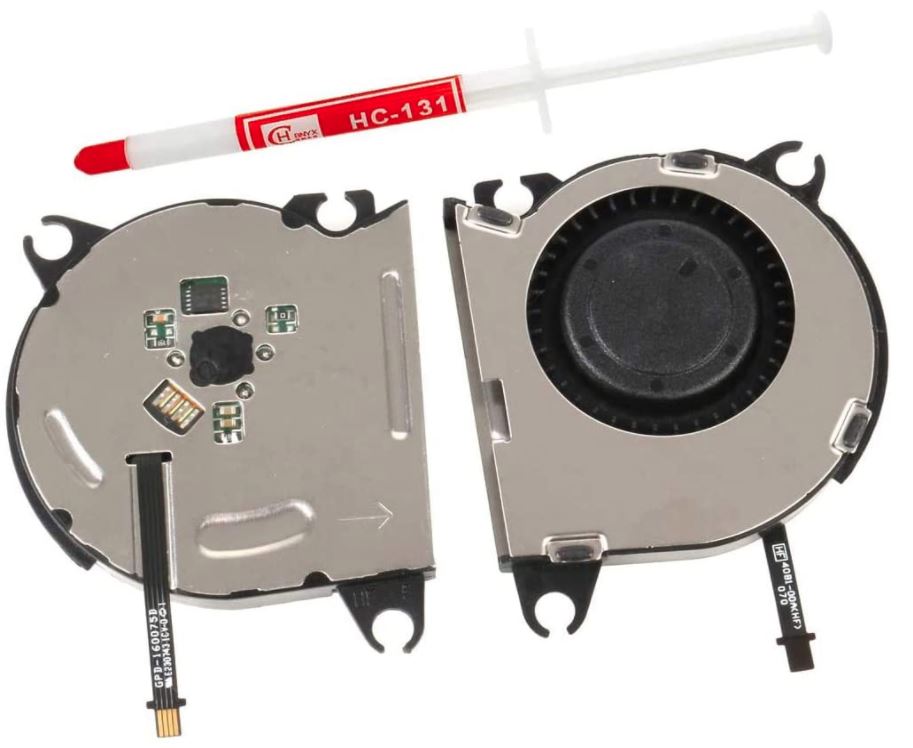
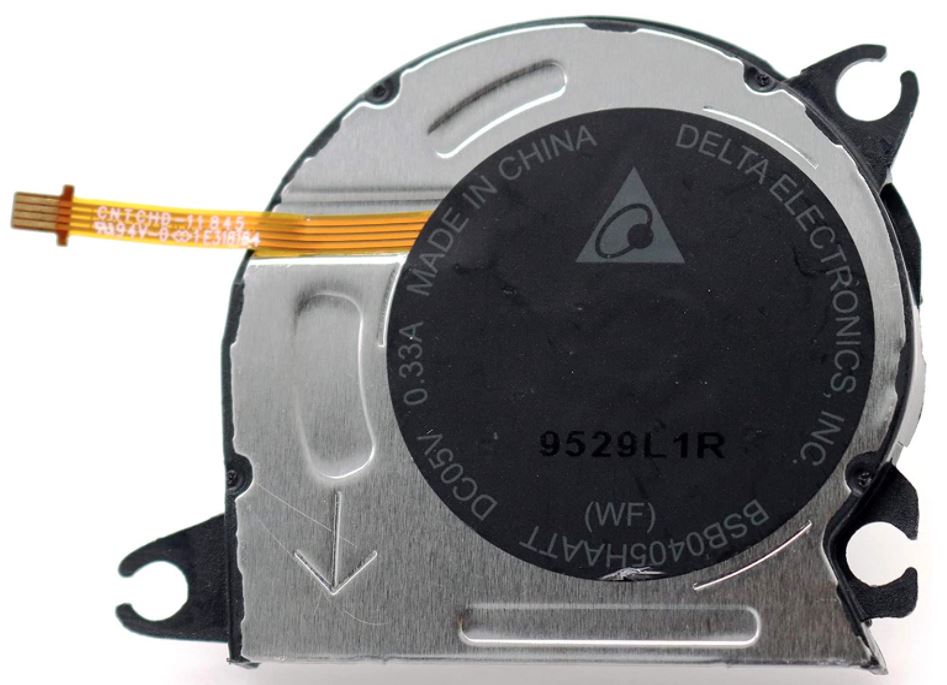
S-Union New Replacement Internal Cooling Fan
Like the inRobert fan, the S-Union New Replacement Internal Cooling Fan is an OEM replacement. You remove your old fan, you install this one, and you get back to gaming. It’s as simple as that. The fan includes a tube of thermal paste, but no installation tools. The lack of tools can be problematic if this is your first time repairing your Switch. On the other hand, if you already own tools, you can save a few bucks on the S-Union kit. In this case, you’re going to get a great deal.
One thing the S-Union fan offers that the inRobert doesn’t is a 9-month manufacturer’s warranty. This isn’t much, but it’s enough to protect you in the event that you receive a dud. S-Union also offers after-sales service if you run into issues during installation.
PartEGG Original Replacement Internal CPU Cooling Fan
The PartEGG Original Replacement Internal CPU Cooling Fan is just what it sounds like. It’s an OEM replacement fan with no extra tools, bells, or whistles. Now, for most people this isn’t going to be ideal. It’s not that there’s anything wrong with the fan. It’s just that you don’t get everything you need to do the job. Even if you already own Nintendo Switch repair screwdrivers, you still need thermal paste.
That said, there are a couple of situations where the PartEGG fan can be an excellent choice. One is if you’re a computer enthusiast and already own a bunch of thermal paste. In this case, your hobby has just saved you a few extra bucks. Another is if you can get a great deal on some thermal paste. But considering the low cost of a complete replacement kit, this is not very realistic. In most cases, you’ll get the best deal by purchasing a complete package.
Final Verdict
Let’s be upfront about this. All three of these are simple OEM fans. In terms of mechanical performance, none of them is going to perform differently than the others. The difference between these kits comes entirely down to the extras.
The most comprehensive kit is the inRobert Replacement Internal Cooling Fan. If you’ve never opened up your Nintendo Switch before, it’s almost certainly your best option. You get everything you need to get the job done, and you can use the tri-point screwdrivers for future repairs.
If you already have tri-point screwdrivers, the S-Union New Replacement Internal Cooling Fan will probably be your best choice. You get the fan and a tube of thermal paste, so you’re ready to perform the repair.
Serious enthusiasts may want to consider the PartEGG Original Replacement Internal CPU Cooling Fan. It doesn’t include any thermal paste, so it’s your cheapest option. And if you already have thermal paste sitting around from another project, the fan is all you need.
Meet Ry, “TechGuru,” a 36-year-old technology enthusiast with a deep passion for tech innovations. With extensive experience, he specializes in gaming hardware and software, and has expertise in gadgets, custom PCs, and audio.
Besides writing about tech and reviewing new products, he enjoys traveling, hiking, and photography. Committed to keeping up with the latest industry trends, he aims to guide readers in making informed tech decisions.
so i used BOTH the elecgear AND the S-union
and when i installed them one fan gave my system an error message and the other disabled the touch screen on the switch.
when i put the old fan back, the system worked just fine i connected everything correctly to the tee.
I dont know why this is giving me such a hard time!!