Artillery Hornet

Pros
- Very high resolution and accuracy.
- Large printing area.
- Can print both hard and rubbery plastics.
- Easy to set up and assemble.
- Very quiet operation.
Cons
- Requires precise heat settings for non-PLA materials.
- Difficult to keep clean.
If someone had told you 25 years ago that 3D printing would become a reality, you probably would have laughed. Plastic has been molded for decades, which is a well-known technique. But molds aren’t always the best option for most applications. Let’s say you’re making a prototype. You’d have to create a prototype mold, which is a lot of headache and investment. Not only that, but you’d need a ton of special equipment. And for each iteration of your design, you’d have to create a whole new mold. With a 3D printer, you can simply tweak your prototype in your design software, and try again. Nowadays, it’s much cheaper for designers to go from initial design to final product.
That said, you don’t have to be an inventor or engineer to use a 3D printer. You might just be a homeowner who wants to fix your own plastic components. Things like replacement knobs and caps can be difficult to find. With a 3D printer, you can create your own replacement parts. 3D printers are also great for hobbyists. You can make pieces for tabletop games, or create figurines or even rubber face masks. But before you buy, it’s important to choose the correct printer. Different printers have different sized printing areas, different resolutions, and use different materials. Especially for beginners, this can become confusing. Thankfully, we’re here to clarify things!
We’re about to review the Artillery Hornet 3D Printer. This is a big, beefy printer with a relatively large printing area. The printing plate has a tempered glass surface, which makes it easy to remove your finished work. You get a fairly high printing resolution, as well as plenty of easy ways to adjust the printer’s performance. But we need to talk about many more features before we can render a fair verdict. We’ll have to look at the overall design, and how the printer is put together. We’ll need to talk about what materials you can use, and what types of things you can create. We’ll also have to discuss how you operate the printer, and how you send your files to it. Let’s get started, and see what we learn!
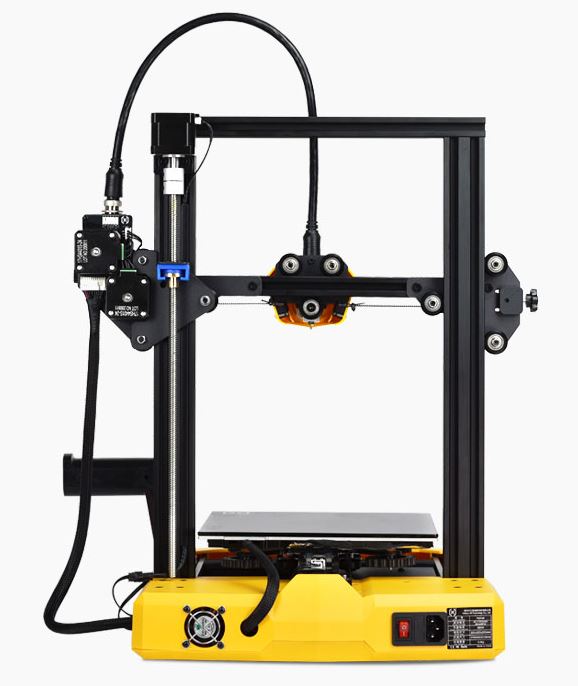
Overall Design
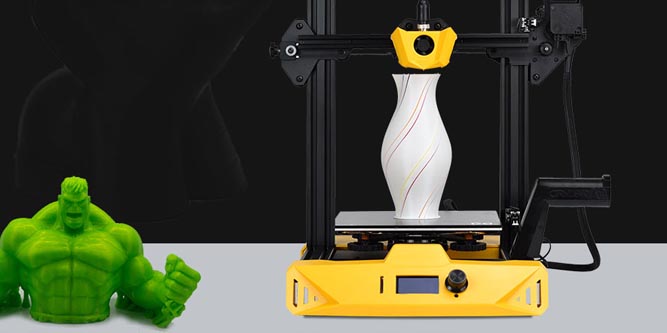
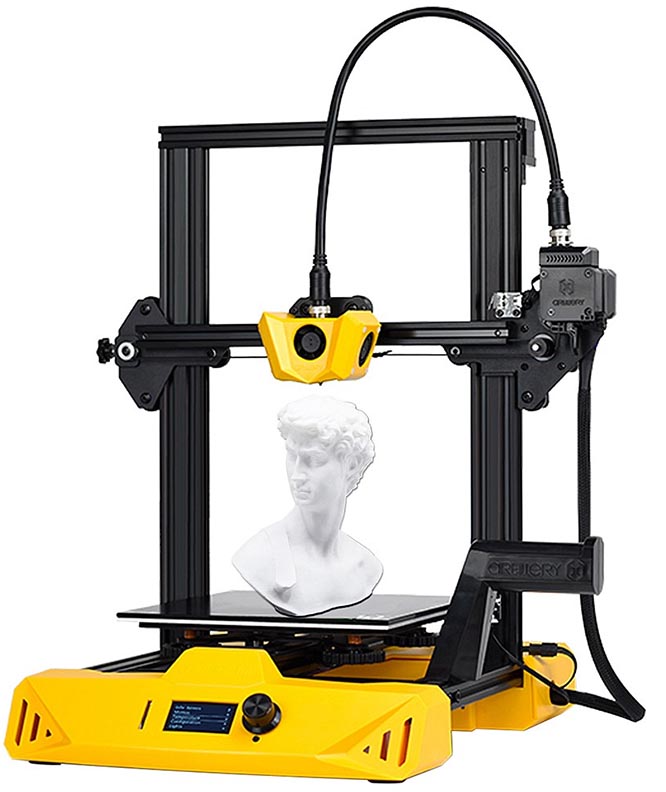
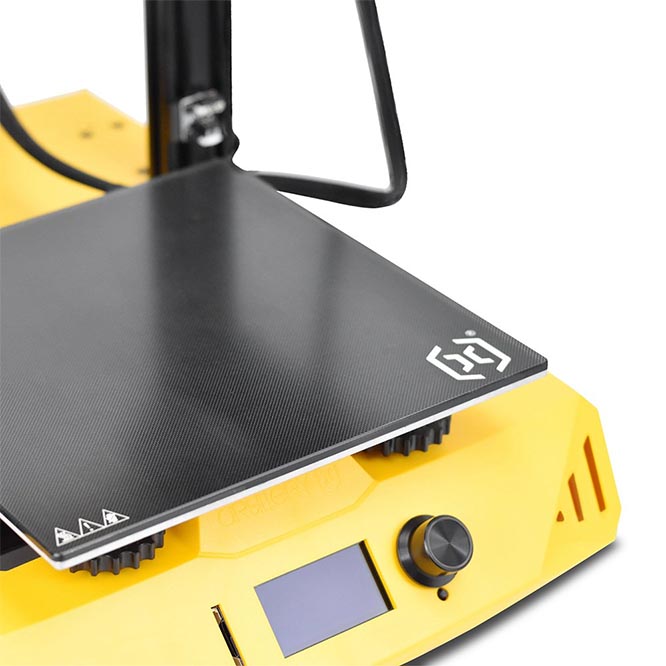
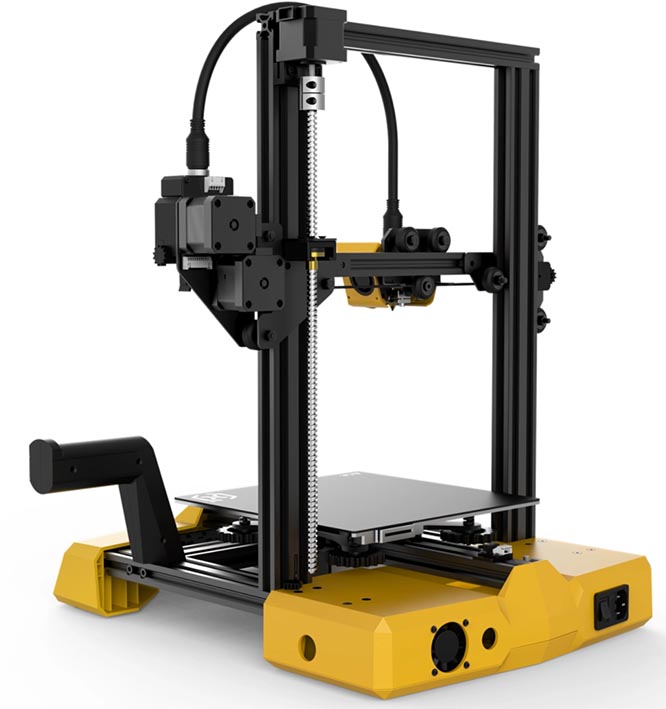
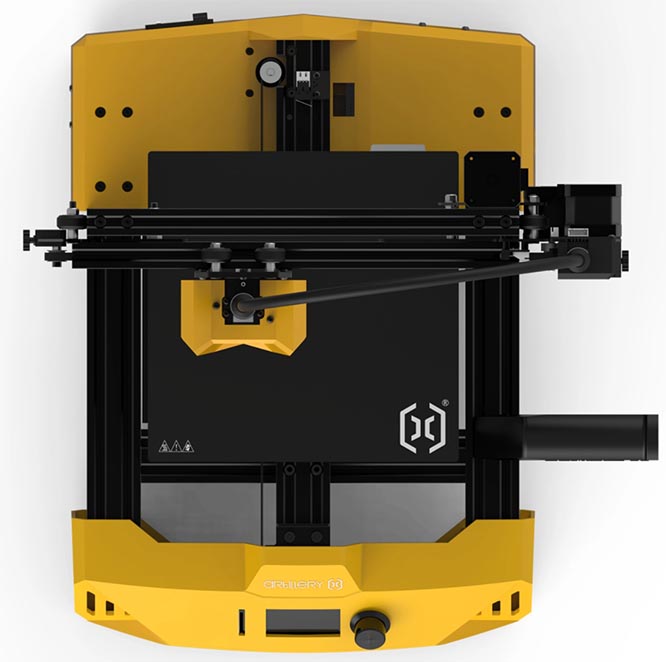
The Artillery Hornet 3D Printer has a large footprint, at 21.25 inches wide and 30.7 inches deep. The base is constructed from a set of aluminum rails, with a beefy yellow plastic housing. In between the two side rails, there’s a black tempered glass platform where your product prints out. A gantry sits above the base, straddling the two side rails. The side rails are motorized, which allows the gantry to move from front to back. The total height is a little more than two feet, including the stabilizing brace at the top of the gantry. The aluminum gantry and rails are all black, which gives the whole machine a slick appearance.
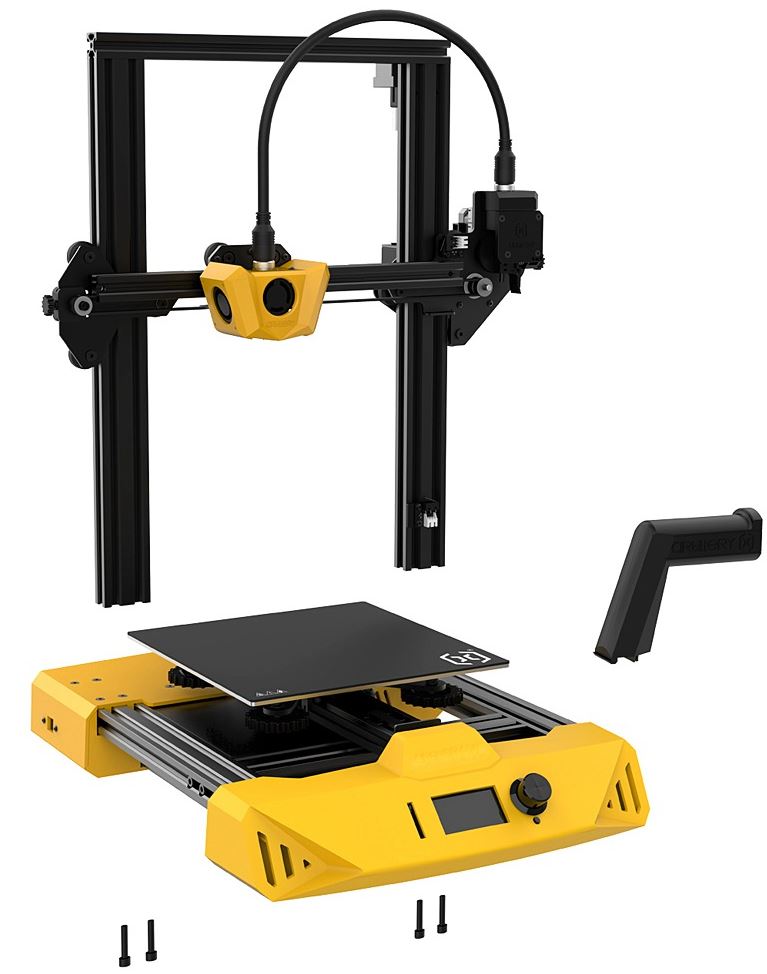
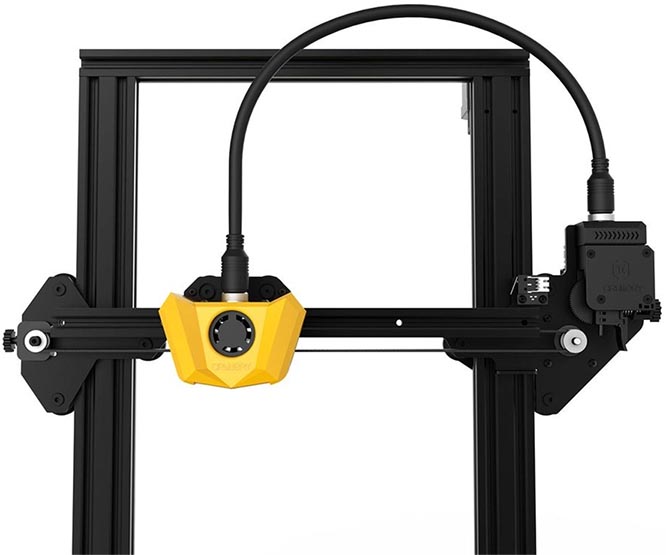
There’s a rail running between the two sides of the gantry, which is also motorized. This allows the rail to move freely up and down along the Z-axis. On this rail, you’ll see the yellow print head, which matches the yellow on the base. There’s a rubber belt running parallel to the gantry rail, right through the print housing. This belt attaches to a motor on the side of the gantry, which moves the print head left and right. Between the motors on the gantry, the rail, and the print head, it can move itself along all three axes. The total area under the print head measures 8.66 inches square and 9.84 inches high. Officially, this is actually 220mm x 220mm x 250mm. This is a fairly large printing area for a home printer, especially for a beginner model.
A cable extends from the print head to the side motor, and another from the side motor to the base. This is actually an all-in-one cable, which provides both data and power. Because there’s only one cable, you don’t have to worry about running multiple cables during setup. The filament also runs through a tube in this cable, further simplifying installation. When the printer arrives, the gantry and base are already pre-assembled. All you have to do is use the included screws to attach them. There’s also a little handle to screw onto the side of the base. Even for a beginner, assembly should only take a few minutes. On the downside, the all-in-one cable/filament feeder can also complicate diagnostics and cleaning.
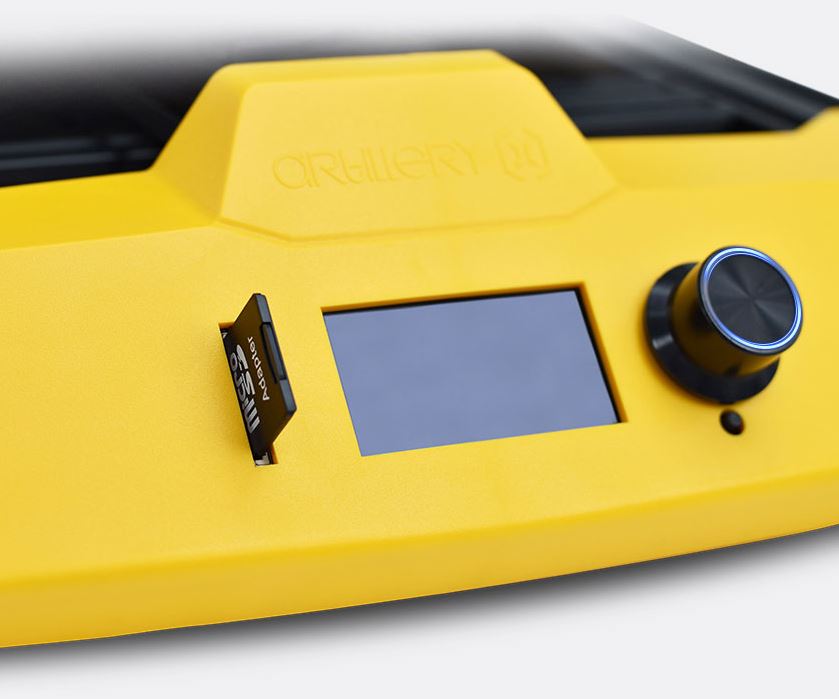
Controlling this printer is very easy. There’s an LCD screen on the base that shows all the information you need to know. You can view your job progress, temperature settings, and other settings. Controls are all performed with a clickable knob. It can be a little awkward at first, but ultimately, it’s a very convenient control scheme.
Use code “NNNHORNET” for a discount when you order from GeekBuying.
As we mentioned, this is a fairly large printer. But what if you need even more space for your prototypes or models? In that case, you should take a look at the Longer LK5 PRO. It has an oversized printing area, as well as a very high print speed. Then again, the print resolution isn’t very high.
Compatibility and Ease of Use
There are two ways of printing to the Artillery Hornet printer. The default method is to connect via USB with your PC or Mac. Then, you can use your favorite CAD software to print directly to the printer. Alternatively, you can insert an SD card in the front slot, and print your files from there. You can also use the USB connection to update your firmware, which is available for free on Artillery Hornet’s website.
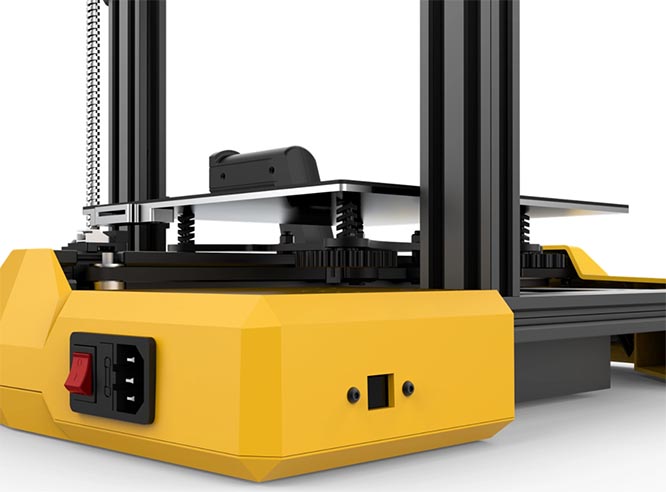
You’ll find that this printer is very easy to use for beginners. For one thing, there are dual fans inside the print head, which keeps the electronics from overheating. There’s also an additional fan in the base, which cools extruded plastics very quickly. As a result, you won’t have to wait very long to remove your completed projects. There’s even an ultra-slick coating on the bottom platform. This keeps your creations from getting stuck to the base, and makes them very easy to remove.
The nozzle itself is made from a high-quality copper, which is great at conducting heat. It has an 0.015” opening, small enough to allow for extreme accuracy and to minimize errors. This works very well right out of the box for standard PLA plastic. That said, if you’re printing non-PLA plastic, you need to be very specific with your heat settings.
The Artillery Hornet printer has a couple of important adjustment features that make it much easier to use. To begin with, the filament holder is adjustable. Normally, you shouldn’t need to mess with this. But if you’re experiencing any wobbling during printing, you can move the holder lower. This will lower the center of gravity, improving the print head’s stability. Another helpful tool is the belt tensioner for the rubber X-axis belt. This is essential, since a rubber belt will inevitably stretch a bit over time. When it does, you just give the tensioner a twist and tighten it back up again.
Then again, this is still a beginner printer. If you want something with more advanced features, consider the Kodak Portrait 3D Printer. It has two filament reels, so you can print in two colors at once. There’s also an enclosed housing, which makes it safer to use around kids and pets. That said, it’s an older model.
Use code “NNNHORNET” for a discount when you order from GeekBuying.
Printing Materials and Quality
The Artillery Hornet 3D Printer uses a printing process called Fused Deposition Modeling (FDM). This is the standard method of operation for a home 3D printer, and it’s pretty straightforward. In an FDM printer, a plastic filament is fed through a tube and into a hot print head. The head melts the filament, and deposits the plastic onto the print plate. This process creates a smooth, steady flow of plastic, and can deposit layer on layer to build a 3D object. The downside is that you’re using little plastic threads, so the surface may need some smoothing once you’re done. But that’s par for the course with any 3D printer.
The plastic filament itself can be made from a number of materials. In the case of the Artillery Hornet printer, you can use PLA, PETG, or TPU plastic. Here’s a quick look at all three, and what they’re good for:
- Polylactic Acid, or PLA, is a plant-based material that produces a hard, solid plastic. This is environmentally friendly, since it’s biodegradable under certain circumstances. These circumstances include direct sunlight, so it’s a poor choice for extended outdoor use.
- Polyethylene Terephthalate Glycol, or PETG, is a special food-safe plastic. It’s great for bottles and other containers, since it won’t leech toxic chemicals into your food. The layered material can harbor bacteria, though. So you’ll need to coat the inside with a food-grade epoxy to keep it safe.
- Thermoplastic Polyurethane, or TPU, is a more flexible, stretchy plastic that has a number of applications. It’s rubbery and durable, so it can be used for seals, gaskets, and other similar parts.
The Artillery Hornet printer has a resolution of 100-300 microns, depending on your settings and materials. The print head is precise down to 10 microns, which is about 1/3 the thickness of a human hair. Along the Z-axis, this rises to 100 microns. But you’re still getting “three hairs” of accuracy, which is excellent for a starter printer.
Final Verdict
The Artillery Hornet 3D Printer is a high-quality 3D printer that’s ideal for beginners. Assembly takes just a few minutes, and you get almost-universal compatibility. Printing is very accurate, and you can use a wide variety of filament types. It can be difficult to clean, but other than that, it’s very easy to use. All in all, we were very happy. Don’t forget to use code “NNNHORNET” for a discount when you order from GeekBuying.
Meet Ry, “TechGuru,” a 36-year-old technology enthusiast with a deep passion for tech innovations. With extensive experience, he specializes in gaming hardware and software, and has expertise in gadgets, custom PCs, and audio.
Besides writing about tech and reviewing new products, he enjoys traveling, hiking, and photography. Committed to keeping up with the latest industry trends, he aims to guide readers in making informed tech decisions.