
The PlayStation 4 is the second-best selling video game console of all time, behind only the PlayStation 2. And while the PlayStation 5 has made a lot of waves recently, the PS4 still has plenty of life left in it.
That’s one thing that’s so awesome about Sony’s technology. The PS4 is a masterpiece of engineering, and was far ahead of its time at release. With a whole slew of games to choose from, people will be using the PS4 for years to come.
But the PS4 is just like any other hardware; it ages, and parts break down. The electronic parts themselves are pretty durable, as are most electronics in general. If there’s a factory defect, circuit boards and wires typically fail within a year. If not, they can last for many decades as long as they’re not exposed to moisture.
But there are a handful of mechanical components that will break down with repeated use. Perhaps the most important of these is the optical drive, which is a pretty important part. Without it, you can’t play your physical games.
Thankfully, the disc drive can be replaced without having to replace the entire PlayStation console. It’s not the simplest repair; as we’ll see, you’ve got to do a fair bit of disassembly and reassembly.
But there’s no soldering required, and you only need a few simple tools to do the job. For that reason, many people choose to replace their damaged optical drive rather than buy a new console.
Choosing the Best PS4 Replacement Disc Drive
Today, we’re going to review three of the best PS4 replacement disc drives on today’s market. Each one is very well designed for its purpose. However, not all of them are suitable for all PS4 consoles. The PS4 comes in different variants, with different capabilities and build requirements.
In order to find the best replacement drive, you need first and foremost to find one that fits your specific console. Only then can you even consider using it. For that reason, we’ve chosen three different drives to fit the three main console types. Let’s take a closer look at each one, and see why these are your best selections.
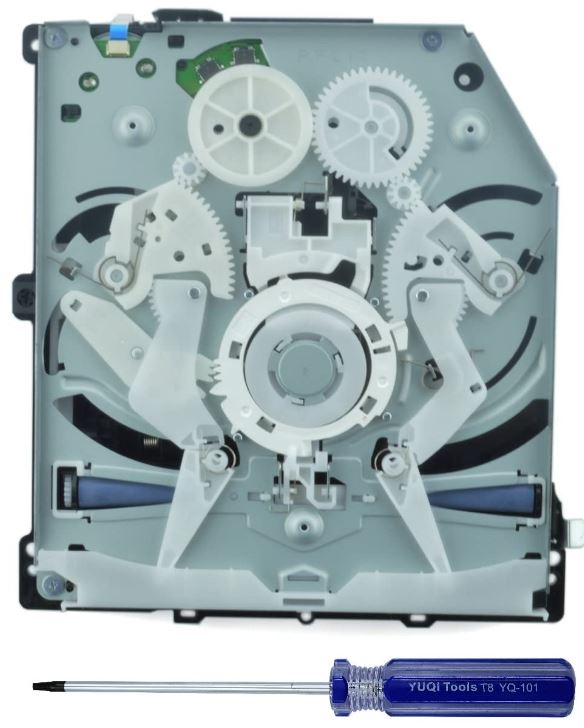
Genuine Sony PS4 Blu-ray Drive Replacement
Sony is one of those brand names, like McDonald’s, that needs no introduction. Besides the PlayStation, you already know them for their other high-quality electronics.
If you’re going to replace a Sony part, why not replace it with a Sony part? The Genuine Sony PS4 Blu-ray Drive Replacement is just what it sounds like. It’s an OEM replacement for the disc drive on the original PS4 console. This is a big, beefy drive compared to the others, at 8.7 x 6.6 x 1.8 inches. It won’t fit in the smaller PS4 Slim or PS4 Pro.
Despite the fact that this is a Sony part, there’s no PCB board included. This is the part that allows the drive to read copy-protected PlayStation discs. Without it, you can use the drive for movies, but not for games. Thankfully, the replacement process is straightforward, and we’ll outline that momentarily.
The kit includes a T8 Torx screwdriver to help with the replacement process. This is a compact driver with a hard, tough-to-damage tip. The handle is a solid transparent plastic, with blue stripes and an ergonomic knurled grip.
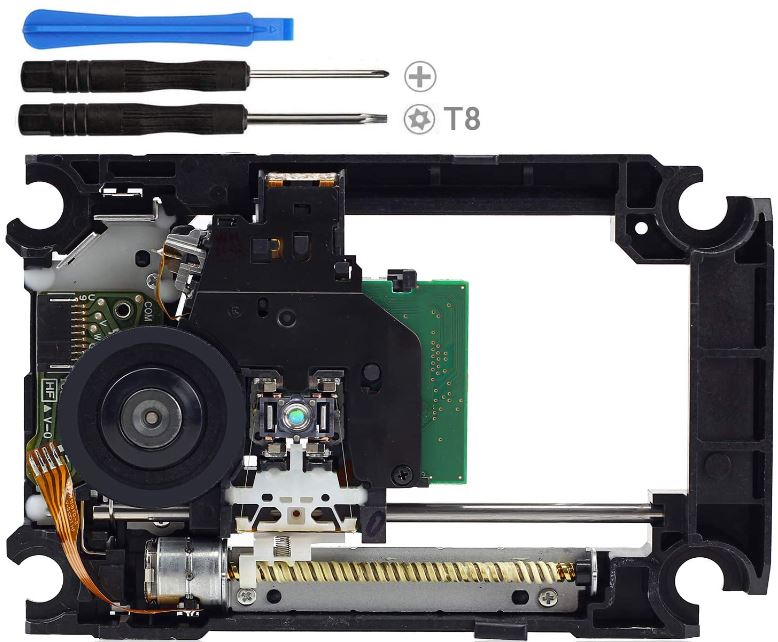
CHENLAN PS4 Blu-ray Drive
CHENLAN might not be a household name, but they’re a manufacturer we’ve dealt with in the past. Not long ago, they made our list for the best Xbox One replacement disc drives. Considering that we’re talking about yet another replacement drive, it only made sense to give theirs a look.
The CHENLAN Blu-ray Drive is a significantly smaller drive than the last one, because it’s designed for the PS4 Slim. It also works with certain early versions of the PS4 Pro, specifically those with model number CUH-7000. These consoles use a specialized plastic bracket for mounting the drive. The bracket is built right around this replacement, which makes assembly straightforward.
There’s no PCB board included, so you’ll need to swap in your own. That said, you get all the tools you need for making the swap. There’s a T8 Torx driver and a #0 Philips driver, which both have cheap plastic handles. There’s also a plastic spudger, for manipulating electronics without doing any damage.
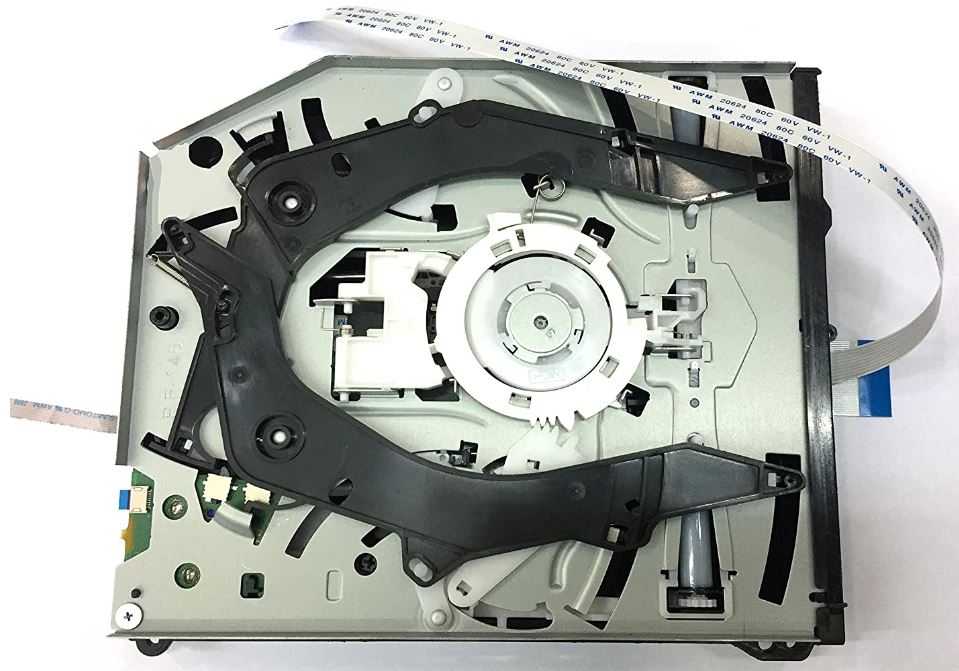
HongLei PS4 Blu-Ray Drive
HongLei is yet another manufacturer that specializes in replacement parts. A few months back, we reviewed their Nintendo Wii replacement DVD drive. As it turned out, it performed pretty well. So it made sense to take a closer look at their replacement PS4 drive.
The HongLei Blu-Ray Drive is an aftermarket replacement drive that fits most PS4 Pro consoles. This includes model numbers CUH-1215A, CUH1215B, or any model numbers that fit the pattern of CUH-12XX. It’s bigger than the Slim model, at 8 inches long and 7 inches wide, but it’s perfect for these Pro consoles.
This is just a bare drive, with no tools or other accessories. However, it has one thing the other options don’t have; a built-in PCB board. This means you won’t have to swap your PCB during the replacement process, which will save a lot of time.
How to Replace the PS4 Disc Drive
Replacing the PS4 disc drive takes around 30 minutes to an hour. Most of this time will be spent assembling and disassembling your console. The steps here are for the original PS4, but the process will be similar for other PlayStation consoles. It’s a bit of a pain, but you don’t need to do any soldering and you don’t need any special skills. That said, you will need the following tools:
- Tweezers
- TR8 Torx Security Screwdriver
- Phillips #0 Screwdriver
- Plastic spudger
Open the Case
First, flip the PS4 upside-down, and use your tweezers to remove the four stickers on the back. Two of these will be located towards the center, with two more positioned at the left and right corners. Underneath, you’ll see a set of Torx screws. Remove all of these, and set them aside somewhere safe.
This will free up the lower half of the case, so it can be lifted off. It’s held in place by a stiff set of plastic clips, which will need to be worked loose. This can take a bit of elbow grease.
In the back half of the case, there’s a large power supply unit, which needs to be removed. First, use your tweezers to disconnect the cable from the power supply to the motherboard. Next, remove the three Torx screws and two Philips screws that secure the power supply in place. It’s now unscrewed, but it will still be retained by a set of prongs on the left side. You may have to wiggle it around a bit to work it lose. When you reassemble the system, make sure the prongs are properly fitted before you press down.
Remove the Optical Drive
Now that you’re inside the case, you’ll have to disconnect the optical drive and remove it. This requires you to remove some other components first.
To begin with, there’s the antenna cable, a small black wire that connects next to the power supply prongs. Use your spudger to free this up, after which you’ll have to remove it. This involves pulling it free from the cable guides, which needs to be done carefully. You’ll also need to carefully remove it from underneath the optical drive cable. With the antenna cable free, unscrew the Torx screw on the antenna and set it aside.
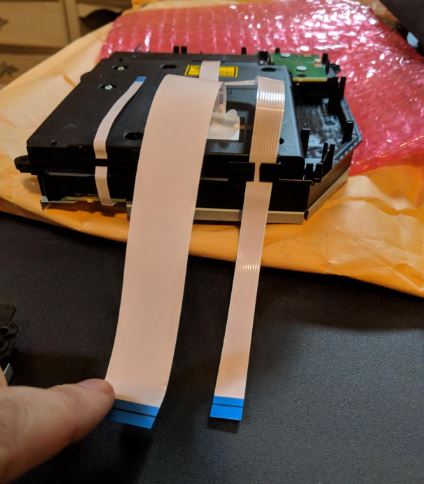
With that out of the way, you can remove the optical drive cable. There’s a metal release lever on top of the drive, which needs to be pressed down. While holding down the lever, use your tweezers or your other hand to tug on the black tab. Repeat this process on the other end of the cable, which is connected to the mother board. This will free up the cable, so you can remove it and set it aside. When reinserting the cable, there’s no need to press the lever. Just push the cable in until it clicks.
There are four screws that secure the disc drive itself: three Torx screws and one Philips screw. Remove these, and you can freely lift the optical drive right out of the housing.
Replace the PCB
If your replacement drive has a PCB board already, all you have to do is install your new drive. Then you can reverse the process for reassembly. However, in most cases, you’ll have to swap out the PCB.
First, you’ll have to remove the metal bracket that covers the drive. This is held in place by three Philips screws. Remove these, and you can lift off the bracket.
Now, remove the three Philips screws from the PCB board. This is the green circuit board at the side of the drive. Using a spudger, flip the cable connector open on the wider ribbon cable, then gently tug on the cable to remove it. The smaller ribbon cable can simply be tugged free. Now, you’re ready to reassemble the PCB into your new drive.
Final Verdict
As we said at the outset, the best PS4 replacement disc drive depends mostly on your console model.
For the original PS4, accept nothing less than the Genuine Sony PS4 Blu-ray Drive Replacement. This is an OEM replacement, so you’re getting just as much quality as you got from your original drive. And while it’s just a single tool, the T8 Torx driver is a well-designed screwdriver.
The CHENLAN Blu-ray Drive comes from a reliable aftermarket brand. It’s ideal for your PS4 Slim, as well as for some PS4 Pro users. And while the tools aren’t exactly top-of-the-line, you get everything you need for installation.
The HongLei Blu-Ray Drive, meanwhile, is the best choice for the PS4 Pro. It doesn’t come with any tools, but it’s well-engineered and ready to install. Thanks to the built-in PCB board, you’re going to have a much easier time performing the job. For that reason alone, this drive is worth your consideration.
Meet Ry, “TechGuru,” a 36-year-old technology enthusiast with a deep passion for tech innovations. With extensive experience, he specializes in gaming hardware and software, and has expertise in gadgets, custom PCs, and audio.
Besides writing about tech and reviewing new products, he enjoys traveling, hiking, and photography. Committed to keeping up with the latest industry trends, he aims to guide readers in making informed tech decisions.