
If you own an Xbox One, you know how much value it still has. The vast majority of Game Pass games are Xbox One-compatible, and you can still run all your apps. There’s no two ways about it; the Xbox One still has a lot of life back in it. That’s why we’ve reviewed a number of replacement parts, like Xbox One replacement AC adapters. If you want to keep gaming, you want to keep all your system’s parts in working order!
One of the most notorious failure points on the Xbox One is the optical drive. While the system itself is robust and rarely fails, the optical drive tends to stop working after a few years. This means you can’t watch video discs or play any games that come on optical disc. If you prefer to play disc-based games, a broken optical drive can put you out of commission altogether. No matter what, you want to get it replaced as soon as possible.
We’re about to review three of the best Xbox One replacement disc drives on the market. To find out which one is best, we’ll talk about how they’re built, and what they ship with. We’ll also talk about how to change an Xbox One optical drive. The process isn’t all that complicated, and it can be done in less than half an hour. That said, you’ll need to be comfortable with soldering electronics. If you’re less than eager to solder your disc drive, you may want to hire a professional to do the job.
Either way, it helps a lot to choose the right drive. Let’s take a closer look, and see how all three of our options stack up!
Genuine Microsoft OEM Xbox One Disc Drive Replacement
If you’re looking for a one-for-one replacement, there’s nothing like using the original part. Microsoft offers many replacement parts for their consoles, as well as many accessories. For example, we recently reviewed the official external SSD for the Xbox Series X/S.
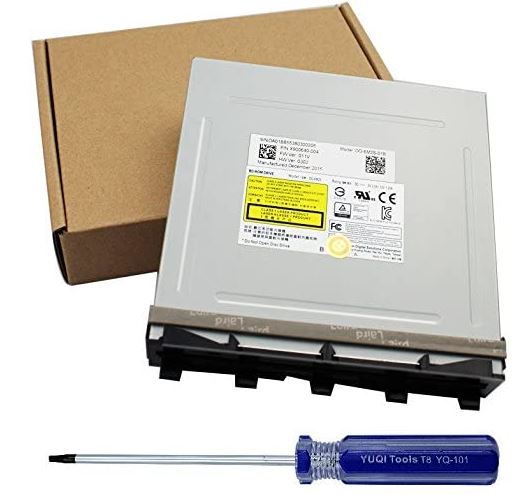
The Genuine Microsoft OEM Xbox One Disc Drive Replacement is exactly what it sounds like. It’s Microsoft’s OEM drive, and it’s exactly the same as the one in your console right now. The only difference is that it’s working. It has a rectangular profile and a grey aluminum housing with a mounting flange on the back. Once it’s installed, it works just the same as the original. All you have to do is follow the instructions and make the change.
To help things go more smoothly, the package includes a T8/T10 Torx driver. This is a dual driver with a solid plastic handle made from blue and transparent plastic. It’s not much, but it’s helpful for disassembling and reassembling your Xbox One console.
Generic Xbox One Blu-Ray Disk Drive Replacement
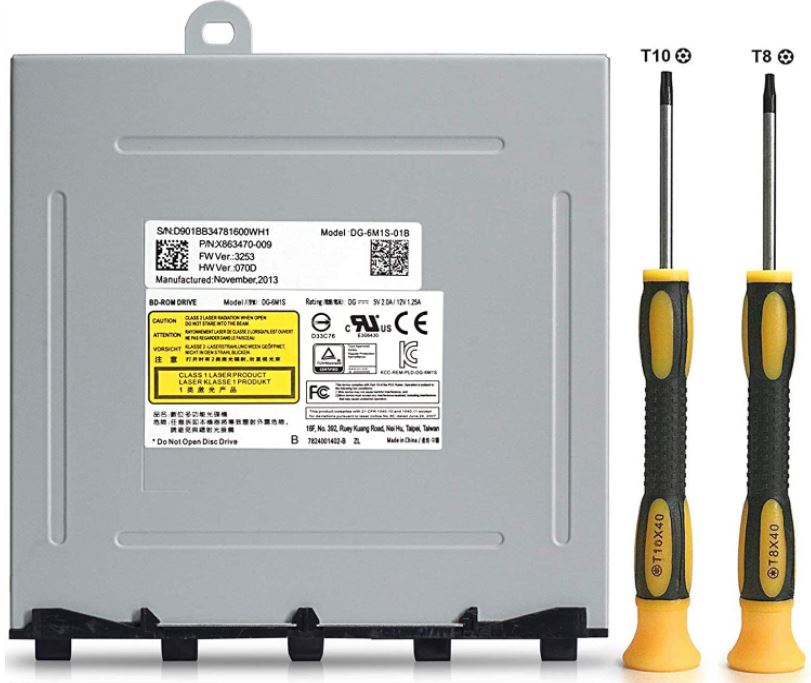
The Generic Blu-Ray Disc Drive Replacement is a refurbished OEM drive that still meets manufacturer specs. It looks and feels identical to an OEM drive, as one might expect. It has the same housing and the same rear flange.
This kit includes a pair of separate T8 and T10 Torx drivers. These have a slim design, with yellow handles and rubbery black grips. The grips are tapered, which makes them nice and ergonomic, and comfortable to use with your fingers.
CHENLAN Original Lite-on Replacement Disc Drive
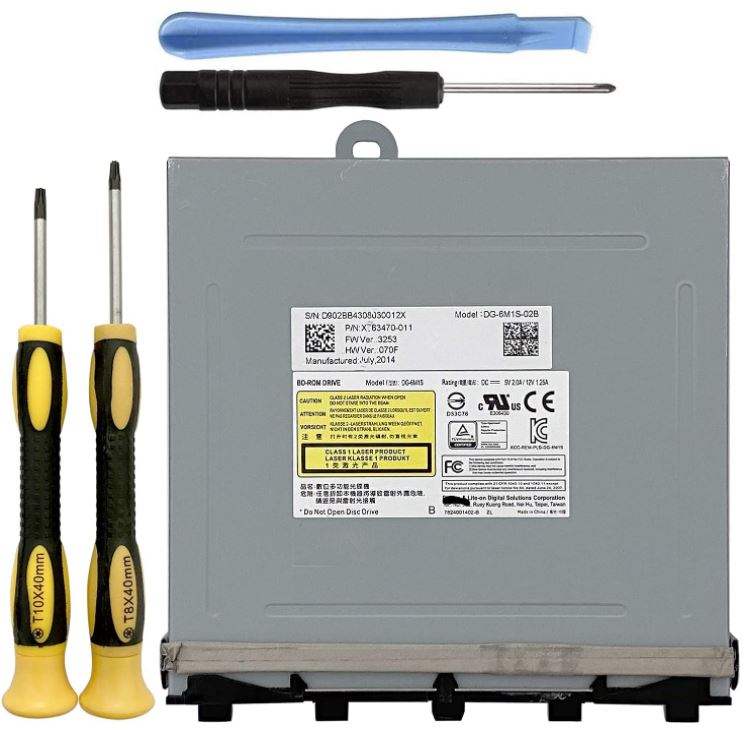
The CHENLAN Original Lite-on Replacement Disc Drive is an aftermarket drive for the Xbox One. It’s made from a lot of the same components, though, including the same housing. It’s also built to the same specifications, so you won’t have any compatibility options. Despite being manufactured by a third-party company, it still works fine right out of the box.
The kit includes a set of surprisingly high-quality Torx drivers, similar to those in the generic kit. You also get a #1 Philips screwdriver with a black plastic handle. There’s even a little plastic spudger to help disassemble the Xbox.
How to Change Your Xbox One Optical Drive
Changing your Xbox One optical drive is pretty straightforward – as long as you’re comfortable with soldering. That said, you’ll want to make sure to gather the proper tools.
You will need:
- Plastic spudger (ideally 2)
- Tweezers
- T8 Torx screwdriver
- T10 Torx screwdriver
- #1 Philips screwdriver
- Soldering iron
- Solder
To open the Xbox One, you’ll have to remove the tamper-evident tape on the back left. Don’t worry. Your console isn’t under warranty anymore, anyway. You’ll also need to pry open the plastic ventilation panel on the side of the housing closest to the USB port.
This is pretty easy to pry out, especially if you start at the back and work towards the front. Underneath, you’ll see a little black tab at the front corner of the Xbox. Slide it back and remove it.
Now you’re ready to disassemble your console!
Open the Case
The Xbox One’s case is held together by a series of plastic clips that are located inside of the housing. The best way to disassemble it is to work a plastic spudger into the crack in the case, and push the first tab loose. Now, leave that spudger in place. The clips tend to spring back into place and snap shut, which is frustrating throughout the entire process. But at least with the spudger in place, you won’t have to open the first tab again.
Work your way along the side of the Xbox, ideally using a second spudger. Make sure the first spudger remains in the gap throughout the entire process. Even as the gap gets wider and looks safe, don’t trust it. The case could suddenly snap shut at any point, and you don’t want that to happen.
Ideally, you want to start towards the front of the side panel, and work around towards the back. Around the time you’re done separating the back of the housing, it should feel like it’s ready to pop open. If it still doesn’t want to come free, keep working along the remaining side. If you’re still having trouble, move your spudger back around through the gap. There may be a clip or two that has returned into its position.
Whatever you do, don’t yank the top of the case right off. It’s still connected by a ribbon cable at the front, which powers the front controls. Using some tweezers, lift the little loop that holds the connector to the control board. Then, use your spudger to push the locking tab open. At that point, the cable should come easily out, and you can remove the top of the case.

Access the Optical Drive
Now that the case is open, it’s time to take out your old optical drive. First, look at the control board on the front. Use a spudger to remove the little black cable with the metal connector. And using a pair of tweezers, disconnect the other cable with the white connector.
Next, it’s time to remove the WiFi board from the top of the metal inner case. There’s a pair of T8 Torx screws holding it in place. You can move it to the side, but don’t remove it completely. Instead, remove the screw underneath it, which is labeled “C3.” You’ll also want to remove the other seven T10 Torx screws around the top side of the case.
Lift the metal case up gently, but don’t remove it entirely. It will still be connected via the WiFi board cable. Locate this cable, pull it free of the motherboard, and you can remove the metal case.
You’ll see the optical drive, connected by a set of ribbon cables. Remove these carefully, and take your time not to damage the connectors. You’ll need them in good condition to reassemble the system.
Replace the PCB
Before you install your new optical drive, you’ll have to replace the PCB from the original drive. First, remove the sticky foam padding at the back of the drive, which will reveal a set of screws. Remove these, as well as the screws at the other corners, and the top of the housing should come right off.
The PCB is the big green circuit board inside of the housing. It’s connected to the other components via three ribbon cables. As when you were removing the optical drive itself, be careful. The connectors are easy to damage, which can make it impossible to properly reconnect your cables.
At the corner of the PCB, you’ll see a pair of red and black cables soldered to the board. Get your soldering iron ready, and take as much time as you need to melt the old solder. Be careful not to nick anything else on the board and cause any damage. It helps to use tweezers to pull the wires free once the solder is melted.
The PCB is secured by a clip on the right side. You’ll have to grab it by the middle and shift it upwards before it will come out all the way. Remove the PCBs on both drives, and put the board from your old drive into the new one. Insert it back into place, being careful to properly seat the tab on the right hand side. If you don’t, it could snap, and crack the entire board.
Re-solder the wires, reassemble the optical drive, and install it in your Xbox. Reverse the disassembly process, and you’re ready to go.
Final Verdict
As you can see, these three disc drive replacements are all very similar. It’s largely a balance of price versus reliability. The accessories are also different, but that’s a secondary concern.
The Genuine Microsoft OEM Xbox One Disc Drive Replacement is the priciest of the three. At the same time, it has the most limited accessories. But it’s an OEM part, so it’s more likely to last a long time.
The Generic Blu-Ray Disk Drive Replacement costs less, and comes with nicer drivers. Then again, it’s refurbished. It’s tougher to set any firm expectations as far as long-term reliability goes.
The CHENLAN Original Lite-on Replacement Disc Drive is the most affordable of the bunch. It also comes with the most comprehensive set of tools. But it’s an aftermarket part, so your mileage may vary.
Meet Ry, “TechGuru,” a 36-year-old technology enthusiast with a deep passion for tech innovations. With extensive experience, he specializes in gaming hardware and software, and has expertise in gadgets, custom PCs, and audio.
Besides writing about tech and reviewing new products, he enjoys traveling, hiking, and photography. Committed to keeping up with the latest industry trends, he aims to guide readers in making informed tech decisions.