When you’re installing solar panels, you need the right crimping tools to make secure, waterproof connections that last. You’ll want a kit with a precision ratchet mechanism, durable construction, and connectors rated for outdoor use. The six kits reviewed here offer different features and price points, so your choice depends on your specific needs. Let’s examine what each one brings to the job.
| BougeRV Solar Crimper Tool Kit with Connectors |
| Beginner-Friendly Essential | Wire Gauge Compatibility: 14-10 AWG (2.5/4/6 mm²) | Solar Connector Pairs Included: 12 pairs | Crimper Tool Type: High-carbon steel with precision jaw | VIEW LATEST PRICE | Read Our Analysis |
| SOMELINE Solar Connector Crimping Tool Kit (12-Pair) |

| Professional-Grade Complete | Wire Gauge Compatibility: 14/12/10 AWG | Solar Connector Pairs Included: 12 pairs | Crimper Tool Type: Ratchet mechanism with professional dies | VIEW LATEST PRICE | Read Our Analysis |
| iCrimp Solar PV Panel Crimping Tool Kit |

| Compact Portable Kit | Wire Gauge Compatibility: 14/12/10 AWG (2.5/4/6 mm²) | Solar Connector Pairs Included: 4 pairs | Crimper Tool Type: High-precision ratchet mechanism | VIEW LATEST PRICE | Read Our Analysis |
| haisstronica Solar Crimping Tool Kit with MC4 Connectors |

| Most Comprehensive Bundle | Wire Gauge Compatibility: 14-10 AWG (2.5/4/6 mm²) | Solar Connector Pairs Included: 20 pairs | Crimper Tool Type: Ratcheting mechanism with precision dies | VIEW LATEST PRICE | Read Our Analysis |
| PEBA Solar Crimping Tool Kit with Connectors |
| Best Warranty Coverage | Wire Gauge Compatibility: 16/14/12/10 AWG (1.5-2.5/4/6 mm²) | Solar Connector Pairs Included: 6 pairs | Crimper Tool Type: Carbon steel with professional-grade dies | VIEW LATEST PRICE | Read Our Analysis |
| Solar Crimping Tool for Solar Panel Cables with Connectors |

| Best Value Pick | Wire Gauge Compatibility: 14/12/10 AWG (2.5/4/6 mm²) | Solar Connector Pairs Included: 12 pairs | Crimper Tool Type: High-carbon steel with ratchet mechanism | VIEW LATEST PRICE | Read Our Analysis |
More Details on Our Top Picks
BougeRV Solar Crimper Tool Kit with Connectors
If you’re working on solar panel installations and need a complete, ready-to-use crimping solution, the BougeRV Solar Crimper Tool Kit with Connectors offers everything you’ll need in one package. The kit includes a wire crimper, spanner wrenches, and twelve pairs of solar connectors sized for 14-10 AWG cable. The high-carbon steel crimper delivers precise, accurate crimps with its high-precision jaw. You’ll find the ergonomic handle comfortable during extended use. The connectors feature 2.5/4/6 mm² capacity with PPO housing and waterproof ring design, making them suitable for outdoor installations. Follow the included installation video for step-by-step guidance. This kit works well for DIY solar projects, RV installations, boat setups, and professional repairs.
- Wire Gauge Compatibility:14-10 AWG (2.5/4/6 mm²)
- Solar Connector Pairs Included:12 pairs
- Crimper Tool Type:High-carbon steel with precision jaw
- Waterproof Rating:Waterproof ring design
- Spanner Wrenches Included:1 pair
- Storage Solution:Not specified
- Additional Feature:High-precision jaw accuracy
- Additional Feature:Included installation video guidance
- Additional Feature:RV/boat installation compatibility
SOMELINE Solar Connector Crimping Tool Kit (12-Pair)
What makes the SOMELINE kit stand out for both professional installers and DIY enthusiasts? You get an efficient ratchet mechanism with adjustable crimp force, professional dies, and a quick release lever. The kit includes wire strippers for cutting and preparing cables, plus 12 pairs of male and female connectors with pins ready to use. You’ll also receive two specialized wrenches for assembling and disassembling solar connectors. The carbon steel construction handles 14/12/10 AWG wire sizes. The zinc-plated copper cores feature waterproof sealing and IP67 ratings. Store everything in the double-layer portable box, keeping your tools organized and accessible for any installation or maintenance project.
- Wire Gauge Compatibility:14/12/10 AWG
- Solar Connector Pairs Included:12 pairs
- Crimper Tool Type:Ratchet mechanism with professional dies
- Waterproof Rating:IP67
- Spanner Wrenches Included:1 pair
- Storage Solution:Double-layer portable storage box
- Additional Feature:Adjustable crimp force control
- Additional Feature:IP67 waterproof rating
- Additional Feature:Wire strippers included
iCrimp Solar PV Panel Crimping Tool Kit
The iCrimp Solar PV Panel Crimping Tool Kit stands out as an all-in-one solution for installers and maintenance workers who need reliable equipment for solar connector work. You’ll get the LY-2546B crimping tool, wire shear cutter, two solar spanner wrenches, four pairs of IWS4 connectors, and a canvas carrying bag. The crimper handles 14, 12, and 10 AWG cable (2.5/4.0/6mm²) with a precision ratchet mechanism that guarantees complete crimps every time. The included spanners lock and release IWS4 connectors from Renogy and Amphenol. This kit works well for RV, boat, trailer, camper, marine, and off-grid installations where you need portable, dependable crimping capability.
- Wire Gauge Compatibility:14/12/10 AWG (2.5/4/6 mm²)
- Solar Connector Pairs Included:4 pairs
- Crimper Tool Type:High-precision ratchet mechanism
- Waterproof Rating:Not specified
- Spanner Wrenches Included:1 pair
- Storage Solution:Canvas/Oxford bag
- Additional Feature:High-precision ratchet mechanism
- Additional Feature:Canvas Oxford bag included
- Additional Feature:Compatible with Renogy connectors
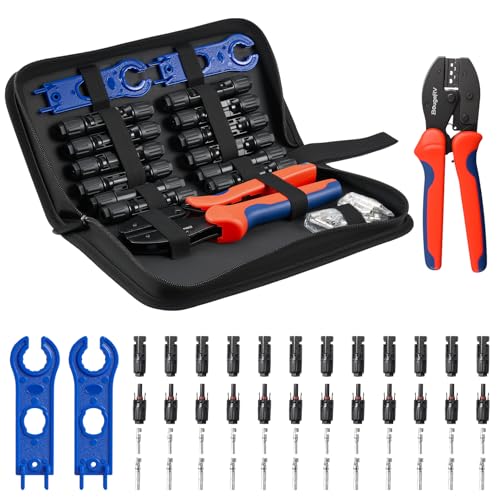
haisstronica Solar Crimping Tool Kit with MC4 Connectors
Looking to complete solar panel installations without investing in multiple specialized tools? The haisstronica kit supplies everything you need in one portable organizer. You’ll get twenty-five pieces total: MC4 connectors, connector pins, a wire crimper with ratcheting mechanism, a wire stripper, and two spanners. The crimper handles AWG 14-10 wire gauges with precision dies for secure connections. The stripper works on multiple wire types including copper and coaxial cable. MC4 connectors feature waterproof design with tinned copper pins rated for over twenty years of durability. This comprehensive kit handles PV cable installations efficiently, supporting both male and female connections for complete solar system assembly.
- Wire Gauge Compatibility:14-10 AWG (2.5/4/6 mm²)
- Solar Connector Pairs Included:20 pairs
- Crimper Tool Type:Ratcheting mechanism with precision dies
- Waterproof Rating:Waterproof design with sealing ring
- Spanner Wrenches Included:2 pieces
- Storage Solution:Portable organizer
- Additional Feature:20-year connector durability
- Additional Feature:Tinned copper pins included
- Additional Feature:Versatile wire stripper capability
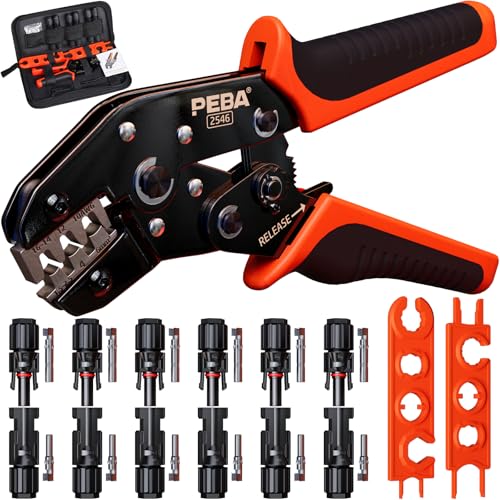
PEBA Solar Crimping Tool Kit with Connectors
If you’re an electrician, technician, or DIY enthusiast who needs a complete solar crimping solution in one package, the PEBA Solar Crimping Tool Kit delivers everything you’d require for PV cable installation and connector work. The kit includes a carbon steel crimper rated for AWG16-10 gauge wire, two spanners for opening connectors, six pairs of solar panel connectors, and a toolbag for transport. The connectors feature zinc-plated copper cores with PPO insulation, delivering IP68 waterproof performance and UV resistance. You’ll crimp cables ranging from 1.5mm² to 6mm² diameter. Professional-grade dies ensure consistent quality across repeated applications. The manufacturer covers defects with a one-year warranty.
- Wire Gauge Compatibility:16/14/12/10 AWG (1.5-2.5/4/6 mm²)
- Solar Connector Pairs Included:6 pairs
- Crimper Tool Type:Carbon steel with professional-grade dies
- Waterproof Rating:IP68
- Spanner Wrenches Included:2 spanners
- Storage Solution:Compact toolbag
- Additional Feature:IP68 waterproof performance
- Additional Feature:One-year manufacturer warranty included
- Additional Feature:Professional-grade precision dies
Solar Crimping Tool for Solar Panel Cables with Connectors
Assembling solar panel connections requires a crimper that handles multiple cable sizes with consistent precision—and this kit delivers exactly that capability. You’ll crimp 2.5/4/6mm² cables using the durable high-carbon steel crimper with its ratchet mechanism and auto-lock release device. The kit includes twelve pairs of male and female connectors, connector pins, and spanner wrenches for installation and maintenance. The tool’s stable self-locking mechanism ensures secure connections, while its IP67 waterproof rating protects against dust and moisture. Non-slip PP+TPR handles reduce fatigue during repeated use. This 1000V DC-rated crimper provides consistent, high-quality results across multiple crimping cycles for reliable solar system assembly.
- Wire Gauge Compatibility:14/12/10 AWG (2.5/4/6 mm²)
- Solar Connector Pairs Included:12 pairs
- Crimper Tool Type:High-carbon steel with ratchet mechanism
- Waterproof Rating:IP67
- Spanner Wrenches Included:1 pair
- Storage Solution:Not specified
- Additional Feature:Auto-lock release device
- Additional Feature:1000V DC rating
- Additional Feature:Self-locking mechanism design
Factors to Consider When Choosing Solar Crimping Tool Kits
You’ll want to evaluate five key factors when selecting a solar crimping tool kit: wire gauge compatibility range, crimper durability and materials, connector quantity and types included, waterproof rating and sealing capability, and storage and portability features. First, check that the kit’s wire gauge range matches your solar panel cables, typically 10 to 4 AWG for most residential installations. Second, verify the crimper’s construction materials—aluminum or steel bodies with hardened dies last longer and maintain accuracy through repeated use.
Wire Gauge Compatibility Range
What wire gauge does your solar installation require? Most solar crimping tool kits support AWG 14 to AWG 10, which corresponds to cross-sectional areas of 2.5, 4, or 6 mm². You’ll find kits specify compatibility using either the AWG standard or metric measurements—both refer to identical wire sizes. Before purchasing, match your PV cable type against the kit’s stated range. Verify the included connectors and dies accommodate your specific wire gauge. Some kits cover a narrower range like 0.8–2.5 mm², while others extend to 6 mm². Check the documentation to confirm your cables fit within the tool’s crimping capacity. Selecting the wrong gauge results in unreliable connections and potential system failure.
Crimper Durability And Materials
The materials and construction methods used in your crimping tool directly affect how long it’ll last and how consistently it performs. Choose crimpers made from high-carbon steel or alloy steel, which maximize hardness and resist wear from repeated use. Look for a ratchet mechanism that ensures uniform, repeatable crimps by providing controlled release and consistent pressure throughout each operation. Select tools with ergonomic, non-slip handles using materials like PP+TPR to reduce hand fatigue during extended crimping sessions. Check for IP67 ratings and waterproof seals that protect internal dies and connectors in outdoor solar installations. Verify that your tool includes built-in auto-lock/release features and sturdy dies with precise crimp molds for reliable, long-term performance across numerous crimps.
Connector Quantity And Types
Beyond selecting a durable crimper itself, you’ll want to evaluate what connectors and accompanying components come inside the kit, since these items directly affect how much work you can complete before depleting your supply. Quality kits typically include multiple pairs of solar connectors—often 12 pairs of male and female units—covering various circuit configurations. Check that the kit supports connector types matching your cable sizes: 2.5, 4, and 6 mm² variants align with standard PV cables. Some kits provide spare connector pins for field repairs and repinning, reducing downtime. Included wrenches or spanners help you fasten and release connectors during assembly and maintenance. The greater your connector quantity, the more simultaneous crimps you’ll perform without reordering parts, improving job efficiency and project continuity.
Waterproof Rating And Sealing
Why does waterproof protection matter for your solar crimping kit? Your connections must withstand outdoor elements without failing. Look for tools and connectors rated IP67 or higher. IP67 ratings mean the equipment handles immersion up to 1 meter for 30 minutes. IP68 provides even greater protection for longer or deeper water exposure.
Check that connectors include sealing rings and PPO insulation. These components prevent moisture from entering at the crimp junction, maintaining electrical integrity. Double sealing rings on cables offer extra defense against water intrusion during rain or splashes.
Waterproof and dustproof design reduces corrosion on metal contacts and preserves crimped connections over time. In outdoor and marine settings, this protection directly extends your kit’s lifespan and reliability. Prioritize these sealing features when selecting your crimping tool.
Storage And Portability Features
How you’ll transport and organize your crimping tools directly affects your efficiency on the job site. Look for kits featuring double-layer cases or reinforced toolbags that keep crimpers, wrenches, and connectors separated and accessible. Hard or semi-hard cases protect your equipment during transport while supporting stacking in vehicles. Integrated dividers and designated slots prevent accessories from shifting or getting lost during movement between locations. Verify the storage solution accommodates all components—crimpers, spanners, connectors, and pins—without creating excess bulk. Lightweight housings made from hard plastic or reinforced fabric improve portability for field work. Check that the case design allows you quick access to frequently used items without unpacking everything. Select a kit where all components fit compactly, enabling you to grab what you need and work efficiently on-site.
Final Thoughts
You’ll want to select a solar crimping tool kit based on your specific AWG wire requirements and connector types. Compare the waterproof ratings, ratchet precision, and included accessories across options like BougeRV, SOMELINE, and iCrimp. Verify the kit contains necessary spanners or wrenches for field assembly. Purchase from reputable suppliers offering warranty coverage. Test your chosen kit on practice connectors before beginning actual installation work.
Meet Ry, “TechGuru,” a 36-year-old technology enthusiast with a deep passion for tech innovations. With extensive experience, he specializes in gaming hardware and software, and has expertise in gadgets, custom PCs, and audio.
Besides writing about tech and reviewing new products, he enjoys traveling, hiking, and photography. Committed to keeping up with the latest industry trends, he aims to guide readers in making informed tech decisions.